Showing posts with label Android Development for Everyday People. Show all posts

Friday, 5 August 2016

Android Development for Everyday People - Conclusion


Congratulations on getting to the last week of Android Development for Everyday People. You have gone the distance and won.

When I started this series, I doubted a lot of things about myself. I am a trained engineer so writing isn’t really my thing. An English major would have a fit seeing the posts in this series. The above picture helped me get started on this series.

Starting anything is an act of faith. We can choose to have faith that grace will provide what we need as we go along and start with our doubts or wait and do nothing. Use this same faith as you work on your apps.

Creating Ise in its current form has taken me 6 years of work. Ise was the first game I ever created. I first created it in 2010 using J2ME. Slowing down the process of seed distribution and capture was the greatest pain point for this game. In the end, I found out that the way to do this would be to use the Clock as a loop structure which would exit only when the number of seeds held by the selected pot was 0. By using two clocks working in tandem, I could then slow down the process of seed distribution and capture long enough for a user to see it. I doubt if I would have discovered this technique without the visual programming environment that App Inventor provides.

Personally, I see App Inventor as a great prototyping tool. It is useful for creating the Minimum Viable Product (MVP) of any idea. After which you can test and refine your idea until you have something you can give an app developer to develop for you.

Alternatively, you could learn to develop Android applications for yourself. Now that you know how to program in App Inventor, there isn’t anything stopping you from trying. There is an abundance of materials available online but in my own opinion the best to start from is to do the courses on Udacity first.

Appstore Submission

By now I expect that you have completed your first App Inventor application if so then what next? Depending on your goal for creating your application, you can keep it to yourself or share it with the world. One way to share it with the world is to mail it to your friends or place it on a public website. The problem with this method is that it means that your users would have to configure their phones to take apps from external sources.

This isn’t hard to do but I must add that your users may not be technical so they might be reluctant to do so. In order to avoid such a situation, place your application on the Google Play Store. This involves a one-time fee of $25. To complete your payment you would need a means of making online payment. Once you have the money ready and your means of payment, all is now set to get your application into the Google Play Store.

The End or The Beginning?

Having made it this far, I will share a secret with you. You didn’t have to run App Inventor online in fact all the apps created were run locally on my laptop. To do this, I used AiLiveComplete. You can find it at this link https://sourceforge.net/projects/ailivecomplete/. AiLiveComplete is an offline solution for running App Inventor on your local machine.

Now before you get angry please understand that in order to trust you with this secret, I had to test you. I couldn’t cast my pearls before swine. I had to know you could go the distance and win. You have proven that you can so between us there will be no more secrets.

My second reason was that I didn’t want to discourage you. I wanted you to see what App Inventor could do for yourself. Now that you have seen it for yourself, I hope you have the motivation to set it up on your machine by yourself. For me it was easy to do. I sincerely hope you can follow the instructions and get it up and running on your machine. More importantly, watch the video first before you do anything.

If you have succeeded in making AiLiveComplete run locally on your machine, I want to officially congratulate you for having a factory running on your machine. You now own an app factory. If you didn’t continue as you have learned. Don’t let this or anything stop you.

Today computers surround us everywhere we go. Smartphones are perhaps the most ubiquitous form of computing available today. With the skill of being able to  program you can bend the computer to your will. This skill becomes akin to a super power. Just remember that with great power comes great responsibility.

The Road Ahead

Now that the first draft of this series is done, I am filled with a sense of relief. In total, it has taken 24 weeks to get the whole series completed.

I plan to develop this series into an ebook and that means that my work is far from over. Chapters 8 and 9 contain the code for creating Ise and I have decided to review those chapters and create an mini ebook out of it. The title will be Creating a Mancala game using App Inventor.

Creating a Mancala game using App Inventor will be imagined as an introduction to App Inventor. Consider it a revision of all the things covered for the length of this course. I intend to start from the very beginning and introduce you to the thought process and reasoning that when into the creation of Ise.

As this series draws to an end, I want to share a picture with you. Use it as a reminder of the power to choose and the responsibility of freewill. I wish you health, wealth and happiness in this great gift called life.


Friday, 27 May 2016

Android Development for Everyday People - Using App Inventor To Send Shortcodes

Welcome to a new week. This week, we will be looking at how to use App Inventor to send shortcodes.
Shortcodes are numbers meant for services that are created in collaboration with a telecoms provider. The aim of which is to carry out a particular functionality in the telecoms system.

The service I will be using as an example is the Bank 737 shortcode service from GTB. Now I am not a staff of GTB only a customer who got dissatisfied with the inconvenience of having to type *737* every time I wanted to perform an operation.

During the course of developing this application, I learned how to use shortcodes in App Inventor. Special thanks go to @puravidaapps for insight on how to do this.

The system architecture for this service is shown below:


 Once again I repeat that I am not a staff of GTB so please don’t take this diagram as the gospel. This diagram is based on my analysis of how the system works from my perspective as an engineer, it represents how I would design the system if I was given the task of implementing it.


Bank1337 is simply a frontend to the Bank 737 shortcodes. It starts the process of contacting the shortcode service. Once it does that, the GTB USSD API takes over and continues the interaction with the user.

The shortcodes that power this service are shown below:


Getting Started


Using the NICE method, our first step would be to name our application. In my case, I named my application Bank1337. 1337 represents Leet. We don’t use the name Bank 737 because we don’t have the copyright and we wouldn’t want GTB to come after us J.

Choose a name for your project and let’s start creating our application. Last week, we covered how to create a multi-screen applications so I won’t go over it here again.

For the shortcodes, there are 9 things we can do. They are listed below:
  1. Buy Airtime (Self)
  2. Buy Airtime (Third Party)
  3. Transfer to GTBank
  4. Transfer to Other Banks
  5. Pay Bills (Startimes)
  6. Internet Banking Details
  7. Generate Token Code
  8. Account Opening
  9. Balance Check/Enquiry

The code for the Bank1337 application has been placed in the App Inventor Gallery. For the purposes of this tutorial, I shall only explain how to create the code for the first operation. Please search the App Inventor Gallery for the source code.

User Interface

The operations 1 to 5 will have their own screens while the remaining can be done from the first screen.
Our first screen looks as shown below:


Once the user presses any of the first five operations, it should go to a new screen. The remaining can be done using the first screen. In total, this application has 6 screens.


For the first operation, we use a simple user interface to retrieve the amount of airtime the user wants to buy. This is shown below:


For our textbox component, we want to ensure that the user enters a number and that the number entered is less than N1000.


The NumbersOnly property of our textboxes are set to ensure that only numbers are entered in the textboxes. This is done for all the textboxes used throughout this application.

Since the code is available online, I will show you the code that moves from one screen to the other. This is shown below:


Once we click on the first button, the program redirects to Screen2. On Screen2 we perform our operation.
The code for Screen2 is shown below:


The only component we have not seen before is the PhoneCall component. This is found in the Social drawer of the Palette.

The PhoneCall component allows you to make phone calls using App Inventor. The PhoneNumber of the PhoneCall component must be set to the shortcode value along with the value in the textbox.

Note the %23 which is the Unicode value of #. App Inventor does not allow you to use # so we trick the component into making a call with its Unicode value.

At the end of the day, every character is converted to Unicode so using this method, we ensure that the # is attached at the end of our shortcode. So what is going to be set as the phone number of the PhoneCall component is going to be in format *737*AMOUNT%23.

Conclusion

This week, we created a simple application to work with the shortcode service from GTB. While the original shortcode service is simple, the Bank1337 application adds accuracy and convenience to the mix.

The source code for the Bank1337 application is available in the App Inventor Gallery and you can also download the final application from the Google Play Store.

The gift of being able to program is the fact that you can create. You don’t have to accept the world as it is you can create solutions to meet your needs. Once you learn to program, you can bend computers to your will and make them do whatever you want.

As a Nigerian I testify that the world is gradually moving to the stage where smartphones and hence computers surround us everyday. So learning how to program is starting to look like a super power.

Next week, we will be looking at how to create games using App Inventor. 3 more topics to go and we will be done with this series have a great weekend.

Monday, 25 April 2016

Android Development for Everyday People - Working With A Database

Welcome to a new week. Last week we started work on MovieMagic2016 mobile application to view the list of movies for the year 2016.

This application is intended to be a sample so we are using only 5 movies. You can extend it as you wish.
Last week, I mentioned that in App Inventor the way to transfer data from one screen to another is to use a database.

This week we will be integrating a database into our application. To get started open the project in your workspace and let’s get started.

Databases

A database is a means of storing information. Think of it like a tank where you pour water into. Once you are done, all you need to do is run the tap to get the water from it.

In application development, database systems like MySQL, Oracle and Microsoft SQL Server are used to create a database.

In App Inventor, the ways by which we implement databases include: TinyDB, TinyWebDB and more recently Firebase.

For our purposes, we shall be using TinyDB. TinyDB is used to create a database that is local to your application.

Using TinyDB

To use a database in your application, go to the Paletter area and click on Storage. Drag out the TinyDB component to Screen1. It will now appear in your Components list. Do the same for Screen2.

We add a TinyDB component to both screens as this is the only way to transfer data between 2 screens. Data in TinyDB is transferred using tags.

Tags are a key value pair that allow us store a piece of information if we know the name we assign to it.
For our application, we want to assign the name of our selection to the text of the Label in Screen2 and use that as a basis for displaying the picture of the movie on the Image component in Screen2.

Now that our TinyDB component is part of both Screen1 and Screen2, we can now create out tags.

Creating Tags

Tags are used to identify the data that we have stored in TinyDB. To understand this concept think of TinyDB tags like endpoints of a bridge.

The tags help you match the endpoints of a bridge to one another. Once a bridge is formed between one screen and another, you can pass data between them.

Switch to the Blocks Editor of Screen1 and click on the TinyDB component. Drag out the StoreValue block which is shown below:
Duplicate the above block or drag out another one. We are going to create 2 Tags and they are:
  1. Index
  2. Selection

For our list component, the Index tag gives us the position of the selected movie in the ListPicker. This Index tag will be used in Screen2 to select a movie image.

Our Selection tag gives us the actual name of the movie as displayed in the list.This Selection tag will be used in Screen2 to display the name of the selected movie to the user.

To create a Tag, drag an empty Text block from the Text drawer in App inventor and place it on the part of the StoreValue block labelled tag.

Our blocks should now look as shown below:
 For our values to store they are as follows: for our Index tag, we use the value of the index given to us by the ListPicker. For our Selection tag, we use the value displayed to the user which the user touched.

To get this blocks, click on the ListPicker component and find the block for the SelectionIndex place this below the Index tag. Click on the ListPicker again and find the block for Selection place this below the Selection tag. Your entire code block is shown below:
 Now place this in the AfterPicking event handler of the ListPicker. Your code should be as shown below:
 Now switch to Screen2 and go to its Block Editor. So far the only code we have here is the one to switch back to Screen1.

What we need to do now is Initialize the values from Screen1 once Screen2 loads. Then we assign those values to their respective components,

To do this, declare 2 variables. Call them Index and Selection respectively. Intialize the value of the Index to 0 using a Math block and that of Selection to an empty text block. The code for this is shown below:
Now ensure that you have done the above steps. The rest of the way is easy. Click on the TinyDB component and drag out the GetValue block which is shown below:

 This block serves to get the value stored in the Tag of the TinyDB component. Duplicate the above block or drag out another one.

Click on Screen2 and drag out the Initialize block for the Screen component. Now go to variables and drag out the Set blocks. You need 2 for the Index and Selection variable.

Place them inside the Initialize block of the Screen and join the GetValue block to their ends. Your code should look as shown below:
 Now add your Index and Selection tags. This is done by going to the Text drawer and dragging out an empty block. Type in the names of your tags in their respective blocks.

Your code will be as shown below:
 Now that you have gotten this far, all that is left is to assign our values to their respective components.
The code to do this is shown below:
 Now build your application. Test it. The expected outcome should be that whenever a movie is selected, you should see the movie name and logo on the next screen.

Copyright Infrigement

Please don’t submit this application to the Google Play Store. It will be rejected. I found this out the hard way.

Below is the reply I got when I tried to submit a similar application:

This application however shows you the personalization of mobile application development. While indeed not every application will be accepted on the Google Play Store, it should not stop you from bringing your idea to life.

Conclusion

Congratulations on passing the point of safe return. This week we are 60% done with this course. I am grateful that you are still here.

3 more topics and all that would be left for me to do would to conclude this series. Next week we will be looking at how to work with maps in App Inventor. We will be creating a simple application that lets the user view fun spots in Lagos.

By now, I expect that you should have an idea for an application that you are working on. If you haven’t started working on any application, I encourage you to start as its the only way to get a firm grasp on the work we have done so far.


Friday, 15 April 2016

Android Development for Everyday People - Creating Multi-screen Applications

Welcome to a new week. This week we cross the point of safe return. All the applications we have created so far have been single screen. This week, we will be creating our first multi-screen application. The concepts from this week will be extending into next week so please pay attention as we begin.

A multi-screen application in App Inventor is an application that has more than one screen. When you have an application like this, you have to figure out a way to transfer your program flow from your current screen to a new screen.

The transfer of program flow means that your data will not be transferred from one screen to the other. The way to do this is to use a database. This we shall cover next week. For this week, we shall look at how to transfer program flow from one screen to another.

Getting Started

To start we shall be creating an application called Movie Magic 2016. Movie Magic 2016 is an application designed to allow a user view details of the movies from 2016 and below.

You already know how to do this so create a project called MovieMagic2016. Let the project load up.

Drag in an Image component, a Label and a ListPicker to Screen1. Next click on Screen1 in the Components list and set its AlignHorizontal property to center.

Now find your movie image and upload it to the server. Next set the uploaded image as the Picture for the Image component.

Next change text in the Label component to “Find all your favourite movies”. Finally, change the text in the ListPicker component to “View List of Movies”.


Your application screen should now look as shown below:


Adding a New Screen

Now that we are done with our user interface for the first screen, we need a second screen to display the image of the movie that is selected by the user.

To do this, we need to add a second screen to our application. To do this, click on the Add Screen button as shown below:


Once you click on it, it brings up the New Screen dialog box as shown below:


Click on OK. Once you do that, a new screen loads up. This screen will be where we will view the image of our selected movie. Set the AlignHorizontal property of the Screen component to Center. Also set the ScreenOrientation property to Portrait.

To keep this simple, we will make this screen display an image for the movie selected by the user. Once we get to this screen, we want to see the movie name and the image of the movie selected by the user. To make things simple, we want a way to go back to our first screen.

Our first task is to create the user interface of the second screen. To do this, we need to add a Label, an Image component and a Button component to the screen.

Our list of movies for selection are:
  1. Deadpool
  2. Star Wars: The Force Awakens
  3. Avengers Age of Ultron
  4. Terminator Geneysis
  5. Fast and Furious 7

Find images for the movies listed above and ensure that they are the same size. Ensure that you rename the images from 1 to 5 matching the movies in the list above.

Upload the images for the movies listed 1 to 5 and set the image for Deadpool as the Picture for the Image component. My images are sized 225 by 225.

Our second screen is now as shown below:


Now we can start our programming. To switch between screens, Click on the screens dropdown and select Screen1. The screens dropdown is shown below:


Once you get to the layout for Screen1, switch to the Blocks editor. Create a list called movies and assign the movies in the list above to it.

Now our list will be as shown below:

Next we have to initialize our ListPicker component to have the elements when the Screen components initializes.


Going To The Next Screen

Go to the Control drawer in the Built-in section of the palette. Find the “open another screen”  block in the Control drawer. This is shown below:

Go to the Text drawer in the Built-in section of the palette. Drag out an empty Textblock and enter Screen2. Join it to the block above. Your block is now as shown below:

Click on the ListPicker component and drag out the AfterPicking block. This event handler responds to what happens after an item is selected from the list. The final code block is shown below:


Going Back To The Previous Screen

To go back to the previous screen, you need to go to the code for the Screen2 component and repeat the process of creating a block.

The Button component will be used to back to Screen1. When you are done, your code should look as shown below:

Now test your mobile application using your setup. You will see that the Screens move between themselves.

Conclusion

This section was meant to teach you how to create multi-screen applications and in this we have succeeded. You should have a simple application that moves between screens.

In App Inventor, there is no way to transfer data from one screen to another so the movie that we have selected will not reflect on the next screen.

To transfer data from one screen to another in App Inventor, we need to use a database. We will go into this next week. See you then.

Monday, 21 March 2016

Android Development for Everyday People - Making Lists


Welcome to a new week. This week we will be looking at lists. A list is a collection of items. An example of a list is a restaurant menu. It is a list of foods sold by the restaurant as well as their prices.

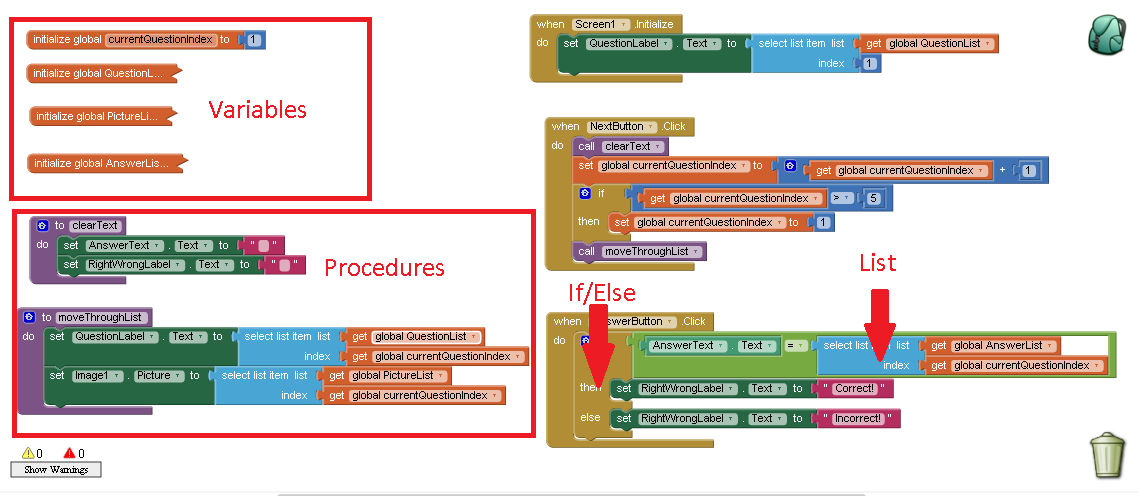
The first App Inventor application I created was Nigerian States and Capital. It was part of the requirements for finishing the edx course. Above is the image for the code used to create this project the initial project can be found here. Due to time constraints, I used only 5 out of the 36 states in Nigeria.

This project was also my first App Inventor application to be submitted to the Google Play Store. I expanded it to include 36 states in Nigeria along with the Federal Capital Territory. It is a quiz that test the knowledge of Nigerian states and their capitals. It can be found on the Google Play Store by clicking here.

This week I successfully uploaded AlphabetDraw to the Google Play Store. AlphabetDraw is a simple application designed to teach toddlers the letters of the alphabet. You can find it here.

If you look through all this applications, the concept of lists is used to create them. This week, we will be using my first mobile application as the basis for teaching this topic. So go to this link and download it.


Getting Started


If you can’t see the introductory image clearly, please download it and look through it. In the variables section, we have 4 variables and they are:
  1. currentQuestionIndex
  2. QuestionList
  3. PictureList
  4. AnswersList
We have 2 procedures to use in this application. I covered procedures in the last topic so please read through it. I know it was long but a firm grasp of that topic would help you as you go along. Our two procedures are:

  1. clearText
  2. moveThroughList

If you look at the rest of the code, you should notice that the naming convention I followed easily explains what my objects do. This is a good programming habit to imbibe. You should name objects and components of your application based on what they do.

The Screen1.Initialize block initializes the QuestionLabel to display the first question in the QuestionList.
The NextButton allows the user scroll through the questions in the QuestionList. If the user exceeds 5, the if block resets currentQuestionIndex to 1. This prevents the application from crashing.

The AnswerButton gives feedback to the user if the input values is correct or incorrect. Note the select list item block in the examples. It allows you to select the elements of a list.

List Indexing
Take the list of 5 states in Nigeria as shown below:
  1. Abia State
  2. Adamawa State
  3. Akwa Ibom State
  4. Anambra State
  5. Bauchi State

List indexing is the assignment of a number to each value in a list. For our list above, the index of the Anambra State value is 4. In App Inventor, list indexing starts from 1. The power of this is that if we know the index of a list, we can get the value at that index.

This concept is used a lot in working with lists so please don’t skip this part. As a test, the index for Bauchi State is?

NICE Methodology

In an earlier lesson, I covered the NICE Methodology. I follow it whenever I am designing applications. NICE means Name, Interface, Controls and Events. For our application, we are lucky that the name has already been chosen.

For our user interface, we will use the design shown below:

The controls for our application are:
  1. An image component to display the image of the state
  2. A question label to display the question to the user
  3. A textbox for the user to enter the answer
  4. A submit button to submit the answer entered by the user
  5. A feedback label to display if the entered value is correct or wrong
  6. A next button to display the next values for the application

The events that will make our application work are the click events for the Submit and Next buttons.

Project Creation

The first thing to do is to create your project at http://ai2.appinventor.mit.edu you already know how to do this so I won’t be showing you this. Call your project Nigerian States and Capitals. Once your project window shows up, create your user interface. To do this, follow my lead.

Go to the user interface drawer and drag out image component unto the screen. This is shown below:


Next we go to the media section of our screen and upload the images of our states. I got the images I used from Wikipedia so get them from there.

The Media section is shown below:


Click on the Upload File button. It will bring up the pop up shown below:


Click on the Choose File button. It will bring up a screen which will allow you navigate to where your image is stored. Select the image. Your screen should be as shown below:


Click on OK to upload the image to the App Inventor setup. Your image is then uploaded. You will see that your media section has changed to reflect this. You can view this below:

Now attach the image you just uploaded to the image component you just uploaded. This is similar to the process of adding an icon to an application which we have already covered. So click inside the Picture property and select the image you have uploaded.

Set the height of the image component to 250 pixels and the width of fill parent. Click on the ScalePictureToFit checkbox and you have successfully set all the properties of the image component. It is important you do this first because the layout.

Drag out the label component under the image component. Click the rename button in the components section and rename it to QuestionLabel. Please there should be no spaces in the name of your components.

Clear out the text property and make it empty. Like in the 3 number average, the label becomes a dash but we know it’s still there.

Next drag out the horizontal arrangement under the Layout drawer. Inside it, place a textbox and call it AnswerText and a button and call the button AnswerButton.

For your AnswerText, set the hint to Enter an answer and the text on the AnswerButton to Submit.
Drag a label and rename it to FeedbackLabel. In the image on this post, I called it RightWrongLabel but at the time I was working on a deadline and didn’t have time to think about my project. Clear the text in the FeedbackLabel. Your label should disappear but you know it is there.


Finally, drag out a button component to the screen, rename it to NextButton. We also change its text value to Next. Now out user interface is complete. Our components drawer should look as shown below:


Event Handling

To get started, we need to first declare our variables. If you look carefully at the code for this program, our first variable currentQuestionIndex is set to 1. You already know how to do this.

Go to the blocks area and create a variable called currentQuestionIndex your workspace should only have one block that looks like this:
For our three remaining variables QuestionList, PictureList and AnswerList, creating them requires using the Lists Drawer.

I will demonstrate how to do this using the QuestionList variable as an example. First we go to the variables drawer and drag out the initialize global block. Change the name to QuestionList. Your block should now look like this:
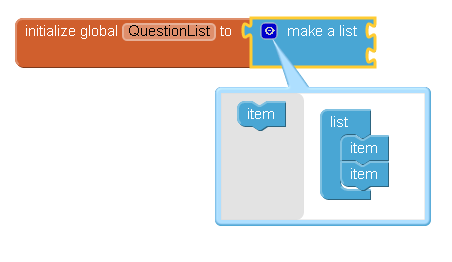
Go to the List drawer and drag out the make a list block. Attach it to the end of the block above. Your block should now look like this:

Now we need a list of 5 items. So we click the part of the list block that looks like an eye. It should open up like this:

Now drag the item outside into the list block to make it up to 5. You have done this before so I expect your block now looks like this:

Now all we have to do is attach our questions to it. To do this, go to the Text drawer and drag out an empty text block. Attach it 5 times. Your list should now look like this:
Now enter your questions and your block should look like this:
Now our QuestionList variable is complete. Duplicate this block and do the same for AnswerList and PictureList. So AnswerList look like this:
Before we can create out PictureList variable, please upload remaining pictures for the states in Nigeria. Note how they are stored in the Media area and match them to the index they represent. Your PictureList should now look something like this:
Now that we are done with our variables, the hard work is out of the way. Now we need to start the program.

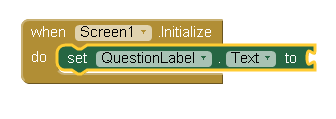
To start the program we need to program the code that would run when the program starts. This will ensure that the first question is displayed when the program is first run. To do this click on Screen1 and drag out the initialize block.

Next click on the QuestionLabel. Drag out the set QuestionLabel Text to block and snap it to the initialize block of Screen1. Your block should look like shown below:
Now we need to refer to the content of the first index of the QuestionList. This is the first question we will ask the user. Our goal is that once the application runs, we display the first question to the user. To do this, go to the Lists drawer and drag out the select list item. Your block will now be as shown below:

Go to the variables drawer and drag out the get block. Drag out 2 of them. In the first block, select the QuestionList and for the second one, select the currentQuestionIndex and attach it to the respective blocks. Our blocks should now look like this:

Our variable currentQuestionIndex is used to move through the list. The goal would be to increase it until we get to 5 then we reset its value to 1.

Now would be a good time to do a build of our application to see how far we have gone. You know how to build an application so there is no need for me to cover it again. Just ensure that your Screen Orientation for Screen1 is set to Portrait.

Once your build finishes, run it on your setup. I will run mine on BlueStacks. My application looks like this:


So we are close to getting to the original application. Now let’s move on and create the rest of this application.

To complete our application, we need to first create our procedures. Then we will use them in the event listeners.


Our first procedure is the clearText procedure. It clears the text in the AnswerText textbox and the FeedbackLabel label. This will allow us to clear them when we move to the next question. Its easy so I will do it for you. The code to do this is shown below:
Our next procedure is called moveThroughList and what it does is to allow us move through our QuestionList and PictureList as the user presses the next button.

The next thing to do is to create the events for our buttons. We start with the NextButton. When the NextButton is clicked by the user, we want to display the image of the next state and the question for that state. This event also resets our currentQuestionIndex when it is greater than 5.

The code to do this is shown below:

The if block can be found in the Control drawer. It is used to test if the value of the currentQuestionIndex is greater than 5. We place it after we have increased the value of the currentQuestionIndex.

Finally we create the event listener for our AnswerButton. When the user types in a value into the AnswerText textbox and presses the AnswerButton comparision is made between the value entered by the user and the correct answer. Based on this comparision, the text in the FeedbackLabel changes.

The code to do this is shown below:
The comparison is made using the block from the Logic drawer. The normal if block is used for the comparison but we click on the sink and bring out the else part of it. This is shown below:
So we are done creating our application. Build it and test it out. Mine works perfectly. If yours didn’t, take a break for a day. Come back tomorrow and redo the tutorial.

Science shows us that learning involves increasing the intelligence so give yourself time to grow.

Conclusion

Congratulation on making it to 4th part of this course. I commend you for hanging in there. The next topic we will be covering will be databases. I haven’t created the application I intend to use to demonstrate the concept of databases so I will take my time in doing it.

You can check up on our progress by visiting this page. Have a great week and a great month ahead.