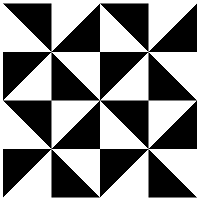
We will use the 5 pixel grid to trace out this image. The image of this is shown below:
The plan to draw this shape is given below:
- Divide the symbol into 4 equal parts
- Get the coordinates of the centers of the 4 quadrants
- Lift up the pen
- Place the pen in center of the upper left quadrant
- Move to the top left corner of the upper left quadrant
- Place the pen down
- Set the heading of the pen to 315 degrees
- Draw a line from the top left corner to the bottom right corner
- Set the heading of the pen to 180 degrees
- Move forward to the length of the middle of the center of the quadrant
- Set the heading of the pen to 90 degrees
- Move forward to the end of the length of the symbol
- Set the heading for the pen to 180 degrees
- Move forward by half of the length of the symbol
- Fill the shape
- Lift up the pen
- Place the pen in the right upper quadrant
- Place the pen down
- Set the heading of the pen of the pen to 225 degrees
- Draw a line from the upper right quadrant to the lower left quadrant
- Set the heading of the pen to 90 degrees
- Move forward by half of the length of the side of the quadrant
- Set the heading of the pen to 0 degrees
- Move forward by the length of the quadrant
- Set the heading of the pen to 90 degrees
- Move forward by half of the length of the quadrant
- Fill the shape
- Repeat steps 3 - 27 for the remaining quadrants
Using Turtle Graphics
We will use the template.py file and rename it to kyemfere.py.
The first step of our plan is manual. We have to find the center of the symbols in all the quadrants.
The image is divided into 4 parts as shown below:
The coordinates of the centers of the quadrants starting from the upper right quadrant and moving clockwise are: (-95, 95), (95, 95), (95, -95) and (-95, -95).
Now we lift up the pen and move it to the position of the center of the first quadrant. The code to do this is shown below:
turtle.penup()
turtle.setposition(-95, 95)
The top left corner of the quadrant is at (-190, 190) we move the pen to that position and set the heading of the pen to 45 degrees. We then find the length from the top left corner to the center of the entire symbol. The code to do this is shown below:
turtle.setposition(-190, 190)
turtle.pendown()
Before we can draw a line from the upper left quadrant to the center of the symbol, we need to use the coordinateDistance function to find the distance between the two points. The code for the function is shown below:
def coordinateDistance(x1, y1, x2, y2):
dx = x1 - x2
dy = y1 - y2
D = math.sqrt((dx * dx) + (dy * dy))
return D
length = coordinateDistance(-190, 190, 0, 0)
To place the pen down you use the code shown below:
turtle.pendown()
We set the heading of the pen and we move from the top left corner of the quadrant to the center of the symbol. The code to do this is shown below:
turtle.setheading(315)
turtle.forward(length)
Now that the shape is done, we need to fill it. To fill the shape, we place the turtle.begin_fill() and turtle.end_fill() functions before and at the end of the drawing code.
The generated image is shown below:
The code for steps 16 to 27 is shown below:
turtle.begin_fill()
turtle.penup()
turtle.setposition(0, 190)
turtle.pendown()
turtle.setheading(225)
turtle.forward(length)
turtle.setheading(90)
turtle.forward(95)
turtle.setheading(0)
turtle.forward(190)
turtle.setheading(90)
turtle.forward(95)
turtle.end_fill()
The generated image is shown below:
The rest is easy. We simply need to move the turtle to where we want it to be in order to draw the other parts of the symbol.
We will move to the upper right quadrant and draw the first half of the symbol in that quadrant. The code to do this is shown below:
turtle.begin_fill()
turtle.penup()
turtle.setposition(95, 95)
turtle.setposition(0, 190)
turtle.pendown()
turtle.setheading(315)
turtle.forward(length)
turtle.setheading(180)
turtle.forward(95)
turtle.setheading(90)
turtle.forward(190)
turtle.setheading(180)
turtle.forward(95)
turtle.end_fill()
The generated image is shown below:
The code to complete the upper left quadrant is shown below:
turtle.penup()
turtle.begin_fill()
turtle.setposition(190, 190)
turtle.pendown()
turtle.setheading(225)
turtle.forward(length)
turtle.setheading(90)
turtle.forward(95)
turtle.setheading(0)
turtle.forward(190)
turtle.setheading(90)
turtle.forward(95)
turtle.end_fill()
The generated image is shown below:
From this stage onwards, I will batch together the code that draws the remaining quadrants.
The code to draw the lower right part is shown below:
turtle.begin_fill()
turtle.penup()
turtle.setposition(0, 0)
turtle.pendown()
turtle.setheading(315)
turtle.forward(length)
turtle.setheading(180)
turtle.forward(95)
turtle.setheading(90)
turtle.forward(190)
turtle.setheading(180)
turtle.forward(95)
turtle.end_fill()
turtle.penup()
turtle.begin_fill()
turtle.setposition(190, 0)
turtle.pendown()
turtle.setheading(225)
turtle.forward(length)
turtle.setheading(90)
turtle.forward(95)
turtle.setheading(0)
turtle.forward(190)
turtle.setheading(90)
turtle.forward(95)
turtle.end_fill()
The generated image is shown below:
The code to draw the lower left symbol is shown below:
turtle.begin_fill()
turtle.penup()
turtle.setposition(-190, 0)
turtle.pendown()
turtle.setheading(315)
turtle.forward(length)
turtle.setheading(180)
turtle.forward(95)
turtle.setheading(90)
turtle.forward(190)
turtle.setheading(180)
turtle.forward(95)
turtle.end_fill()
turtle.penup()
turtle.begin_fill()
turtle.setposition(0, 0)
turtle.pendown()
turtle.setheading(225)
turtle.forward(length)
turtle.setheading(90)
turtle.forward(95)
turtle.setheading(0)
turtle.forward(190)
turtle.setheading(90)
turtle.forward(95)
turtle.end_fill()
The generated symbol is shown below:
Conclusion
In this section we cover how to draw the Kyemfere symbol using the Python programming language.
This post is part of the series: Drawing Adinkra Symbols using Python. The goal is to draw 40 Adinkra symbols using the Python programming language.


No comments:
Post a Comment