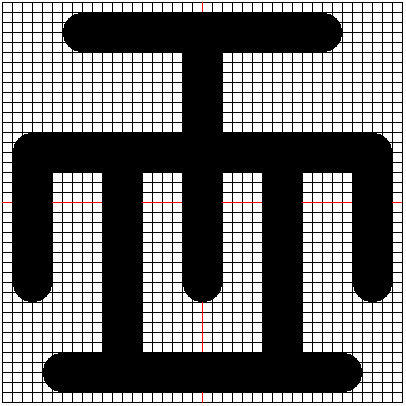
Fawohudie means "Independence". It is the symbol of independence, freedom and emancipation.
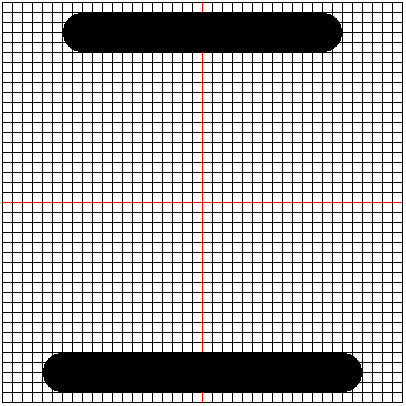
We will use the 5 pixel grid to trace out this image. The image of this is shown below:
This symbol consists of semi-circles and straight lines. The outermost circles intersect with each other however, their point of intersection is erased out slightly. The entire shape symmetric. We will start with the lower circle.
The plan to draw this shape is as follows:
- Lift the turtle
- Move the turtle to the position at the right edge of the circle
- Place the turtle down
- Draw the semi-circle
- Set the heading of the turtle to 0 degrees
- Draw the line down to the point where it moves up
- Draw the line up to the origin point
- Draw the line down to the point where it flattens
- Draw the line to the other part of the semi-circle
- Use the other steps from 1 to 9 to draw the inner circle and its own lines
- Repeat the above steps from 1 to 9 to draw the outer circle for the upper part
- Repeat the above steps from 1 to 9 to draw the inner circle for the upper part
- Draw the that erases the point of intersection between the two lines
Using Turtle Graphics
We will use the template.py file and rename it to fawohudie.py. The size of each square on our grid is 10 pixels. We shall use this as our multiplication factor.
From step 1 of our plan, we need to lift we need to lift the pen. The code to do this is shown below:
turtle.penup()
The point at the right edge of the circle is at the coordinates (16.5, -16). Using a scale factor of 10, our coordinates now become (165, -160).
The code to move our turtle to this position is:
turtle.setposition(165, -160)
We need to set the heading of our turtle to 90 degrees. The code to do this is shown below:
turtle.setheading(90)
We will increase the pensize of our turtle to 10 pixels. The code to do this is shown below:
turtle.pensize(10)
For our third step, we need to place the pen down so that the turtle can begin drawing. The code to do this is shown below:
turtle.pendown()
The code to draw the semi-circle is shown below:
turtle.circle(165, 180)
The generated image is shown below:
Now we set the heading of the turtle to 0 degrees. The code to do this is shown below:
turtle.setheading(0)
The coordinates of the point where the line moves up are (-80, -160). The distance from the current point where the turtle is to this point is 85 pixels. So we can move the turtle forward by 85 pixels. The code to do this is shown below:
turtle.forward(85)
The image generated is shown below:
To draw a line up to the origin point, we need to find the distance from where the turtle is to the origin point. The coordinates of the point where the turtle is (-80, -160) and the coordinates of the origin point is (-80, 0). We already know that the angle between the two points is 45 degrees.
We will use the coordinateDistance function that we used to draw the Epa symbol. The function definition is given below:
def coordinateDistance(x1, y1, x2, y2):
dx = x1 - x2
dy = y1 - y2
D = math.sqrt((dx * dx) + (dy * dy))
return D
The code to use this function for our case is shown below:
outerLine = coordinateDistance(-80, -160, 0, -80)
The outerLine variable will be used throughout this program to draw the other outer lines.
Now we set the heading of our shape to 45 degrees. The code to do this is shown below:
turtle.setheading(45)
Now we move forward by the length of the outerLine. The code to do this is shown below:
turtle.forward(outerLine)
The generated image is shown below:
Now that we have the variable outerLine and we know that the angle is 45 degrees, we can complete the outer shape.
We need to draw the line from the point where it currently is to the point where it rejoins the flat part of the shape. To do this, our heading needs to be 315 degrees and we need to move forward by the length of the outerLine. The code to do this is shown below:
turtle.setheading(315)
turtle.forward(outerLine)
The generated image is now:
All we have to do now is to set the heading of the turtle to 0 degrees and make the turtle move forward by 85 pixels. The code to do this is shown below:
turtle.setheading(0)
turtle.forward(85)
The generated image is shown below:
At this stage, the outer part of the lower part of our symbol is done. We will use the same steps we have followed to draw the inner part or the lower part of our symbol.
We repeat the steps we used to draw the outer part to draw the inner part. The coordinates of the point in the inner part of the shape is (125, -140). So we can lift up the pen and move the turtle to the point (125, -140). The code to do this is shown below:
turtle.penup()
turtle.setposition(125, -140)
Now we place the pen down and set it heading to 90 degrees. The code to do this is shown below:
turtle.setheading(90)
turtle.pendown()
Now we can draw a semi-circle of radius 125. The code to do this is shown below:
turtle.circle(125, 180)
Now we need to draw the inner left line. The way to do this will be to set the heading of your turtle to 0 degrees and move in by 35 pixels.
The code that does this is shown below:
turtle.setheading(0)
turtle.forward(35)
The image generated is shown below:
innerLine = coordinateDistance(-90, -140, 0, -50)
turtle.setheading(45)
turtle.forward(innerLine)
The generated image is shown below:
We repeat the steps from step 8 of our algorithm. The code to do this is shown below:
turtle.setheading(315)
turtle.forward(innerLine)
The generated image is shown below:
To complete the lower part of this shape, we need to set the heading of the turtle back to 0 degrees and move forward by 35 pixels. The code to do this is shown below:
turtle.setheading(0)
turtle.forward(35)
The generated image is shown below:
The lower part of the symbol is complete. Now we can start drawing the upper part of our symbol.
To draw the upper part of this symbol, we repeat the steps we have taken so far and do them for the upper part of this symbol.
The first step is to lift up the turtle. The code to do this is shown below:
turtle.penup()
We now move the turtle to the upper left hand side. The code to do this is given below:
turtle.setposition(-165, 160)
Next we set the heading of the turtle to 270 degrees. The code to achieve this is given below:
turtle.setheading(270)
The pen is now placed down and we draw a semi-circle. The code that does this is shown below:
Now we set the heading to 180 degrees and we move to the left by 85 pixels. The code that does this is given below:
turtle.setheading(180)
turtle.forward(85)
The image generated is shown below:
The distance up to the line where the origin point is has already been obtained. It is the variable outerLine. The angle between the two points is 45. So we can set the heading and move forward by the value of the outerLine. The code to do this is shown below:
turtle.setheading(225)
turtle.forward(outerLine)
The generated image is shown below:
We need to draw the line from the point where the turtle is to where it rejoins the flat part of the shape. The code to do this is given below:
turtle.setheading(135)
turtle.forward(outerLine)
The generated image is shown below:
To complete the outer part of our shape, we need to draw the line back to our starting position. The code to do this is shown below:
turtle.setheading(180)
turtle.forward(85)
Our generated image now becomes:
To draw the inner upper part of the symbol, we need to lift up the pen and move it to the point (-125, 140). The heading must also be set to 270 degrees. We then put down the pen and draw a circle of radius 125. The code to do this is shown below:
turtle.penup()
turtle.setposition(-125, 140)
turtle.setheading(270)
turtle.pendown()
turtle.circle(125, 180)
The generated image is shown below:
To draw the inner right line, we need to set the heading to 180 degrees and move in by 35 pixels. The code to do this is given below:
turtle.setheading(180)
turtle.forward(35)
The generated image is shown below:
We know that the length from where the turtle currently is the innerLine variable. We set the heading to 225 degrees.
The code to do this is shown below:
turtle.setheading(225)
turtle.forward(innerLine)
The generated image is shown below:
Now we draw a line back to where the straight line will be drawn to. The code to do this is shown below:
turtle.setheading(135)
turtle.forward(innerLine)
The generated image is shown below:
The drawing will be completed by drawing line to the starting point. To do this, we set the heading of our turtle to 180 degrees and draw a line to our starting point.
The code to do this is shown below:
turtle.setheading(180)
turtle.forward(35)
The image generated is shown below:
All that is left is to clean up the part where the outer circles intersect. To do this, we must move the turtle to where the turtles first intersect. This position is at (-50, 0), set the heading of the turtle to 0 degrees, change the colour of the pen to white, increase the pensize to 20 pixels and draw a line that is 100 pixels in length.
The code to do this is shown below:
turtle.penup()
turtle.setposition(-40, 0)
turtle.setheading(0)
turtle.pendown()
turtle.pencolor(255, 255, 255)
turtle.pensize(20)
turtle.forward(80)
To draw the final image, I placed a comment on the call to the drawHorizontalLine(400, 40) and drawVerticalLine(400, 40) functions. The final image is thus:
The inner arrow is the turtle. Beyond that, this shape is done.
Summary
At the end of this section, we have successfully used Python turtle to draw the Fawohudie symbol. I will admit that the final output isn’t perfect but the basic symbol has been drawn.