Thursday, 19 April 2018

Mpuankron


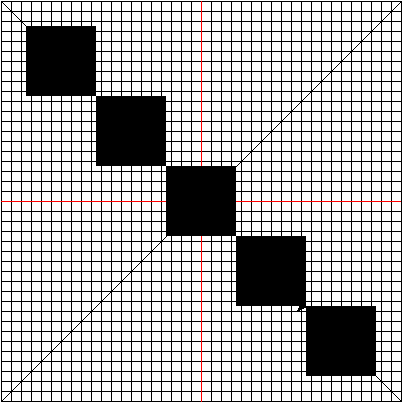
Mpuankron means "nine tufts of hair". It is the symbol of democracy.

We will use the 5 pixel grid to trace out this image. The image of this is shown below:


The plan to draw this shape is given below:
  1. Lift up the pen
  2. Move the pen to the location for the upper left square
  3. Draw the first square
  4. Repeat steps 1 -  3 for the other squares

Using Turtle Graphics

We will use the template.py file and rename it to mpuankron.py.

Before we can draw the first square, we need to draw two diagonals. To do this we borrow the code from Akoma Ntoaso project. We only need the diagonal length for the entire grid. This is 565.685424949.

The code below will draw the diagonal lines.

turtle.penup()
turtle.setposition(-200, -200)
turtle.setheading(45)
turtle.pendown()
turtle.forward(565.685424949)
turtle.penup()
turtle.setposition(200, -200)
turtle.setheading(135)
turtle.pendown()
turtle.forward(565.685424949)

The generated image is shown below:


The coordinates of the first square is (-175, 175). We will move the pen there and draw the square.

As we need to repeat the operation 9 times, we can best do it with a function. To create the function we only need the starting position of the function and the length of the square we want to draw.

Do bear in mind that the length of the square is 70 pixels.

The code for the function is shown below:

def drawFilledSquare(x, y, length):
    turtle.penup()
    turtle.setposition(x, y)
    turtle.begin_fill()
    turtle.setheading(0)
    turtle.forward(length)
    turtle.right(90)
    turtle.forward(length)
    turtle.right(90)
    turtle.forward(length)
    turtle.right(90)
    turtle.forward(length)
    turtle.right(90)
    turtle.end_fill()
To call the function, we simple pass in the parameters for the first square. The code for this is given below:

drawFilledSquare(-175, 175, 70)

The generated image is shown below:


The coordinates for the second, third, fourth and fifth squares are (-105, 105), (-35, 35), (35, -35) and (105, -105). The code to call the function is given below:

drawFilledSquare(-105, 105, 70)
drawFilledSquare(-35, 35, 70)
drawFilledSquare(35, -35, 70)
drawFilledSquare(105, -105, 70)

The generated image is shown below:


To complete the symbol, we need the coordinates for the remaining squares. Starting from the lower left hand side, the coordinates are: (-175, -105), (-105, -35), (35, 105) and (105, 175).

The code to call the function is shown below:

drawFilledSquare(-175, -105, 70)
drawFilledSquare(-105, -35, 70)
drawFilledSquare(35, 105, 70)
drawFilledSquare(105, 175, 70)

The generated image is shown below:


Conclusion

At the end of this section we have succeeded in drawing the Mpuankron symbol. You have to admit that it has a particular eerie beauty to it.

This post is part of the series: Drawing Adinkra Symbols using Python. The goal is to draw 40 Adinkra symbols using the Python programming language.

Tuesday, 10 April 2018

Mmara Krado


Mmara Krado is composed of two distinct words. "Mmara" means law and "Krado" means padlock. It is the symbol of the seal of law and order. It represents supreme authority and the court of justice.

We will use the 5 pixel grid to trace out this image. The image of this is shown below:


The plan to draw this shape is given below:
  1. Lift up the pen
  2. Set the pensize to 15 pixels
  3. Move the turtle to the left position of the inner semi-circle of the upper part of the symbol
  4. Set the heading to 90 degrees
  5. Place the pen down
  6. Draw the inner semi-circle
  7. Lift up the pen
  8. Move the turtle to the left position of the middle semi-circle of the upper part of the symbol
  9. Set the heading to 90 degrees
  10. Place the pen down
  11. Draw the middle semi-circle
  12. Lift up the pen
  13. Move the turtle to the left position of the outer semi-circle of the upper part of the symbol
  14. Set the heading to 90 degrees
  15. Place the pen down
  16. Draw the outer semi-circle
  17. Lift up the pen
  18. Move the turtle to the right position of the inner semi-circle of the lower part of the symbol
  19. Set the heading to 270 degrees
  20. Place the pen down
  21. Draw the inner semi-circle
  22. Lift up the pen
  23. Move the turtle to the right position of the middle semi-circle of the lower part of the symbol
  24. Set the heading to 270 degrees
  25. Place the pen down
  26. Draw the middle semi-circle
  27. Lift up the pen
  28. Move the turtle to the right position of the outer semi-circle of the lower part of the symbol
  29. Set the heading to 270 degrees
  30. Place the pen down
  31. Draw the outer semi-circle
  32. Lift up the pen
  33. Place the pen at the location for the leftmost part of the upper part of the symbol
  34. Set the heading to 0 degrees
  35. Place the pen down
  36. Move forward to cover the leftmost part of the upper part of the symbol
  37. Lift up the pen
  38. Move the pen to the location of the innermost part of the upper part of the symbol
  39. Place the pen down
  40. Move forward to cover the right of the upper part of the symbol
  41. Lift up the pen
  42. Place the pen at the location for the leftmost part of the lower part of the symbol
  43. Place the pen down
  44. Move forward to cover the leftmost part of the lower part of the symbol
  45. Lift up the pen
  46. Move forward over the gap between the two parts
  47. Place the pen down
  48. Move forward to cover the right of the lower part of the symbol
  49. Lift up the pen
  50. Move the pen to the left  location of the middle semi-circle
  51. Set the heading to 90 degrees
  52. Move forward to cover the gap
  53. Lift up the pen
  54. Move the pen to the right location of the middle semi-circle
  55. Move forward to cover the gap
Using Turtle Graphics

We will use the template.py file and rename it to mmara.py.

The coordinate left position of the inner semi-circle is (25, 50). Once we know this, we can write the code for steps 1 to 6.

The code for this is shown below:

turtle.penup()
turtle.pensize(30)
turtle.setposition(25, 50)
turtle.setheading(90)
turtle.pendown()
turtle.circle(25, 180)

The generated image is shown below:


The coordinate of the middle semi-circle is (75, 50). Knowing this value, we can draw the middle semi-circle. The code for steps 7 to 11 is shown below:

turtle.penup()
turtle.setposition(75, 50)
turtle.setheading(90)
turtle.pendown()
turtle.circle(75, 180)

The generated image is shown below:


The coordinate of the outer semi-circle is (125, 50). Knowing this value, we can draw the outer semi-circle. The code for steps 12 to 16 is shown below:

turtle.penup()
turtle.setposition(125, 50)
turtle.setheading(90)
turtle.pendown()
turtle.circle(125, 180)

The generated image is shown below:


The coordinate for the inner semi-circle of the lower part of the symbol is (-25, -50). The code for steps 17 to 21 is given below:

turtle.penup()
turtle.setposition(-25, -50)
turtle.setheading(270)
turtle.pendown()
turtle.circle(25, 180)

The generated image is shown below:


The coordinate for the middle semi-circle of the lower part of the symbol is  is (-75, -50). The code for steps 22 to 26 is given below:

turtle.penup()
turtle.setposition(-75, -50)
turtle.setheading(270)
turtle.pendown()
turtle.circle(75, 180)

The generated image is shown below:


The coordinate for the middle semi-circle of the lower part of the symbol is  is (-125, -50). The code for steps 27 to 31 is shown:

turtle.penup()
turtle.setposition(-125, -50)
turtle.setheading(270)
turtle.pendown()
turtle.circle(125, 180)

The generated image is shown below:


The location of the leftmost part of the upper part of the symbol is (-125, 40). The distance between this point and the location of the innermost part of the upper part of the symbol is 100.

The code for steps 32 to 36 is shown below:

turtle.penup()
turtle.setposition(-125, 40)
turtle.setheading(0)
turtle.pendown()
turtle.forward(100)

The location of the innermost part of the upper part of the symbol is at (25, 40). The code for steps 37 to 40 is shown below:

turtle.penup()
turtle.setposition(25, 40)
turtle.pendown()
turtle.forward(100)

The generated image is shown below:


To draw the lower line, we simply repeat the steps we used to draw the upper line but now use the coordinates (-125, -40) and (25, -40).

The code to draw the lower line is shown below:

turtle.penup()
turtle.setposition(-125, -40)
turtle.setheading(0)
turtle.pendown()
turtle.forward(100)
turtle.penup()
turtle.setposition(25, -40)
turtle.pendown()
turtle.forward(100)

The generated image is shown below:


To draw the remaining lines we only need the coordinates of the left and right location of the middle semi-circle. These are (-75, -40) and (75, -40). The gap between the two lines is 80 pixels.

The code to complete the shape is shown below:

turtle.penup()
turtle.setposition(-75, -40)
turtle.setheading(90)
turtle.pendown()
turtle.forward(80)

turtle.penup()
turtle.setposition(75, -40)
turtle.setheading(90)
turtle.pendown()
turtle.forward(80)

The final symbol is shown below:


Conclusion

At the end of this section, we have managed to draw the Mmara Krado symbol.

This post is part of the series: Drawing Adinkra Symbols using Python. The goal is to draw 40 Adinkra symbols using the Python programming language.

Sunday, 8 April 2018

Menso Wo Kenten


Menso Wo Kenten means "I am not carrying your basket". It is the symbol of industry, self-reliance, and economic self-determination.

We will use the 5 pixel grid to trace out this image. The image of this is shown below:


The plan to draw this shape is given below:
  1. Get the coordinates of the starting points of the stars
  2. Lift up the pen
  3. Set the pen size to 10 pixels
  4. Move it to the starting point of the first star
  5. Place the pen down
  6. Move forward by the y coordinate of the star
  7. Find the angle between the turtle and the topmost part of the star
  8. Set the heading of the pen to angle
  9. Find the distance between the turtle and the topmost part of the star
  10. Move forward by the distance found
  11. Set the heading of the pen to the value of the 360 minus the angle
  12. Move forward by the distance found
  13. Set the heading of the pen to 0 degrees
  14. Move forward by the y coordinate of the star
  15. Find the angle between the turtle and the next position of the line
  16. Find the distance between the turtle and the line
  17. Set the heading of the pen to angle obtained in 15
  18. Move forward by distance obtained in 16
  19. Set the heading of the pen to value of 180 minus the value obtained in 15
  20. Move forward by the distance obtained in 16
  21. Set the heading of the pen to 180
  22. Move forward by the y coordinate of the star 
  23. Set the heading of the pen to value of the angle obtained in 7 minus 180 degrees
  24. Move forward by the distance obtained in 9
  25. Set the heading of the pen to the value of 180 minus the angle obtained in 7
  26. Move forward by the distance obtained in 9
  27. Set the heading of the pen to 180 degrees
  28. Move forward by the y coordinate of the first star
  29. Set the heading of the pen to 300 minus the value obtained in 15
  30. Move forward by the value obtained in 16
  31. Set the heading of the pen to 360 minus the value obtained in 15
  32. Move forward by the value obtained in 16
  33. Repeat steps 4 to 32 for the second star
  34. Repeat steps 4 to 32 for the third star

Using Turtle Graphics

We will use the template.py file and rename it to menso.py.

The first step of our plan is manual. We need to find the coordinates of the starting points of the stars.

Starting from the smallest, these are: (-50, 40), (-100, 70) and (-150, 100). The shape we used is slightly off by 10 pixels.

One of the rules of design for Adinkra symbols is symmetry. As a result of this, we will shift the starting points down by 10 pixels.

The new coordinates are now: (-50, 30), (-100, 60) and (-150, 90). Visual inspection of the new coordinates reveal a pattern.
The code for steps 2 to 6 is given below:

turtle.penup()
turtle.setposition(-50, 30)
turtle.pensize(10)
turtle.pendown()
turtle.forward(30)

Next we try to find the angle from the current position of the turtle to the topmost position of the star. The coordinates of the two positions are (-20, 30) and (0, 60). The code to do this is shown below:

myradians = math.atan2(60 - 30, 0 - (-20))
upperAngle = math.degrees(myradians)
turtle.setheading(upperAngle)

Next we find the distance between the two points using the coordinateDistance function shown below:

def coordinateDistance(x1, y1, x2, y2):
    dx = x1 - x2
    dy = y1 - y2
    D = math.sqrt((dx * dx) + (dy * dy))
    return D
length = coordinateDistance(-20, 30, 0, 60)
turtle.forward(length)

Steps 11 and 12 are easy as we have the values we need the code for these steps is shown below:

turtle.setheading(360 - upperAngle)
turtle.forward(length)

The code for steps 13 and 14 is given below:

turtle.setheading(0)
turtle.forward(30)

The code for step 15 to 18 is shown below:

myradians = math.atan2(0 - 30, 30 - 50)
lowerAngle = math.degrees(myradians)
turtle.setheading(lowerAngle)
lowerLength = coordinateDistance(50, 30, 30, 0)
turtle.forward(lowerLength)

The code for steps 19 and 20 is given below:

turtle.setheading(180 - lowerAngle)
turtle.forward(lowerLength)

From this point on, the rest is easy as we have all the values we need.

The code for steps 21 and 22 is given below:

turtle.setheading(180)
turtle.forward(30)

The code for steps 23 and 24 is given below:

turtle.setheading(upperAngle - 180)
turtle.forward(length)

The code for steps 25 and 26 is given below:

turtle.setheading(180 - upperAngle)
turtle.forward(length)

The code for steps 27 and 28 is given below:

turtle.setheading(180)
turtle.forward(30)

The code for steps 29 and 30 is given below:

turtle.setheading(300 - lowerAngle)
turtle.forward(lowerLength)

The code for steps 31 and 32 is given below:

turtle.setheading(360 - lowerAngle)
turtle.forward(lowerLength)

The generated image is shown below:


When we decide to draw the next star we don’t need to find the angles again. All we need are the distances for the star.
We repeat the code starting from step 2. We will skip the steps in the code where the value is known. The code for steps 2 to 6 is shown below:

turtle.penup()
turtle.setheading(0)
turtle.setposition(-100, 60)
turtle.pendown()
turtle.forward(60)

Next we find the distance from the current position of the turtle to the position of the topmost part of the star. We know the coordinate of the turtle to be (-40, 60) and that of the topmost part to be (0, 120).

The code to draw the line is shown below:

turtle.setheading(upperAngle)
length = coordinateDistance(-40, 60, 0, 120)
turtle.forward(length)

The rest is easy from this point on. The code to draw the rest of the shape is shown below:

turtle.setheading(360 - upperAngle)
turtle.forward(length)

turtle.setheading(0)
turtle.forward(60)

turtle.setheading(lowerAngle)
turtle.forward(length)

turtle.setheading(180 - lowerAngle)
turtle.forward(length)

turtle.setheading(180)
turtle.forward(60)

turtle.setheading(upperAngle - 180)
turtle.forward(length)

turtle.setheading(180 - upperAngle)
turtle.forward(length)

turtle.setheading(180)
turtle.forward(60)

turtle.setheading(300 - lowerAngle)
turtle.forward(length)

turtle.setheading(360 - lowerAngle)
turtle.forward(length)

The generated image is shown below:


To draw the outer star, we don’t need to do much we move the pen to is new position and find the value of the length from the position of the turtle to the topmost position.

The code to do this is shown below:

turtle.penup()
turtle.setheading(0)
turtle.setposition(-150, 90)
turtle.pendown()
turtle.forward(90)

turtle.setheading(upperAngle)
length = coordinateDistance(-60, 90, 0, 180)
turtle.forward(length)

turtle.setheading(360 - upperAngle)
turtle.forward(length)

turtle.setheading(0)
turtle.forward(90)

turtle.setheading(lowerAngle)
turtle.forward(length)

turtle.setheading(180 - lowerAngle)
turtle.forward(length)

turtle.setheading(180)
turtle.forward(90)

turtle.setheading(upperAngle - 180)
turtle.forward(length)

turtle.setheading(180 - upperAngle)
turtle.forward(length)

turtle.setheading(180)
turtle.forward(90)

turtle.setheading(300 - lowerAngle)
turtle.forward(length)

turtle.setheading(360 - lowerAngle)
turtle.forward(length)

The generated image is shown below:


Conclusion

At the end of this section, we have successfully drawn the shape but there is a variance on the left side.
I shall address this when I review this section.

In this section we cover how to draw the Menso Wo Kenten symbol. It is basically a star shaped symbol.

This post is part of the series: Drawing Adinkra Symbols using Python. The goal is to draw 40 Adinkra symbols using the Python programming language.

Friday, 30 March 2018

Kuronti ne Akwamu


Kuronti ne Akwamu means “Kuronti and Akwamu”. It is the symbol of democracy, sharing ideas, taking council. The Centre for Democratic Development (CDD) in Ghana holds an annual lecture series called the Kronti ne Akwamu Lecture to discuss issues related to democratic development.

We will use the 5 pixel grid to trace out this image. The image of this is shown below:


The plan to draw this shape is given below:

  1. Lift up the pen
  2. Set the pensize to 20 pixels
  3. Draw the outer square
  4. Draw the center lines
  5. Set the pensize to 5 pixels
  6. Draw the serrated lines in the upper left box
  7. Draw the serrated lines in the lower right box

Using Turtle Graphics

We will use the template.py file and rename it to kuronti.py.

The code for steps 1 and 2 is given below:

turtle.penup()
turtle.pensize(20)

To draw the square, we need to find the length from (-180, 180) to (180, 180). This will enable us draw the square.

To do this, we use the coordinateDistance function which is shown below:

def coordinateDistance(x1, y1, x2, y2):
dx = x1 - x2
dy = y1 - y2
D = math.sqrt((dx * dx) + (dy * dy))
return D

The code to find the length of the side is given below:

length = coordinateDistance(-180, 180, 180, 180)

The drawSquare function is now used to draw the square. The code to do this  is given below:

drawSquare(length)

The generated image is shown below:


To draw the center lines, we have to move the turtle to the left hand side and move forward by the length of the side. Next we move the turtle to the bottom, set its heading to 90 degrees and move up by the length of the side. The code to do this is shown below:

turtle.setposition(-180, 0)
turtle.pendown()
turtle.forward(length)
turtle.penup()
turtle.setheading(90)
turtle.setposition(0, -180)
turtle.pendown()
turtle.forward(length)

The generated image is shown below:


Drawing the serrated lines is sort of tricky. This is because we have to draw them 15 times in either direction. To do this, we will use two functions. One for the horizontal lines and the other for the vertical lines.

The code to draw the vertical lines is given below:

def drawVerticalLines(x1, y1, division, space, length):
for line in range(0, division):
turtle.penup()
turtle.setposition(x1, y1)
x1 = x1 + space
turtle.pendown()
turtle.forward(length)
The code to use it is simple and straightforward. It is shown below:

turtle.pensize(5)
length = int(length / 2)
drawVerticalLines(-160, 0, 15, 10, length)

The generated image is shown below:


To draw the horizontal lines on the upper left box, we create a function called drawHorizontalLines and use it. The code for drawHorizontalLines is shown below:

def drawHorizontalLines(x1, y1, division, space, length):
for line in range(0, division):
        turtle.penup()
        turtle.setposition(x1, y1)
        y1 = y1 + space        
        turtle.pendown()
        turtle.forward(length)
To draw the horizontal lines, we use the code shown below:

turtle.setheading(0)
drawHorizontalLines(-180, 20, 15, 10, length)

The generated image is shown below:


To draw the serrated lines for the lower right box, we only need the starting coordinates for the horizontal
and vertical lines which are (20, -180) and (0, -160).

The code to draw the vertical lines is shown below:

turtle.setheading(90)
drawVerticalLines(20, -180, 15, 10, length)

The code to draw the horizontal lines is shown below:

turtle.setheading(0)
drawHorizontalLines(0, -160, 15, 10, length)

The generated image is shown below:


Conclusion

We have succeeded in drawing the Kuronti ne Akwamu symbol.

This post is part of the series: Drawing Adinkra Symbols using Python. The goal is to draw 40 Adinkra
symbols using the Python programming language.

Thursday, 29 March 2018

Abusua Pa


Abusua Pa means "Good Family". It is the symbol for the family unit.

We will use the 5 pixel grid to trace out this image. The image of this is shown below:


The plan to draw this shape is given below:
  1. Lift up the pen
  2. Increase the pensize to 40
  3. Move it to the lower left hand corner of the outer square (-100, -100)
  4. Place the pen down
  5. Move forward to the position (100, -100)
  6. Turn left by 90 degrees
  7. Repeat steps 5 and 6 3 times
  8. Draw the center lines
  9. Draw the outer circles
  10. Reduce the pensize to 5
  11. Draw the inner squares
Using Python Turtle

We will use the template.py file and rename it to abusuapa.py.

The code for steps 1 and 2 is given below:

turtle.penup()
turtle.pensize(40)

To move the pen to the lower left hand corner, we have to use the setposition function. The position we want to move it to is (-10, -10). The code to do this is shown below:

turtle.setposition(-100, -100)
turtle.pendown()

To find the distance between to points, we use the coordinateDistance function which is shown below:

def coordinateDistance(x1, y1, x2, y2):
dx = x1 - x2
dy = y1 - y2
D = math.sqrt((dx * dx) + (dy * dy))
return D
We calculate the length between the two points using the code shown below:

length = coordinateDistance(-100, -100, 100, -100)

Rather than repeat steps 5, 6 and 7 we shall use the drawSquare function. The code to do this is shown below:

drawSquare(length)

For this to work, we need to comment out the turtle.reset command in the drawSquare function. The generated image is now shown below:


I realize that since we are using the drawSquare function, we no longer need the setposition code. We can comment it out.

To draw the center lines, we have to move the turtle to the left hand side and move forward by the length of the side. Next we move the turtle to the bottom, set its heading to 90 degrees and move up by the length of the side. The code to do this is shown below:

turtle.setposition(-100, 0)
turtle.pendown()
turtle.forward(length)
turtle.penup()
turtle.setheading(90)
turtle.setposition(0, -100)
turtle.pendown()
turtle.forward(length)

The generated image is shown below:


To draw the outer circle we will start with the top and move clockwise. To draw the upper circle, we need to move the turtle to the position (60, 120). Then we draw the semi-circle. The code to do this is shown below:

turtle.penup()
turtle.setposition(50, 120)
turtle.pendown()
turtle.circle(50, 180)

The generated image is shown below:


To draw the remaining semi-circles, we move clockwise and also change the heading of our turtle accordingly. The code to do this is shown below:

turtle.penup()
turtle.setposition(120, -50)
turtle.setheading(0)
turtle.pendown()
turtle.circle(50, 180)

turtle.penup()
turtle.setposition(-50, -120)
turtle.setheading(270)
turtle.pendown()
turtle.circle(50, 180)

turtle.penup()
turtle.setposition(-120, 50)
turtle.setheading(180)
turtle.pendown()
turtle.circle(50, 180)

The generated image is shown below:


Completing this shape is easy. All we have to do is draw the lines that are within the squares. To do this we must reduce the pensize to 5 and set the orientation of the turtle appropriately to draw the lines.

The code to do this is shown below:

turtle.penup()
turtle.pensize(5)
turtle.setposition(-60, -100)
turtle.setheading(90)
turtle.pendown()
turtle.forward(length)

turtle.penup()
turtle.setposition(-40, -100)
turtle.setheading(90)
turtle.pendown()
turtle.forward(length)

turtle.penup()
turtle.setposition(40, -100)
turtle.setheading(90)
turtle.pendown()
turtle.forward(length)

turtle.penup()
turtle.setposition(60, -100)
turtle.setheading(90)
turtle.pendown()
turtle.forward(length)

The generated image is shown below:


To draw the remaining horizontal lines, I shall start from the bottom of the symbol and work my way up the code to do this is shown below:

turtle.penup()
turtle.setposition(-100, -60)
turtle.setheading(0)
turtle.pendown()
turtle.forward(length)

turtle.penup()
turtle.setposition(-100, -40)
turtle.setheading(0)
turtle.pendown()
turtle.forward(length)

turtle.penup()
turtle.setposition(-100, 40)
turtle.setheading(0)
turtle.pendown()
turtle.forward(length)

turtle.penup()
turtle.setposition(-100, 60)
turtle.setheading(0)
turtle.pendown()
turtle.forward(length)

The generated image is shown below:


Conclusion

We have successfully drawn the Abusua Pa symbol using the Python programming language. I would comment that it is a truly beautiful symbol.

This post is part of the series: Drawing Adinkra Symbols using Python. The goal is to draw 40 Adinkra symbols using the Python programming language.


Monday, 19 March 2018

Aban


Aban means "fortress". It is the symbol of strength and authority.

We will use the 5 pixel grid to trace out this image. The image of this is shown below:


The plan to draw this shape is given below:
  1. Lift up the pen
  2. Set the heading to 45 degrees
  3. Move the pen to the start position of the shape
  4. Set the pen size to half of the width of the shape
  5. Place the pen down
  6. Move forward to draw the first line
  7. Turn right by 90 degrees
  8. Move forward to draw half of the first line
  9. Turn left by 90 degrees
  10. Move forward to draw the protruding line at a distance of 5/8 of the length
  11. Lift up the pen
  12. Reverse the turtle by moving back the same distance as you moved forward
  13. Turn right by 90 degrees
  14. Place the pen down
  15. Draw the second half of the line
  16. Turn right by 90 degrees
  17. Move forward to draw the third line
  18. Repeat steps 6 to 17 3 more times
Using Turtle Graphics

We will use the template.py file and rename it to aban.py.

The code for steps 1 to 3 is given below:

turtle.penup()
turtle.setheading(45)
turtle.setposition(0, 80)

Since in step 15 the shape is draw 3 times, it is a good candidate for a function. I will call the function drawTong because a single piece of the shape looks like a tong.

Before we can use a function, the values we need to find are the width of the line, its length and the length of its protrusion.

To find the width of the line, we need to find the distance between two parallel points it passes through and this are: (120, 0) and (40, 80).

It starts at the point (0, 80) and moves at an angle of 45 degrees to the point (80, 160).

The protrusion is the size of the width of the shape.

To get the width and length of the shape, we will use the coordinateDistance function which is shown below:

def coordinateDistance(x1, y1, x2, y2):
dx = x1 - x2
dy = y1 - y2
D = math.sqrt((dx * dx) + (dy * dy))
return D

To find the width and length, we use the expressions below:

width = coordinateDistance(120, 0, 40, 80)
length = coordinateDistance(0, 80, 80, 160)

The code for steps 4 and 5 is shown below:

turtle.pensize(width)
turtle.pendown()

Steps 6 to 16 can be automated using the drawTong function. We will first write out the commands for the steps to check then we will later integrate them into the drawTong function.

The code for steps 6 to 10 is given below:

turtle.forward(length)
turtle.right(90)
turtle.forward(length / 2)
turtle.left(90)
turtle.forward(length * 5 / 8)

The generated image is shown below:


The code to lift the pen is straightforward enough. To reverse the shape, we need to move backward the same number of steps as forward.

The code to do this is shown below:

turtle.penup()
turtle.backward(length * 5 / 8)
turtle.right(90)
turtle.pendown()
turtle.forward(length / 2)
turtle.right(90)
turtle.forward(length)

The generated image is shown below:


Now that we have drawn on part of the symbol, we can use the code to create the drawTong function so that we don’t have to repeat ourselves.

The code for the function is shown below:

def drawTong():
    turtle.forward(length)
    turtle.right(90)
    turtle.forward(length / 2)
    turtle.left(90)
    turtle.forward(length * 5 / 8)
    turtle.penup()
    turtle.backward(length * 5 / 8)
    turtle.right(90)
    turtle.pendown()
    turtle.forward(length / 2)
    turtle.right(90)
    turtle.forward(length)

To draw the shape completely, we need to call this function and alternate with the setheading angle that is representative of the quadrant the function draws in. The code to do this is shown below:

drawTong()
turtle.setheading(315)
drawTong()
turtle.setheading(225)
drawTong()
turtle.setheading(135)
drawTong()

The generated image is shown below:


Conclusion

At the end of this section, we have drawn the completed Aban symbol. I would advise you to go over the code and ensure you understand what each part of the code is doing.

This post is part of the series: Drawing Adinkra Symbols using Python. The goal is to draw 40 Adinkra symbols using the Python programming language.

Monday, 12 March 2018

The Series Continues


Above is the Biafran flag. You would be hard pressed to convince me that the Owia A Repue symbol was not the inspiration for it. Owia A Repue is shown below:


Owia A Repue means "Rising Sun". It is the symbol of progress, renewal, development, warmth, vitality, and energy.

After writing the Conclusion last week, I actually thought I was done with this series.

In my mind, I thought I could kick back and relax but that was not to be the case.

In placing the series out there, I got feedback and found this link which contains a list of 129 Adinkra symbols.

The hardwork would be going through the list and finding the symbols that could be drawn using Python turtle. At the end, I have decided that 17 more symbols could be drawn.

So the series continues.