Showing posts with label WAMP Stack. Show all posts

Thursday, 12 February 2015

How to Install WordPress on WAMP

After you install WAMPServer as explained in this post. You see the above picture when you browse to localhost after starting your WAMPServer. We are going to install WordPress on WAMP because we want to develop our websites locally before moving them to production.

Now my WAMP installation is the default installation. Click on the phpmyadmin link on your installation. When you scroll to the bottom, you will see the following:
This means that I am running the root user with no password. Since it is my local machine, it is of no consequence. Please don't do this for production. Or if you want, you can change your root password.

In order to install WordPress on WAMP, do the following
  1. Go to WordPress.org and download WordPress.
  2. Unzip the archive file in a suitable location.
  3. Copy the unzipped folder to C:\wamp\www folder. When you do this and refresh your browser, the project will show up there. This shows you that the folder is now seen as a project by WAMPServer.
  4. Click on the phpmyadmin link
  5. Once you get to this page, click on the Databases tab.
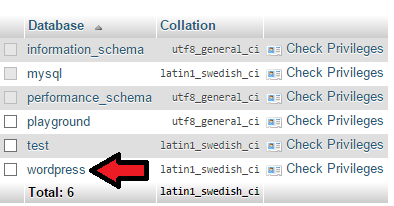
  6. In the new database area, type in your database name. I will be using wordpress as my own.
  7. Click on the Create button to create a new database.
  8. You will get a flash message and see it in the list of databases.
  9. Go to http://localhost/wordpress in your browser and wait for the page to load
  10. Choose your language as English and click on Continue
  11. Read the information screen carefully. It contains information that will be required from you. Click the Let's go button.
  12. Enter the details of your database as I have done below. Note that the password field is empty as we did not set a password for our root user. Click the submit button.
  13. Now click the Run the install button
  14. Provide the information needed. Since you are running a local website, uncheck the Allow search engines to index this site mark. Click on Install WordPress
  15. Congratulations, your have successfully installed WordPress on your local machine
  16. Login to your blog
  17. Browse to your frontend at http://localhost/wordpress
Congratulations, you now have a WordPress sandbox to use as you please.

Monday, 26 January 2015

How to Install WAMP Server on Windows 8


When doing web programming, the LAMP stack is taken as the default. However, when developing on a Windows machine, you replace the L in LAMP with W and you have WAMP.

WampServer is a bundle for web development for windows. It allows you run your own web server on your local machine. This is great because you can test all your web applications on your website and then upload it to your production environment.

In order to install WampServer on your machine, you need to do  the following:

  1. Visit the WampServer  website and click on the Start Using WAMPSERVER button.
  2. It will redirect you to this page
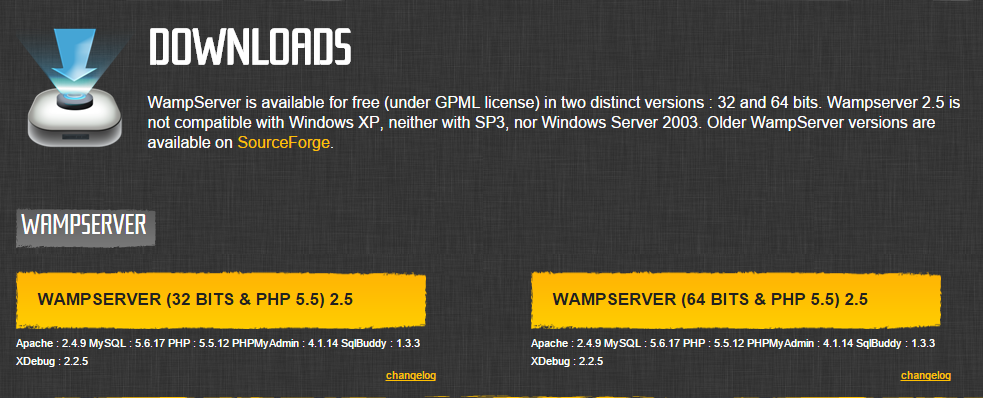
  3. Click the download button for your machine. I am using a 64 bit machine so I will choose that one.
  4. You get the warning below. Read and look for the download directly link.
  5. Clicking on the download link starts your download in your browser window.
  6. Wait for your download to complete. Double click on the file in your browser window.
  7. You get a User Control Notification. Agree to all of them.
  8. The installation starts. Click the next button.
  9. Accept the licence agreement and click next.
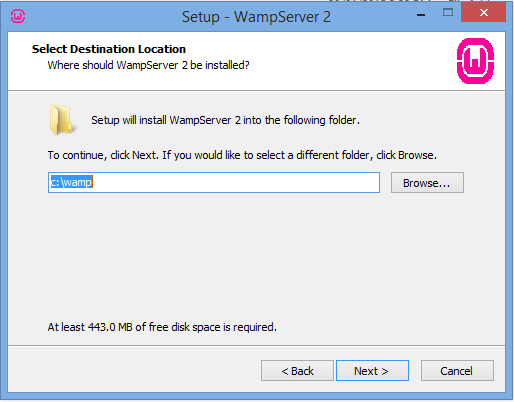
  10. Select the installation destination. I am using the default.
  11. Select additional tasks to be performed. I will choose none because I want to have my WampServer on my start page. Click the Next button.
  12. Your installation is ready to begin. Click on the Install button.
  13. Wait as your installation is progressing.
  14. Once the installation is done, it will ask you to choose your default browser. It like Opera for web development so I will look for it.
  15. Once you do that, your installation concludes. All that is left is to choose your email settings. I will not do that now as we have to configure WAMP to send emails.
  16. Congratulations, you have successfully installed WAMP on your machine.
  17. Launch WampServer on your machine by leaving the check box and clicking finish.
  18. Launching WampServer  brings up the User Control. Agree to everything.
  19. Go to the notification area of your machine and find the WampServer  icon. Left click and put your server online.
  20. Type localhost into your browser window. You will see the screen shown below:
So there you have it. You can now develop web applications on your machine. Next I will explain how to configure your WampServer to send emails.