Thursday, 3 May 2018

Nya Gyidie


Nya Gyidie means "have faith". It is the symbol of faith.

We will use the 5 pixel grid to trace out this image. The image of this is shown below:


The plan to draw this shape is given below:

  1. Lift up the pen
  2. Set the pensize to 40
  3. Draw the large circle
  4. Set the pensize to 1
  5. Draw the outer circles
  6. Draw the inner square
  7. Draw the supporting shape

Using Turtle Graphics

We will use the template.py file and rename it to nya.py.

The for the first two lines is shown below:
turtle.penup()
turtle.pensize(40)

To draw the large circle we need to move the turtle to the position (120, 0) and draw a circle of radius 120 pixels.

The code to do this is shown below:

turtle.setposition(120, 0)
turtle.setheading(90)
turtle.pendown()
turtle.circle(120)

The image generated is shown below:


To draw the outer circles we need to get the coordinates of the right most sides of the circles.

Starting from the right and moving anticlockwise, they are (190, 0), (25, 165), (-140, 0) and (25, -165).

The code to draw the outer circles is shown below:

turtle.pensize(1)

turtle.penup()
turtle.begin_fill()
turtle.setposition(190, 0)
turtle.setheading(90)
turtle.pendown()
turtle.circle(25)
turtle.end_fill()

turtle.penup()
turtle.begin_fill()
turtle.setposition(25, 165)
turtle.setheading(90)
turtle.pendown()
turtle.circle(25)
turtle.end_fill()

turtle.penup()
turtle.begin_fill()
turtle.setposition(-140, 0)
turtle.setheading(90)
turtle.pendown()
turtle.circle(25)
turtle.end_fill()

turtle.penup()
turtle.begin_fill()
turtle.setposition(25, -165)
turtle.setheading(90)
turtle.pendown()
turtle.circle(25)
turtle.end_fill()

The generated image is shown below:


To draw the inner square, we need to move our turtle to the leftmost part of the square and find the angle as well as the length of the side.

The coordinate for the leftmost side is (-50, 0) while the coordinate for the uppermost part is (0, 50).

The code to find the angle between the two points is shown below:

myradians = math.atan2(50 - (0), 0 - (-50))
angle = math.degrees(myradians)

To find the length between the two sides, we need to use the coordinateDistance function. The code for it is shown below:

def coordinateDistance(x1, y1, x2, y2):
    dx = x1 - x2
    dy = y1 - y2
    D = math.sqrt((dx * dx) + (dy * dy))
    return D
We call the function using the code shown below:

length = coordinateDistance(-50, 0, 0, 50)

The code to draw the square is shown below:

turtle.penup()
turtle.setposition(-50, 0)
turtle.begin_fill()
turtle.pendown()
turtle.setheading(angle)
turtle.forward(length)
turtle.setheading(360 - angle)
turtle.forward(length)
turtle.setheading(180 + angle)
turtle.forward(length)
turtle.setheading(90 + angle)
turtle.forward(length)
turtle.end_fill()

The generated image is shown below:


Drawing the upper filled quadrant is not difficult. The quadrant starts at (-40, 90) and heads to the point (0, 50) where it joins the upper tip of the inner square.

To draw this quadrant we move the pen to the position (-40, 90) and draw a line to the point (0, 50). Then we draw the line back to the point (40, 90) where the quadrant ends. The fill property of Python turtle will fill the quadrant for us.

The code to do this is shown below:

turtle.setposition(-40, 90)
turtle.pendown()
turtle.begin_fill()
turtle.setheading(inclineAngle)
turtle.forward(inclineLength)
turtle.setheading(360 - inclineAngle)
turtle.forward(inclineLength)
turtle.end_fill()

The generated image is shown below:


To draw the lower filled quadrant, we need to use the same principles we use to draw the top quadrant.

The code for this is shown below:

turtle.penup()
turtle.setposition(-40, -90)
turtle.pendown()
turtle.begin_fill()
turtle.setheading(360 - inclineAngle)
turtle.forward(inclineLength)
turtle.setheading(360 + inclineAngle)
turtle.forward(inclineLength)
turtle.end_fill()

The generated image is shown below:


To close the gaps in the shape we need to use the fill property.

Move the turtle back to the position of the right hand of the upper triangle. Set the heading to 90 degrees and move forward by 10 pixels.

The code to do this is shown below:

turtle.penup()
turtle.setposition(40, 90)
turtle.setheading(90)
turtle.pendown()
turtle.begin_fill()
turtle.forward(10)
turtle.left(90)
turtle.forward(80)
turtle.left(90)
turtle.forward(10)
turtle.left(90)
turtle.forward(80)
turtle.end_fill()

The generated image is shown below:


The code to draw the lower filled quadrant is shown below:

turtle.penup()
turtle.setposition(-40, -90)
turtle.setheading(270)
turtle.pendown()
turtle.begin_fill()
turtle.forward(10)
turtle.left(90)
turtle.forward(80)
turtle.left(90)
turtle.forward(10)
turtle.left(90)
turtle.forward(80)
turtle.end_fill()

The generated image is shown below:


Conclusion

At the end of this section we have successfully drawn the Nya Gyidie symbol.

This post is part of the series: Drawing Adinkra Symbols using Python. The goal is to draw 40 Adinkra symbols using the Python programming language.

Saturday, 28 April 2018

Nteasee


Nteasee means "understanding". It is the symbol of understanding and cooperation.

We will use the 5 pixel grid to trace out this image. The image of this is shown below:


The plan to draw this shape is given below:

  1. Lift up the pen
  2. Set the pensize to 40 pixels
  3. Draw the upper prong
  4. Draw the lower prong
  5. Draw the upper arrow
  6. Draw the lower arrow
  7. Draw the middle hexagon

Using Turtle Graphics

We will use the template.py file and rename it to nteasee.py.

The code for the first two steps are shown below:

turtle.penup()
turtle.pensize(40)

To draw the upper prong, we must move the pen to the position (-70, 180). We do this because the pensize is 40 pixels and will take up a space of 20 pixels when it is placed down.

We place the pendown and move forward by 130 pixels, turn left by 90 degrees, move forward by 140 pixels, turn left by 90 degrees and move forward by 130 pixels.

The code to do this is shown below:

turtle.setheading(270)
turtle.setposition(-70, 180)
turtle.pendown()
turtle.forward(130)
turtle.left(90)
turtle.forward(140)
turtle.left(90)
turtle.forward(130)

The generated image is shown below:


To draw the lower prong, we need to use the steps above but modify them for our purposes.

To do this, we move the pen to the position (-70, -180) and we set the heading of the turtle to 90 degrees.

Next we move up by 130 pixels, turn right by 90 degrees, move forward by 140 pixels, turn right by 90 degrees and move down by 130 pixels.

The code to do this is shown below:

turtle.penup()
turtle.setheading(90)
turtle.setposition(-70, -180)
turtle.pendown()
turtle.forward(130)
turtle.right(90)
turtle.forward(140)
turtle.right(90)
turtle.forward(130)

The generated image is shown below:


Drawing the upper arrow is easy. We need to use a filled shape to do this. To start we, we move the turtle to the left position of the arrow.

We must reduce the pensize of the turtle to 1. Next move forward by 60 pixels then turn left by 90 degrees and move forward by 15 pixels.

We need to find the angle between the current position of the turtle and its next position as well as the distance between them.

Once we have done the above, the rest is easy. All we need to do is reverse the steps and draw the other half of the arrow.

The code to lift up the pen and set its pensize to 1 is shown below:

turtle.penup()
turtle.pensize(1)

We move the position of the pen to the left side of the arrow as well as change its heading. The code to do this shown below:

turtle.setposition(-20, 70)
turtle.setheading(90)
turtle.pendown()

We move forward by 60 pixels, turn left by 90 degrees and move forward by 15 pixels. The code to do this is shown below:

turtle.begin_fill()
turtle.forward(60)
turtle.left(90)
turtle.forward(15)

The current position of the turtle is at (-35, 130). Its next position is (0, 190). To get there, we need to find the angle between the two points. The code to do this is shown below:

myradians = math.atan2(190 - 130, 0 - (-35))
angle = math.degrees(myradians)

To find the length between the two points, we use the coordinateDistance function. The code for it is shown below:

def coordinateDistance(x1, y1, x2, y2):
    dx = x1 - x2
    dy = y1 - y2
    D = math.sqrt((dx * dx) + (dy * dy))
    return D

We call the function using the code shown below:

length = coordinateDistance(-35, 130, 0, 190)

The code to draw the rest of the arrow is given below:

turtle.setheading(angle)
turtle.forward(length)
turtle.setheading(360 - angle)
turtle.forward(length)
turtle.setheading(180)
turtle.forward(15)
turtle.setheading(270)
turtle.forward(60)
turtle.end_fill()

The generated image is shown below:


To draw the lower part, we need to move the turtle to the position () and reverse the steps above.

The code to do this is shown below:

turtle.penup()
turtle.setposition(-20, -70)
turtle.setheading(270)
turtle.pendown()
turtle.begin_fill()
turtle.forward(60)
turtle.right(90)
turtle.forward(15)
turtle.setheading(360-angle)
turtle.forward(length)
turtle.setheading(angle)
turtle.forward(length)
turtle.setheading(180)
turtle.forward(15)
turtle.setheading(90)
turtle.forward(60)
turtle.end_fill()

The generated image is shown below:


To complete this symbol we need to draw the hexagon.

To do so, we need to move the turtle to the left side of the hexagon. The coordinate of this position is (-20, -30).

The next thing is to find the angle and length between this position and the next position. The coordinates of the next position are (-35, 0).

The code to find the angle and length is given below:

myradians = math.atan2(0 - (-30), -35 - (-20))
hexAngle = math.degrees(myradians)
hexLength = coordinateDistance(-20, -30, -35, 0)

The code to draw the hexagon is given below:

turtle.penup()
turtle.setposition(-20, -30)
turtle.setheading(hexAngle)
turtle.pendown()
turtle.begin_fill()
turtle.forward(hexLength)
turtle.setheading(180 - hexAngle)
turtle.forward(hexLength)
turtle.setheading(0)
turtle.forward(40)
turtle.setheading(360 - (180 - hexAngle))
turtle.forward(hexLength)
turtle.setheading(360 - hexAngle)
turtle.forward(hexLength)
turtle.setheading(180)
turtle.forward(40)
turtle.end_fill()

The generated image is shown below:


Conclusion

At the end of this section, we have successfully drawn the Nteasee symbol.

This post is part of the series: Drawing Adinkra Symbols using Python. The goal is to draw 40 Adinkra symbols using the Python programming language.

Wednesday, 25 April 2018

Nsoromma


Nsoromma means "child of the heavens". It is the symbol of guardianship. A reminder that God is the father and watches over all people.

We will use the 5 pixel grid to trace out this image. The image of this is shown below:


The plan to draw this shape is given below:
  1. Lift up the pen
  2. Find the angle between the edge of the shape in the lower left quadrant and the top of the shape
  3. Find the distance between the edge of the shape in the lower left quadrant and the top of the shape
  4. Move the pen to the position of the lower left quadrant
  5. Set its heading to the value found in 2
  6. Move forward by the distance found in 3
  7. Continue alternating through steps 5 and 6 until the shape is completed
  8. Fill up the final shape
  9. Move to the rightmost position for the radius of the circle
  10. Draw a filled circle

Using Turtle Graphics

We will use the template.py file and rename it to nsoromma.py.

Step 1 is easy, we only need to lift up the pen. The code to do this is shown below:

turtle.penup()

For step 2 we need to find the angle between the lower left point of the symbol and its uppermost part. Their respective coordinates are (-140, -140) and (0, 195).

The code to do this is shown below:

turtle.penup()
myradians = math.atan2(195 - (-140), 0 - (-140))
angle = math.degrees(myradians)

The value of the angle will be used in drawing the entire shape.

Next we find the length between the two points using the coordinateDistance function. The code for it is shown below:

def coordinateDistance(x1, y1, x2, y2):
    dx = x1 - x2
    dy = y1 - y2
    D = math.sqrt((dx * dx) + (dy * dy))
    return D

We call the function using the code shown below:

length = coordinateDistance(-140, -140, 0, 195)

Steps 4 to 6 are easy enough. But we must use the fill property to draw the shape.

The code for the entire drawing is shown below:

turtle.setposition(-140, -140)
turtle.pendown()
turtle.begin_fill()
turtle.setheading(angle)
turtle.forward(length)
turtle.setheading(360 - angle)
turtle.forward(length)
turtle.setheading(90 + angle)
turtle.forward(length)
turtle.setheading(90 - angle)
turtle.forward(length)
turtle.setheading(180 + angle)
turtle.forward(length)
turtle.setheading(180 - angle)
turtle.forward(length)
turtle.setheading(270 + angle)
turtle.forward(length)
turtle.setheading(270 - angle)
turtle.forward(length)
turtle.end_fill()

To really understand what is going on, add each setheading and forward combination gradually.

The generated image is shown below:


Drawing the circle is easy. We simply move the turtle to the position (50, 0), set its heading to 90 degrees and draw a filled circle.

The code to do this is shown below:

turtle.setposition(50, 0)
turtle.setheading(90)
turtle.color("white", "white")
turtle.begin_fill()
turtle.circle(50)
turtle.end_fill()

The generated image is shown below:


The only code that might appear strange is this line:

turtle.color("white", "white")

The above line makes the pencolor and fillcolor of the turtle white.

Conclusion

At the end of this section we have successfully drawn the Nsoromma symbol.

This is my favourite symbol in this series. It has an emergent property. It is made up of triangular shapes that combine to form it.

This post is part of the series: Drawing Adinkra Symbols using Python. The goal is to draw 40 Adinkra symbols using the Python programming language.

Thursday, 19 April 2018

Nnampo Pa Baanu


Nnampo Pa Baanu means "two good friends". It is the symbol of friendship.

We will use the 5 pixel grid to trace out this image. The image of this is shown below:


The plan to draw this shape is given below:
  1. Lift up the pen
  2. Set the pensize to 40 pixels
  3. Move the pen to the bottom of the  location of the center vertical
  4. Draw the center vertical
  5. Set the pensize to 30 pixels
  6. Draw the remaining center verticals
  7. Complete the outline of the shape
  8. Draw the semicircles
Using Turtle Graphics

We will use the template.py file and rename it to nnampo.py.

The code for steps 1 and 2 is given below:

turtle.penup()
turtle.pensize(40)

The coordinates for the bottom of the center vertical are (0, -80). The length of the line is 160 pixels.

The code to draw this line is shown below:

turtle.setposition(0, -60)
turtle.pendown()
turtle.setheading(90)
turtle.forward(120)

The generated image is shown below:


To draw the remaining center verticals, we must first know their coordinates they are: (-165, 60), (-85, 60), (85, 60) and (165, 60).

The code to draw them is given below:

turtle.pensize(30)

turtle.penup()
turtle.setposition(-165, -60)
turtle.pendown()
turtle.setheading(90)
turtle.forward(120)

turtle.penup()
turtle.setposition(-85, -60)
turtle.pendown()
turtle.setheading(90)
turtle.forward(120)

turtle.penup()
turtle.setposition(85, -60)
turtle.pendown()
turtle.setheading(90)
turtle.forward(120)

turtle.penup()
turtle.setposition(165, -60)
turtle.pendown()
turtle.setheading(90)
turtle.forward(120)

The generated image is shown below:


To complete the outline of the shape, we need to draw the top horizontal line and the bottom horizontal line.

The coordinate for the upper line is (-165, 75) and its length is 330 pixels. The code to draw it is shown below:

turtle.penup()
turtle.setposition(-165, 75)
turtle.pendown()
turtle.setheading(0)
turtle.forward(330)

The coordinate for the lower line is (-165, -75). The code to draw it is shown below:

turtle.penup()
turtle.setposition(-165, -75)
turtle.pendown()
turtle.setheading(0)
turtle.forward(330)

The generated image is shown below:


Drawing the semicircles is easy. We need to move the turtle to the position of the rightmost sides and draw the circle.

The code to do this is shown below:

turtle.penup()
turtle.setposition(165, 75)
turtle.pendown()
turtle.setheading(90)
turtle.circle(80, 180)

turtle.penup()
turtle.setposition(-5, 75)
turtle.pendown()
turtle.setheading(90)
turtle.circle(80, 180)

The generated image is shown below:


To draw the lower semicircle we just invert the positions. The code to do this is shown below:

turtle.penup()
turtle.setposition(-165, -75)
turtle.pendown()
turtle.setheading(270)
turtle.circle(80, 180)

turtle.penup()
turtle.setposition(5, -75)
turtle.pendown()
turtle.setheading(270)
turtle.circle(80, 180)

The generated image is shown below:


Conclusion

At the end of this section we have succeeded in drawing the Nnampo Pa Baanu symbol.

This post is part of the series: Drawing Adinkra Symbols using Python. The goal is to draw 40 Adinkra symbols using the Python programming language.

Mrammuo


Mrammuo means "crossing paths". It is the symbol of life challenges.

We will use the 5 pixel grid to trace out this image. The image of this is shown below:


The plan to draw this shape is given below:
  1. Lift up the pen
  2. Set the pensize to 15 pixels
  3. Draw the outer box
  4. Draw the inner diagonals
  5. Draw the serrated edges

Using Turtle Graphics

We will use the template.py file and rename it to mrammuo.py.

The code to lift up the pen and set the pensize is shown below:

turtle.penup()
turtle.pensize(15)

The upper left coordinate for the outer box is (-175, 105). Its length is 350. The code to draw this line is given below:

turtle.setposition(-175, 105)
turtle.pendown()
turtle.forward(350)

We do the same for the lower part of the outer box. The code to do this is shown below:

turtle.penup()
turtle.setposition(-175, -105)
turtle.pendown()
turtle.forward(350)

The generated image is shown below:


To complete the box, we have to draw the vertical lines. The coordinates of the left vertical line is (-125, -105) and its length is 350.

The code to do this is shown below:

turtle.penup()
turtle.setheading(90)
turtle.setposition(-125, -105)
turtle.pendown()
turtle.forward(210)

The code to draw the other vertical line is shown below:

turtle.penup()
turtle.setheading(90)
turtle.setposition(125, -105)
turtle.pendown()
turtle.forward(210)

The generated image is shown below:


Drawing the diagonals is easy but we need to find the length of the diagonal and its angle.

Our first task is to find the angle between two points (-125, -105) and (125, 105). We will use the coordinateDistance function. The code for this is shown below:

def coordinateDistance(x1, y1, x2, y2):
    dx = x1 - x2
    dy = y1 - y2
    D = math.sqrt((dx * dx) + (dy * dy))
    return D
We call the function using the code shown below:

diagonalLength = coordinateDistance(-125, -105, 125, 105)

The code to find the angle between the point is shown below:

myradians = math.atan2(105 - (-105), 125 - (-125))
angle = math.degrees(myradians)

We move the turtle to the position (-125, -105) and draw the line. The code to do this is shown below:

turtle.penup()
turtle.setposition(-125, -105)
turtle.setheading(angle)
turtle.pendown()
turtle.forward(diagonalLength)

The code to draw the other diagonal is given below:

turtle.penup()
turtle.setposition(125, -105)
turtle.setheading(180 - angle)
turtle.pendown()
turtle.forward(diagonalLength)

The generated image is shown below:


Drawing the serrated lines is easy. We simply need to move the turtle to that position and draw the lines.

The coordinate of the first line is (-175, 105) and it length is 50 pixels. The code to draw it is shown below:

turtle.penup()
turtle.setposition(-175, 105)
turtle.setheading(90)
turtle.pendown()
turtle.forward(50)

To draw the rest, we move the the pen by 50 pixels. The code to do this is shown below:

turtle.penup()
turtle.setposition(-125, 105)
turtle.setheading(90)
turtle.pendown()
turtle.forward(50)

The rest of the code for the upper part is shown below:

turtle.penup()
turtle.setposition(-75, 105)
turtle.setheading(90)
turtle.pendown()
turtle.forward(50)

turtle.penup()
turtle.setposition(-25, 105)
turtle.setheading(90)
turtle.pendown()
turtle.forward(50)

turtle.penup()
turtle.setposition(25, 105)
turtle.setheading(90)
turtle.pendown()
turtle.forward(50)

turtle.penup()
turtle.setposition(75, 105)
turtle.setheading(90)
turtle.pendown()
turtle.forward(50)

turtle.penup()
turtle.setposition(125, 105)
turtle.setheading(90)
turtle.pendown()
turtle.forward(50)

turtle.penup()
turtle.setposition(175, 105)
turtle.setheading(90)
turtle.pendown()
turtle.forward(50)

The generated image is shown below:


To draw the lower part, we simply invert the coordinates of the y axis for the shape and change the heading of the turtle to 270.

The code to do this is shown below:

turtle.penup()
turtle.setposition(-175, -105)
turtle.setheading(270)
turtle.pendown()
turtle.forward(50)

turtle.penup()
turtle.setposition(-125, -105)
turtle.setheading(270)
turtle.pendown()
turtle.forward(50)

turtle.penup()
turtle.setposition(-75, -105)
turtle.setheading(270)
turtle.pendown()
turtle.forward(50)

turtle.penup()
turtle.setposition(-25, -105)
turtle.setheading(270)
turtle.pendown()
turtle.forward(50)

turtle.penup()
turtle.setposition(25, -105)
turtle.setheading(270)
turtle.pendown()
turtle.forward(50)

turtle.penup()
turtle.setposition(75, -105)
turtle.setheading(270)
turtle.pendown()
turtle.forward(50)

turtle.penup()
turtle.setposition(125, -105)
turtle.setheading(270)
turtle.pendown()
turtle.forward(50)

turtle.penup()
turtle.setposition(175, -105)
turtle.setheading(270)
turtle.pendown()
turtle.forward(50)

The generated image is shown below:


To draw the left serrated edge, we will first draw the one at the center then figure out how to draw the rest.

The coordinates of the center are (-125, 0). We set its heading to 180 degrees and move forward by 50 pixels.

The code to do this is shown below:

turtle.penup()
turtle.setposition(-125, 0)
turtle.setheading(180)
turtle.pendown()
turtle.forward(50)

The generated image is shown below:


By extrapolation, the y coordinates of the remaining two horizontal lines are 52.5 and -52.5. The code to draw the remaining horizontal lines is given below:

turtle.penup()
turtle.setposition(-125, 52.5)
turtle.setheading(180)
turtle.pendown()
turtle.forward(50)

turtle.penup()
turtle.setposition(-125, -52.5)
turtle.setheading(180)
turtle.pendown()
turtle.forward(50)

The generated image is shown below:


Drawing the right side is easy enough. The code to do so is shown below:

turtle.penup()
turtle.setposition(125, 0)
turtle.setheading(0)
turtle.pendown()
turtle.forward(50)

turtle.penup()
turtle.setposition(125, 52.5)
turtle.setheading(0)
turtle.pendown()
turtle.forward(50)

turtle.penup()
turtle.setposition(125, -52.5)
turtle.setheading(0)
turtle.pendown()
turtle.forward(50)

The generated image is shown below:


Conclusion

At the end of this section, we have succeeded in drawing the Mrammuo symbol.

This post is part of the series: Drawing Adinkra Symbols using Python. The goal is to draw 40 Adinkra symbols using the Python programming language.

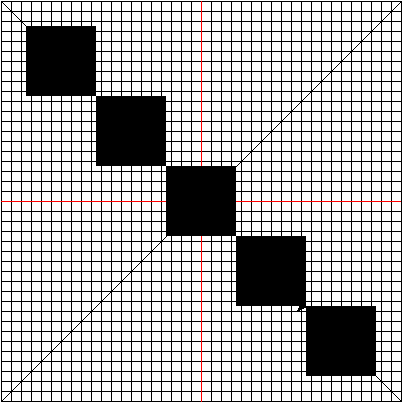
Mpuankron


Mpuankron means "nine tufts of hair". It is the symbol of democracy.

We will use the 5 pixel grid to trace out this image. The image of this is shown below:


The plan to draw this shape is given below:
  1. Lift up the pen
  2. Move the pen to the location for the upper left square
  3. Draw the first square
  4. Repeat steps 1 -  3 for the other squares

Using Turtle Graphics

We will use the template.py file and rename it to mpuankron.py.

Before we can draw the first square, we need to draw two diagonals. To do this we borrow the code from Akoma Ntoaso project. We only need the diagonal length for the entire grid. This is 565.685424949.

The code below will draw the diagonal lines.

turtle.penup()
turtle.setposition(-200, -200)
turtle.setheading(45)
turtle.pendown()
turtle.forward(565.685424949)
turtle.penup()
turtle.setposition(200, -200)
turtle.setheading(135)
turtle.pendown()
turtle.forward(565.685424949)

The generated image is shown below:


The coordinates of the first square is (-175, 175). We will move the pen there and draw the square.

As we need to repeat the operation 9 times, we can best do it with a function. To create the function we only need the starting position of the function and the length of the square we want to draw.

Do bear in mind that the length of the square is 70 pixels.

The code for the function is shown below:

def drawFilledSquare(x, y, length):
    turtle.penup()
    turtle.setposition(x, y)
    turtle.begin_fill()
    turtle.setheading(0)
    turtle.forward(length)
    turtle.right(90)
    turtle.forward(length)
    turtle.right(90)
    turtle.forward(length)
    turtle.right(90)
    turtle.forward(length)
    turtle.right(90)
    turtle.end_fill()
To call the function, we simple pass in the parameters for the first square. The code for this is given below:

drawFilledSquare(-175, 175, 70)

The generated image is shown below:


The coordinates for the second, third, fourth and fifth squares are (-105, 105), (-35, 35), (35, -35) and (105, -105). The code to call the function is given below:

drawFilledSquare(-105, 105, 70)
drawFilledSquare(-35, 35, 70)
drawFilledSquare(35, -35, 70)
drawFilledSquare(105, -105, 70)

The generated image is shown below:


To complete the symbol, we need the coordinates for the remaining squares. Starting from the lower left hand side, the coordinates are: (-175, -105), (-105, -35), (35, 105) and (105, 175).

The code to call the function is shown below:

drawFilledSquare(-175, -105, 70)
drawFilledSquare(-105, -35, 70)
drawFilledSquare(35, 105, 70)
drawFilledSquare(105, 175, 70)

The generated image is shown below:


Conclusion

At the end of this section we have succeeded in drawing the Mpuankron symbol. You have to admit that it has a particular eerie beauty to it.

This post is part of the series: Drawing Adinkra Symbols using Python. The goal is to draw 40 Adinkra symbols using the Python programming language.

Tuesday, 10 April 2018

Mmara Krado


Mmara Krado is composed of two distinct words. "Mmara" means law and "Krado" means padlock. It is the symbol of the seal of law and order. It represents supreme authority and the court of justice.

We will use the 5 pixel grid to trace out this image. The image of this is shown below:


The plan to draw this shape is given below:
  1. Lift up the pen
  2. Set the pensize to 15 pixels
  3. Move the turtle to the left position of the inner semi-circle of the upper part of the symbol
  4. Set the heading to 90 degrees
  5. Place the pen down
  6. Draw the inner semi-circle
  7. Lift up the pen
  8. Move the turtle to the left position of the middle semi-circle of the upper part of the symbol
  9. Set the heading to 90 degrees
  10. Place the pen down
  11. Draw the middle semi-circle
  12. Lift up the pen
  13. Move the turtle to the left position of the outer semi-circle of the upper part of the symbol
  14. Set the heading to 90 degrees
  15. Place the pen down
  16. Draw the outer semi-circle
  17. Lift up the pen
  18. Move the turtle to the right position of the inner semi-circle of the lower part of the symbol
  19. Set the heading to 270 degrees
  20. Place the pen down
  21. Draw the inner semi-circle
  22. Lift up the pen
  23. Move the turtle to the right position of the middle semi-circle of the lower part of the symbol
  24. Set the heading to 270 degrees
  25. Place the pen down
  26. Draw the middle semi-circle
  27. Lift up the pen
  28. Move the turtle to the right position of the outer semi-circle of the lower part of the symbol
  29. Set the heading to 270 degrees
  30. Place the pen down
  31. Draw the outer semi-circle
  32. Lift up the pen
  33. Place the pen at the location for the leftmost part of the upper part of the symbol
  34. Set the heading to 0 degrees
  35. Place the pen down
  36. Move forward to cover the leftmost part of the upper part of the symbol
  37. Lift up the pen
  38. Move the pen to the location of the innermost part of the upper part of the symbol
  39. Place the pen down
  40. Move forward to cover the right of the upper part of the symbol
  41. Lift up the pen
  42. Place the pen at the location for the leftmost part of the lower part of the symbol
  43. Place the pen down
  44. Move forward to cover the leftmost part of the lower part of the symbol
  45. Lift up the pen
  46. Move forward over the gap between the two parts
  47. Place the pen down
  48. Move forward to cover the right of the lower part of the symbol
  49. Lift up the pen
  50. Move the pen to the left  location of the middle semi-circle
  51. Set the heading to 90 degrees
  52. Move forward to cover the gap
  53. Lift up the pen
  54. Move the pen to the right location of the middle semi-circle
  55. Move forward to cover the gap
Using Turtle Graphics

We will use the template.py file and rename it to mmara.py.

The coordinate left position of the inner semi-circle is (25, 50). Once we know this, we can write the code for steps 1 to 6.

The code for this is shown below:

turtle.penup()
turtle.pensize(30)
turtle.setposition(25, 50)
turtle.setheading(90)
turtle.pendown()
turtle.circle(25, 180)

The generated image is shown below:


The coordinate of the middle semi-circle is (75, 50). Knowing this value, we can draw the middle semi-circle. The code for steps 7 to 11 is shown below:

turtle.penup()
turtle.setposition(75, 50)
turtle.setheading(90)
turtle.pendown()
turtle.circle(75, 180)

The generated image is shown below:


The coordinate of the outer semi-circle is (125, 50). Knowing this value, we can draw the outer semi-circle. The code for steps 12 to 16 is shown below:

turtle.penup()
turtle.setposition(125, 50)
turtle.setheading(90)
turtle.pendown()
turtle.circle(125, 180)

The generated image is shown below:


The coordinate for the inner semi-circle of the lower part of the symbol is (-25, -50). The code for steps 17 to 21 is given below:

turtle.penup()
turtle.setposition(-25, -50)
turtle.setheading(270)
turtle.pendown()
turtle.circle(25, 180)

The generated image is shown below:


The coordinate for the middle semi-circle of the lower part of the symbol is  is (-75, -50). The code for steps 22 to 26 is given below:

turtle.penup()
turtle.setposition(-75, -50)
turtle.setheading(270)
turtle.pendown()
turtle.circle(75, 180)

The generated image is shown below:


The coordinate for the middle semi-circle of the lower part of the symbol is  is (-125, -50). The code for steps 27 to 31 is shown:

turtle.penup()
turtle.setposition(-125, -50)
turtle.setheading(270)
turtle.pendown()
turtle.circle(125, 180)

The generated image is shown below:


The location of the leftmost part of the upper part of the symbol is (-125, 40). The distance between this point and the location of the innermost part of the upper part of the symbol is 100.

The code for steps 32 to 36 is shown below:

turtle.penup()
turtle.setposition(-125, 40)
turtle.setheading(0)
turtle.pendown()
turtle.forward(100)

The location of the innermost part of the upper part of the symbol is at (25, 40). The code for steps 37 to 40 is shown below:

turtle.penup()
turtle.setposition(25, 40)
turtle.pendown()
turtle.forward(100)

The generated image is shown below:


To draw the lower line, we simply repeat the steps we used to draw the upper line but now use the coordinates (-125, -40) and (25, -40).

The code to draw the lower line is shown below:

turtle.penup()
turtle.setposition(-125, -40)
turtle.setheading(0)
turtle.pendown()
turtle.forward(100)
turtle.penup()
turtle.setposition(25, -40)
turtle.pendown()
turtle.forward(100)

The generated image is shown below:


To draw the remaining lines we only need the coordinates of the left and right location of the middle semi-circle. These are (-75, -40) and (75, -40). The gap between the two lines is 80 pixels.

The code to complete the shape is shown below:

turtle.penup()
turtle.setposition(-75, -40)
turtle.setheading(90)
turtle.pendown()
turtle.forward(80)

turtle.penup()
turtle.setposition(75, -40)
turtle.setheading(90)
turtle.pendown()
turtle.forward(80)

The final symbol is shown below:


Conclusion

At the end of this section, we have managed to draw the Mmara Krado symbol.

This post is part of the series: Drawing Adinkra Symbols using Python. The goal is to draw 40 Adinkra symbols using the Python programming language.