
Nkyinkyim means "twisting". It is the symbol of that depicts the twists and turns of life.
We will use the 5 pixel grid to trace out this image. The image of this is shown below:

This symbol is simple to draw. It consists of lines. What will make it tricky will be the way the lines change in width.
The plan to draw this symbol is given below:
- Lift up the turtle
- Move the turtle to the position (150, 170)
- Set the pensize to 40 pixels
- Set the heading of the turtle to 180 degrees
- Place the pen down
- Move forward by 300 pixels
- Move backward by 10 pixels
- Set the heading to 270 degrees
- Move forward by 10 pixels
- Change the pen size to 60 pixels
- Move the pen forward by 50 pixels
- Lift up the pen
- Move forward by 10 pixels
- Change the pen size to 40 pixels
- Set the heading to 0 degrees
- Place the pen down
- Move forward by 290 pixels
- Repeat steps 7 to 11
- Repeat steps 12 to 16 but change the heading to 180
- Repeat steps 7 to 11
- Repeat steps 12 to 16
- Repeat steps 7 to 11 however change the number of steps from 50 to 110
- Lift up the pen
- Move backward by 60 steps
- Repeat steps 12 to 16
- Repeat steps 7 to 11 however change the number of steps from 50 to 40
- Lift up the pen
- Change the pen size to 40 pixels
- Move the turtle to the position (-40, -110)
- Change the heading to 270 degrees
- Move forward by 60 pixels
- Lift up the pen
- Change the pen size to 40 pixels
- Move the turtle to the position (40, -110)
- Change the heading to 270 degrees
- Move forward by 60 pixels
Using Turtle Graphics
We will use the template.py file and rename it to nkyinkyim.py.
The code for steps 1 to 6 is given below:
turtle.penup()
turtle.setposition(150, 170)
turtle.pensize(40)
turtle.setheading(180)
turtle.pendown()
turtle.forward(300)
The code for steps 7 to 11 is given below:
turtle.backward(10)
turtle.setheading(270)
turtle.forward(10)
turtle.pensize(60)
turtle.forward(50)
The code for steps 12 to 16 is given below:
turtle.penup()
turtle.forward(10)
turtle.pensize(40)
turtle.setheading(0)
turtle.pendown()
turtle.forward(290)
Step 18 involves us repeating steps 7 to 11 so we copy and paste the code.
We do the same for steps 19, 20 and 21.
The image we have generated so far is shown below:

Executing steps 21 generates the image shown below:

The code for steps 23 and 24 is given below:
turtle.penup()
turtle.backward(60)
Then copy the code for steps 7 to 11 but remember to change the number of steps from 50 to 40.
The generated image is shown below:
The code for steps 27 to 31 is given below:
turtle.penup()
turtle.pensize(40)
turtle.setposition(-40, -110)
turtle.setheading(270)
turtle.pendown()
turtle.forward(60)
The code for steps 32 to 36 is given below:
turtle.penup()
turtle.pensize(40)
turtle.setposition(40, -110)
turtle.setheading(270)
turtle.pendown()
turtle.forward(60)
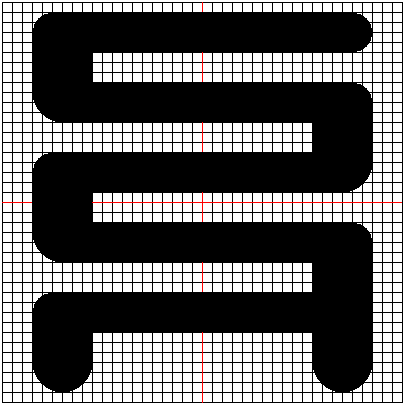
The generated image is shown below:

Conclusion
At the end of this section, we have succeeded in drawing the Nkyinkyim.
No comments:
Post a Comment