Welcome to a new week. Last week, we created the
user interface of the Three Number Average application. By now, I expect that
you have installed BlueStacks based on the instructions given on this blog or
that you have followed the instructions on the App Inventor website and
configured to run your mobile device to run applications.
This week we will be looking how to add events to
our mobile application. This will ensure that when we click the Compute Average
button, the button computes the average of the 3 numbers and displays the
result in our 5th label.
- The textboxes should only allow numbers as input
- The program should only compute the average when all the 3 textboxes are filled
We have ensured the first condition by ensuring that
our textboxes only takes numbers in. To do this we used the NumbersOnly
property for a textbox in App Inventor.
To meet the second condition, we will have to check
that the values in each textbox is not empty. To do this, we first have to
learn about variables, procedures and functions.
Variables,
Procedures and Functions
If you were a librarian and you had a book in a
library and you were searching for a book in the library, the easiest way would
be to check the library reference. All things being equal, a check at the
library reference would reveal the location of your book. Once you have the
location of the book, you can then go to its location to retrieve it.
From the above example, the book you want to
retrieve is a variable. The library reference is a function and you are a
procedure. In computer science terms, a variable is a store of value, a
procedure carries out an action and a function returns a result.
Once you understand how to think in this manner, you
are well on your way to becoming a programmer. Getting this concept is the
hardest step in programming. However, once you do, you can learn how to program
in any language of your choice.
Enough talk. Let’s
get started. Open your browser and visit the App Inventor website (Put link).
You will see a list of projects. My projects list is shown below:
Click on the ThreeNumberAverage on your list. If you
haven’t created any other project, you should have only 1 project listed.
However, if you haven’t created any other project, I must state that I am
disappointed. I told you to create the user interface for your own project. The
best way to learn is by doing.
Once you click on the project, it loads up in the
browser window. My screen is shown below:
To calculate the average of the three numbers, we
have to get the values from their respective text boxes. To do this, we will
need to access the Text property for each Textbox. This is shown below:
We will need four variables to calculate the average
of the three numbers. Remember what I said about naming, our variable names
must make sense to us. Remember that programming isn’t just giving
instructions, it is communication.
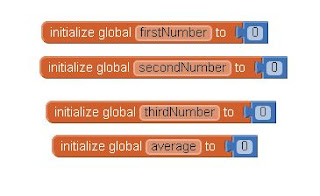
Our variable names are:
- firstNumber
- secondNumber
- thirdNumber
- average
We need just 1 procedure to display the average in
the 5th label. However we will need 2 functions. Our first function
called checkInput will check the textboxes to ensure that all of them have a
number. Since it is a function, it will return either true of false. Once it is
true, we will calculate the average otherwise, we will clear the textboxes and
notify the user of the need to fill all the textboxes.
Programming
Events
The events in App Inventor are found in by clicking
Blocks in our menu. This is shown below:
Right now our Designer window is active. Clicking on
Blocks takes us to our Blocks menu which is shown below:
The Blocks Viewer is empty. This is because we
haven’t done any programming. Do note the dustbin at the corner. It is used to
discard blocks we are no longer using. On the left, you should see a list of
all your components. Look through this list carefully. You will realize that
this is the same list we saw in the designer view.
To create a variable, go to Blocks. Scroll up until
you see the Built-in menu. It is shown below:
Under Built-in, you see a list of stuff you can do.
But where are the functions? In classical computer science, procedures are
different from functions. However, App Inventor considers them the same. They
only vary in usage.
So it begins. In App Inventor, all our programming is
drag and drop. To accomplish this, click on the Variables link. It will bring
up a pop out as shown below:
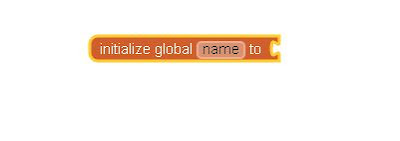
Now drag out the initialize global block to the
white space. Your Blocks area should now look like this:
Next go to Math under the Built-in menu and click on
it. You should see a pop out as shown below:
Drag out the empty block and snap it to the
initialize global name block. Drag out the block with 0 and snap it to the
initialize global name block.
You Block area should be as shown below:
Now click inside the area with name and change the
name to firstNumber. Your Block area will be as shown below:
Do this for your other variables. Your Block area
should be as shown below:
Now we can start. I won’t go over this again. Just
use matching colours to follow along and ask me any questions if you need help.
I can’t promise an immediate response as I work a full time job but I promise
to answer as soon as I am able.
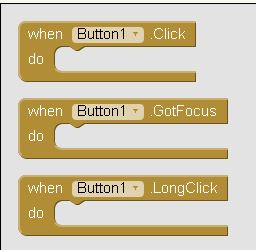
To handle our events, click on Button1, you will see
a pop out as shown below:
Drag out the when Button1.click block into your code
area. This block is called an event listener. Event listeners respond to an
action. The action we want is that when Button1 is clicked, the checkInput function
should first check if the text areas are empty. This function acts like a
sentinel and protects our program.
Creating
the checkInput Function
Our first function works by checking if the contents
of the three textboxes have been filled. If they have been filled, we simply
need to go ahead to calculate the average. Otherwise, we have to clear the text
boxes and display a message to the user.
The code that does
this is shown below:
To create this code, you need to use blocks from the
Procedures, Control, Logic and Text under the Built-in drawer.
I won’t be showing
you how to do this. Did you think this teacher would let you off so easy. Trust
me on this. It isn’t hard to do. However, if you have any problems, Google “how
to create a procedure in App Inventor”. This course is meant to teach you how
to think like a programmer and part of that thought process is the ability to
research. If you find it too hard to do, let me hear from you in the comments.
Debugging
Debugging is the act of getting our programs to work
as expected. Whenever we create programs, it is rare to have them work exactly
as we want them to work. To this end, we need a way to understand what is going
on in our program.
In App Inventor, we debug by using the Notifier
component. It is found under the user interface drawer in App Inventor. Add it
to your Screen. Since it is a non visible component, it will not show on the
screen.
Switch to the block area and drag click on your
Notifier object. Next drag out the ShowAlert block for the Notifier object.
This is shown below:
Note the pouch near notice. It is where we will
place the call to the checkInput function in this pouch.
Click on the Procedures drawer. Now you will see the
call checkInput block.
Drag it out and place it on the pouch of the
ShowAlert block. You code will be as shown below:
To call this block, click on Button1 and drag
out its Click event listener. An event listener waits for an event to occur.
Drag it and place the completed Notifier block inside it. Your code should be
as shown below:
Build your app in App Inventor and test it on
BlueStacks. Your application should look as shown below:
Note that the textboxes have their hints on them
thus showing that they are empty. When you click the Compute Average button,
you should see a popup saying false. When you fill just 1 of the textboxes, the
false still pops up. However, once you fill all 3 textboxes and click on the
Compute Average button.
As always, if you need help, fill them in the
comments and I will get back to you when I can. But search before you ask. That
is what I would do as a programmer.
Creating
the calculateAverage Function
This function takes the values entered by the user
and returns the average. The average is the sum of the numbers divided by 3.
The algorithm for this function is shown below:
- Assign the values in the textboxes to their respective variables
- Add the variables together and divide them by 3
- Assign the value obtained from 2 above to the sum variable
When you drag out the procedure block from Procedure,
to add parameters to it, you need to click on the blue notch on the function
body it will bring out the following:
Now drag the input x block into the inputs block.
Doing this will add your first parameter. This is shown below:
Do this 3 times to and rename your parameters to
firstNumber, secondNumber and thirdNumber. Also rename your procedure to
calculateAverage. Your function should look like below:
Now create the part that will compute our average.
Drag out the get block from the Variables drawer and select firstNumber. Do
this for secondNumber and thirdNumber.
Next go to the Maths drawer and drag out the addition
block. Click on its notch. It will give you this diagram.
The code for the entire function is shown below:
Now add a 3 parameter and place your variables
inside them. Now your function should look like this:
Next in Maths, find a division block. Place this
block into your result and let the above block be on its left and the number 3
on its right. Your final function is shown below:
As always, let me have your questions in the
comments area. The 3 was placed by using the number block found in the Math
drawer.
Your function is complete.
Creating
the displayAverage Procedure
A procedure carries out an action. Our procedure
takes the average as a parameter and displays the result in the 5th
label. This procedure is easy so I will just show the code.
Putting
it all together
Now that we have completed our functions and
procedure, we can create the code for our button. This is shown below:
Build your application. Now you have successfully
created your first application using App Inventor.
Adding
an Application Icon
To customize your application, you need to add an
icon. To do this, go Designer view and click on Screen1.
Browse down to Icon. This is shown below:
When you click inside it, you get a popup as shown
below:
Click on the Upload File button to choose an icon of
your choice. I will use my company logo. So I will navigate to it and load it
up. This is shown below:
Click on the OK button. This will now load our icon.
When we now build our app in BlueStacks or our mobile device, our app icon
should have changed. Try it out yourself.
Conclusion
Congratulations on making it to the end of the
second section of this series. I would be lying to you if I said it wasn’t
long. Take heart in the fact that I wrote it.
I took my time with this section because I wanted to
be sure that we went together. At the end of this section, I expect that the
Three Number Average is running on your setup. Whether you are using BlueStacks
or your mobile device.
What a long post. I now assume you know what to do with App Inventor. If you need help, leave a comment or do a Google Search. Have a great weekend.


Hello,
ReplyDeleteCant find call checkpoint block on app inventor, Somebody help me out.
Thanks
In my own opinion, the Call CheckPoint Block does not exist in App Inventor.
ReplyDeleteWhat exactly do you think it does. Have you checked online if such a block exists?
I was following the ThreeNumberAverage tutorial and the tutorial says i should click and drag the call checkpoint block but all i saw were to procedure do...,to procedure result... and call procedure.I have been stuck here for over 24hrs. Pls what's the way out?Thanks.
DeleteReally appreciate your great works, pls kindly drop your email or whatsapp. Mine idjeemoh@gmail.com my whatsapp, 080 3922 4004.Thanks
Delete