Monday 26 January 2015

How to Install WAMP Server on Windows 8


When doing web programming, the LAMP stack is taken as the default. However, when developing on a Windows machine, you replace the L in LAMP with W and you have WAMP.

WampServer is a bundle for web development for windows. It allows you run your own web server on your local machine. This is great because you can test all your web applications on your website and then upload it to your production environment.

In order to install WampServer on your machine, you need to do  the following:

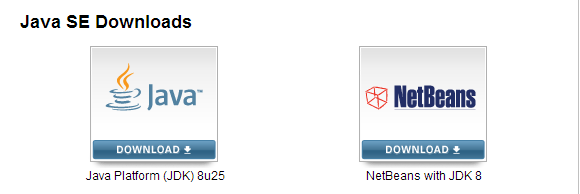
  1. Visit the WampServer  website and click on the Start Using WAMPSERVER button.
  2. It will redirect you to this page
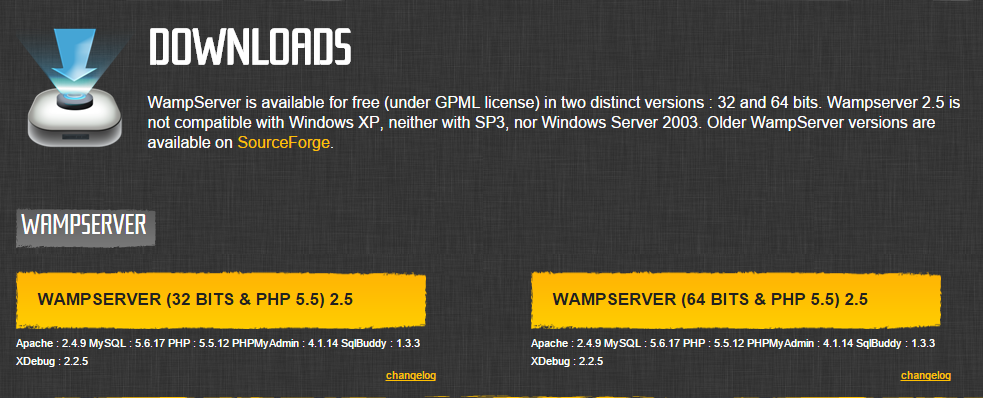
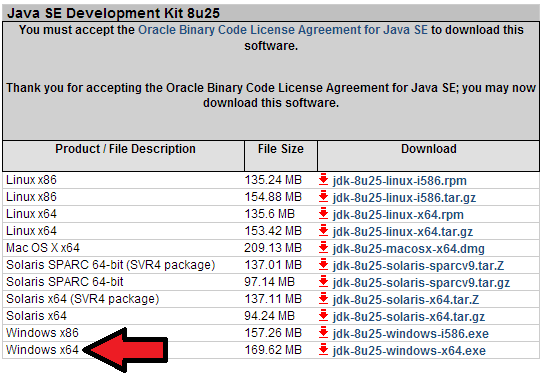
  3. Click the download button for your machine. I am using a 64 bit machine so I will choose that one.
  4. You get the warning below. Read and look for the download directly link.
  5. Clicking on the download link starts your download in your browser window.
  6. Wait for your download to complete. Double click on the file in your browser window.
  7. You get a User Control Notification. Agree to all of them.
  8. The installation starts. Click the next button.
  9. Accept the licence agreement and click next.
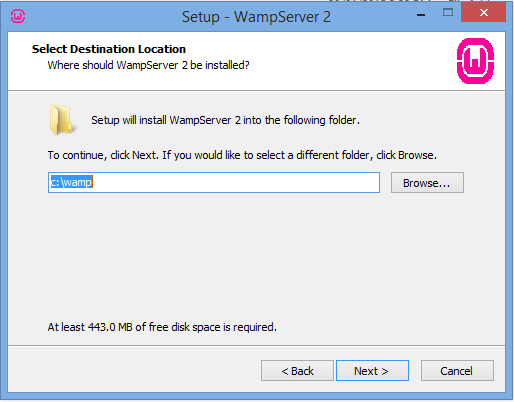
  10. Select the installation destination. I am using the default.
  11. Select additional tasks to be performed. I will choose none because I want to have my WampServer on my start page. Click the Next button.
  12. Your installation is ready to begin. Click on the Install button.
  13. Wait as your installation is progressing.
  14. Once the installation is done, it will ask you to choose your default browser. It like Opera for web development so I will look for it.
  15. Once you do that, your installation concludes. All that is left is to choose your email settings. I will not do that now as we have to configure WAMP to send emails.
  16. Congratulations, you have successfully installed WAMP on your machine.
  17. Launch WampServer on your machine by leaving the check box and clicking finish.
  18. Launching WampServer  brings up the User Control. Agree to everything.
  19. Go to the notification area of your machine and find the WampServer  icon. Left click and put your server online.
  20. Type localhost into your browser window. You will see the screen shown below:
So there you have it. You can now develop web applications on your machine. Next I will explain how to configure your WampServer to send emails.

Saturday 24 January 2015

How to Run Java Programs on Windows 8

public class HelloWorld { 
   public static void main(String[] args) { 
      System.out.println("Hello, World");
   }
}

The above code is for the most basic Java program you can write. All it does is prints out Hello World to the screen.

In order to run the above program, you need to copy the code above and paste it to a file called HelloWorld.java

It is important that you name the file the exact name of your class otherwise you will get an error. Once you do that, save the file in a location you can easily access. I am saving it to my Documents directory.

Follow the following steps to run a Java program on your machine.

  1. Open your command window. This can be done by using Window + R on your machine.
  2. My window take me to my user directory. Use the cd Documents command to get to your documents directory.
  3. Once you are in the Documents directory, run the javac HelloWorld.java command.
  4. If nothing happens, your program is error free. I expect it to be since you are copying my code.
  5. Next run the command java HelloWorld you will see Hello, World on your command window as shown below
There you have it. You can now run Java programs on you machine. Why is this important? It is important because it means that you can use you machine to develop Java applications.

Friday 23 January 2015

How to Add Java to Your Class Path


In the last tutorial. We installed the Java Development Kit on our machine. However, in this tutorial, we are going to modify our classpath.

If you look at the above image, you realize that the javac command doesn't work on command prompt. javac is the command use to instruct the computer to compile a Java program.

In order to set your class path in Java, you first need to right click on you computer icon on your desktop and go to Properties.

Select Advanced system settings. It will bring up a System Properties dialog box as shown below: 


Click on the Environment Variables button. It will bring up another pop up like this:


Create a new system variable called JAVA_HOME by clicking on the New button in the System variables section.
This is why I insisted on setting the installation directory to Java in the last tutorial. Click on OK. Now JAVA_HOME is now a system variable.

Scroll down the System variable area and find the path variable.

Click on the Edit button.
Add this to the end without editing anything -> ;%JAVA_HOME%\bin

Click the OK buttons on all the open dialogs.

To test if you are successful, run the javac command again. It should give you the following output:


Congratulations. You can now run Java programs on your machine.


Wednesday 21 January 2015

How to Install the Java Development Kit on Windows 8


The Java Development Kit is necessary if you want to be able to develop Java applications. In this post. I will go into how to set up your machine for Java development.

The mode of set up I am using is done with the view to preparation for set up of Android on the development machine you are using.

The following steps will enable you develop Java on you machine:

  1. Download the Java Development Kit from the Java website.
  2. Click on the download button of Java logo. Not the Netbeans image. (Netbeans is a Java editor. The only problem with using Netbeans is that you need to keep the option of compiling Java programs without it)
  3. Accept the license to download the Java Development Kit.
  4. Click on the version of Java compatible with your system. I am using a 64 bits machine, so I select the executable file for it.
  5. Wait for your download to conclude in your browser.
  6. Once your download is completed, run the setup by double-clicking on it.
  7. Your setup will bring up the security control. Accept it.
  8. You will see the following screen
  9. Click on the Next button. You will see a screen for choosing your installation path. The most important thing to note here is your installation directory for Java. It is highlighted in red.
  10. Click on the Next button. Your installation will start.
  11. A pop up will come up asking you to install Java to a different location. 
  12. Change this folder to the Java folder. It makes it easier to set your class path.
  13. You will see this screen next.
  14. Congratulations, you have success fully installed the Java Development Kit
Now that the Java Development Kit has been installed, You need to set the class path. This will enable you run Java programs on your machine.

We will do that in the next tutorial.


Saturday 17 January 2015

How to Link Your Blogger Account to Post on Social Media


Running a blog is a means of leveraging on the web. If you want to expand your reach, you need to connect your blog to your social media network.

I just learnt how to do this. I use twitterfeed to link my blog posts to my Twitter, Facebook and LinkedIn pages.

What about Google+ you ask? Well you can do that from Blogger by default.

I hope this helps someone out there.

Friday 16 January 2015

How to Add a Favicon to your Website


A Favicon is that image that appears besides the title of a website in the browser tab. In is a great way to identify your site especially for users that tend to open a lot of tabs when browsing.

Favicon should be 16x16 pixels. For this site, I have highlighted the  Favicon in the picture above. A Favicon  is a great tool to communicate the brand value of your website.

In order to add a Favicon to a website, you need to follow the following steps

  1. Select the image you want to use.
  2. Check the image's properties by right-clicking on it and checking it.
  3. If the image is 16x16 pixels, it is suitable for usage.
  4. Otherwise, use an image editor and shrink it.
  5. Once you have your standard image, go to favicon.cc to change the format to .ico
  6. Name your selected image to be favicon.ico 
  7. Place the favicon.ico image in the root of your website
  8. Refresh your browser
So that is all there is to it. Its easy once you know how.

How to Install Java on Windows 8


Installing Java on a Windows 8 machine is something any serious developer has to do at one point in his career. The reason for this is simple. The Android operating system is based on Java  and sooner or later, you are going to have to interact with it.

Installing Java on your machine is different from installing the Java Development Kit which allows you to develop Java programs on your machine.

Follow the following steps to install Java on your machine

  1. Download Java from the Oracle website by clicking on the Free Java Download Button.
  2. You will be directed to the Java Download Page. Click the Agree and Start Free Download button
  3. It will download the installer to the browser you are using click on that installer
  4. Double click on the installer you downloaded. It will bring up a prompt. Press the install button to start the installation
  5. The installation would run in the background. When it is done, A new window will pop up. It will look like this.
  6. You will get a prompt to install Java in your browser.
  7. Click on it.
  8. Reload your page to activate it
  9. Open a command prompt window and type in java. You will get a response like this
  10. Congratulations. You have successfully installed Java.

Monday 12 January 2015

Installing the Brackets Code Editor


Brackets is a free open source code editor for frontend web development. It allows you code in HTML, CSS and JavaScript by using an improved workflow.

Normally when you are working on frontend development, Your normal workflow is to edit your files, save changes and then refresh your browser. With Brackets you simply activate live preview and as you make your changes in the code editor, it reflects in the browser.

In order to use the live preview feature in Brackets, you need to have Google Chrome already installed. This is because Brackets runs as a chrome extension. I will assume that you have Google Chrome already installed.

The following steps allow you install Brackets on your computer.


  1. Download Brackets from the website. This will allow you have a copy locally. The website is brackets.io.
  2. Click on the download button.
  3. Wait for the download to complete
  4. Go to your downloads folder
  5. Double click on the installation folder. It will bring up destination folder. I will use the defaults.
  6. Click on the install button
  7. Wait for the progress bar to bring a pop up for your user account control and verify it.
  8. Click the finish button to complete your installation.
So there you have it. You have successfully installed Brackets. Find it and launch it. Do have fun coding.