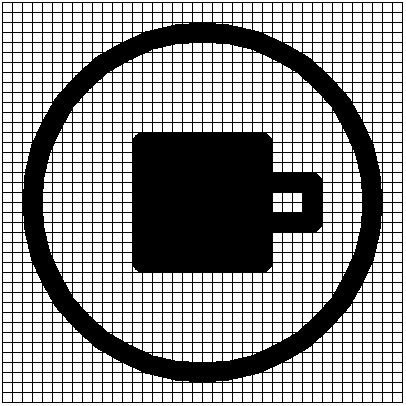
Dame Dame means "chequered or checkered" as in the pattern on a chess or draught board. It is the symbol of intelligence, ingenuity, and strategy.
We will use a grid of 5 pixels to trace out the image. The image of this is shown below:
This symbol consists of an outer circle with an inner square, lines and rectangles. It is quite straightforward to draw it.
The plan to draw this shape is as follows:
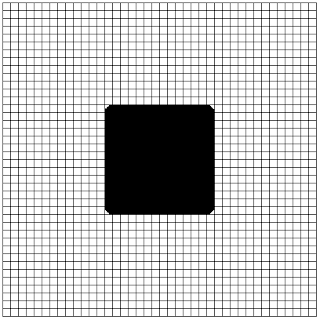
- Draw the inner filled square
- Draw the outer circle
- Draw the rectangle and line for the position where the rectangle faces right
- Draw the rectangle and line for the other heading positions
Before we start, note that the size of the line of the shape is 2 squares. For the size we intend to draw the shape at, this means that we must change the size of our pen to match 2 squares in our grid.
Using Turtle Graphics
In the last section we used a 400 X 400 pixel grid. We will also use it here. Copy out all the code from the top until you get to the section for the command to draw the grid. You will have a grid as shown below:
From this point on, we shall use the 400 X 400 pixel grid. So copy the code that achieved the grid into a file and call it template.py.
Rename the template.py file to damedame.py and let’s get ready to code.
The first thing we are to do is to set the pensize to 20 pixels.
The code to do this is shown below:
turtle.pensize(20)
The left hand side of the square starts from (-60, 60). So we need to move the turtle there. The code to do this is shown below:
turtle.setposition(-60, 60)
Next we begin the fill. Before we do that, we need to also place the pen down. The code to do this is shown below:
turtle.pendown()
turtle.begin_fill()
Now we can start drawing the square. We start by drawing from its current position. The turtle is 120 pixels in length so we move our turtle forward by 120 pixels. The code to do this is shown below:
turtle.forward(120)
Next we turn right by 90 degrees. The code to do this is shown below:
turtle.right(90)
We do this 3 more times. A much more efficient way to do this would be to use a loop. I will leave that up to you. The rest of the code will now be:
turtle.forward(120)
turtle.right(90)
turtle.forward(120)
turtle.right(90)
turtle.forward(120)
turtle.right(90)
Now we can end the fill. The code to do this is shown below:
turtle.end_fill()
Our generated shape is now as shown below:
Next we draw the circle. The position of the circle is at 170 pixels from the center of the circle.
Our first step will be to lift up our pen. The code to do this is shown below:
turtle.penup()
Next we move it to the place on the grid where (0, 170). The code to do this is shown below:
turtle.setposition(0, -170)
Now we place the pen down. The code to do this is shown below:
turtle.pendown()
Next we draw a circle of radius 170. The code to do this is shown below:
turtle.circle(170)
Our generated image now becomes:
The next step is to draw the remaining parts. We will start with the part for where the rectangle is facing right.
Here all we have to do is repeat the steps that drew the square. Our first step would be to lift up the pen. The code to do this is shown below:
turtle.penup()
Next we set the heading of the turtle to 0 degrees. The code to do this is shown below:
turtle.setheading(0)
Now we move the turtle to the upper position to start drawing the line. This is at the end of the filled square. The coordinate of this location is (60, 20). The code to do this is shown below:
turtle.setposition(60, 20)
We now place our pen down. The code to do this is shown below:
turtle.pendown()
We move forward by 50 pixels. The code to do this is shown below:
turtle.forward(50)
Turn right and move forward by 40 pixels. The code to do this is shown below:
turtle.right(90)
turtle.forward(40)
Turn right again and move forward by 50 pixels. The code to do this is shown below:
turtle.right(90)
turtle.forward(50)
The generated shape is shown below:
Now lift up the pen. The code to do this is shown below:
turtle.penup()
Next set the heading back to 0 degrees. The code to do this is shown below:
turtle.setheading(0)
Move the pen to the position where the coordinate is (110, 0). The code to do this is shown below:
turtle.setposition(110, 0)
Place the pen down. The code to do this is:
turtle.pendown()
Move forward by 50 pixels. The code to do this is:
turtle.forward(50)
The generated image is now:
We go on to create the others. The remaining are for the Up, Left and Down directions with headings of 90, 180 and 270 degrees respectively.
Drawing the rectangle and line in all the directions is a simple algorithm which is given below:
- Lift up the pen
- Set the heading
- Move to the leftmost position for the rectangle
- Place the pen down
- Move forward by 50 pixels
- Turn the turtle by 90 degrees to the right
- Move forward by 40 pixels
- Turn the turtle by 90 degrees to the right
- Move forward by 50 pixels
- Lift the pen
- Set the heading
- Place the pen down at the position midway from its outer edge
- Move forward by 50 pixels
If we do this steps for all the directions, we will complete our shape. The hard part would be to figure out the position for the leftmost part for the triangle as found in step 3. Once we achieve that, the rest is easy.
For the up direction, the coordinate for the leftmost part is (-20, 60). The code to draw its own rectangle and line is:
turtle.penup()
turtle.setheading(90)
turtle.setposition(-20, 60)
turtle.pendown()
turtle.forward(50)
turtle.right(90)
turtle.forward(40)
turtle.right(90)
turtle.forward(50)
The generated image is now shown below:
At this stage, we have executed 9 steps in our algorithm. Before we complete the remaining steps, we need to find the coordinates of the position described in step 12 of our algorithm. The coordinates of this point for the up position are at (0, 110).
The remaining steps in our code will now be:
turtle.penup()
turtle.setheading(90)
turtle.setposition(0, 110)
turtle.pendown()
turtle.forward(50)
The generated image is shown below:
We repeat our drawing algorithm for the left direction. The coordinates of the leftmost part is (-60, -20). The code to draw its own rectangle and line is:
turtle.penup()
turtle.setheading(180)
turtle.setposition(-60, -20)
turtle.pendown()
turtle.forward(50)
turtle.right(90)
turtle.forward(40)
turtle.right(90)
turtle.forward(50)
The generated image is shown below:
At this stage, we have executed 9 steps in our algorithm. Before we complete the remaining steps, we need to find the coordinates of the position described in step 12 of our algorithm. The coordinates of this point for the up position are at (-110, 0).
The remaining steps in our code will now be:
turtle.penup()
turtle.setheading(180)
turtle.setposition(-110, 0)
turtle.pendown()
turtle.forward(50)
The generated image will now be:
To complete the image, we repeat our drawing algorithm for the down direction. The coordinates of this part is (20, -60). The code to draw its own rectangle and line is:
turtle.penup()
turtle.setheading(270)
turtle.setposition(20, -60)
turtle.pendown()
turtle.forward(50)
turtle.right(90)
turtle.forward(40)
turtle.right(90)
turtle.forward(50)
The image generated is now shown below:
At this stage, we have executed 9 steps in our algorithm. Before we complete the remaining steps, we need to find the coordinates of the position described in step 12 of our algorithm. The coordinates of this point for the up position are at (0, -110).
The remaining steps in our code will now be:
turtle.penup()
turtle.setheading(90)
turtle.setposition(0, -110)
turtle.pendown()
turtle.forward(50)
The generated image is now shown below:
Conclusion
At the end of this post, we have successfully used the Python turtle environment to draw the Dame Dame symbol.
It is inspiring to think of architecture based on this symbol. It would be an edifice to behold. A 3D model of this would be a great first step.