- Draw the centre circle
- Draw a semi-circle in the upper left quadrant at an angle of 45 degrees to the centre circle
- Draw a line from the circle to the semi-circle you drew in 2 above
- Repeat for the remaining quadrants
- Stop
The above steps make up an algorithm. An algorithm is a sequence of precise instructions that solves a problem or performs a computation.
The centre circle has a radius of 7 squares. Since each square is 5 pixels, this is 35 pixels.
For the semi-circle in the upper left hand corner, when you move clockwise, its coordinates start from (-16.5, 3) to (-3, -16.5). This values are relative to the size of the pixels used for drawing your grid. In my case, I simply counted the number of lines in the grid.
Moving from the upper left hand corner to the upper right hand corner, the coordinates of semi-circle start from (3, 16.5) to (16.5, 3). We take the coordinates in a clockwise direction. If you doubt the results I have, take the image and do it yourself.
Moving on to the bottom right corner, the coordinates of the semi-circle start from (16.5, -3) to (3, -16.5).
The bottom left has the coordinates of its semi-circle start from (-3, 16.5) and go to (-16.5, 3).
From this point on, all we have to do is to multiply the value of the coordinates with the size of our grid in order to replicate this symbol.
Using Turtle Graphics
In the last section where we drew the Adinkrahene, we used a grid of 500 X 500 pixels. In this section, we shall use a grid of 400 X 400 pixels. The reason for this is to make drawing the shape easier as we have decimal values as part of our coordinates.
The steps to drawing a grid are:
- Draw a square of the required length
- Divide the square horizontally by the specified number of squares
- Divide the square vertically by the specified number of squares
Drawing a Square
In the Introduction of this series I drew a grid using some repetitive code. Today, that is not the case as I have refactored the code for this using a function.
The code for this are shown below:
def drawSquare(length):
turtle.reset()
turtle.penup()
turtle.setposition(-length/2.0, length/2.0)
turtle.pendown()
for i in range(0, 4):
turtle.forward(length)
turtle.right(90)
turtle.penup()
turtle.home()
Most of this code is easy enough to understand. All you need to do is to check out the Turtle graphics documentation. There are enough examples online on how to create a function in Python.
I will only mention the turtle.home() command which returns the turtle to the center of the screen.
Dividing the Square Horizontally
The code to do this is placed in a function. The code is shown below:
def drawHorizontalLine(length, division):
pixelSpace = length / division
half = length / 2
for j in range((-half + pixelSpace), half, pixelSpace):
turtle.penup()
turtle.setposition(-half, j)
turtle.pendown()
turtle.forward(length)
turtle.penup()
turtle.home()
The function drawHorizontalLine has two parameters: length and division. The length is the length of the side of the grid while the division is how many squares you want the grid to be divided into.
Dividing the Square Vertically
The code to do this is placed in a function. The code is shown below:
def drawVerticalLine(length, division):
pixelSpace = length / division
half = length / 2
turtle.right(90)
for k in range((-half + pixelSpace), half, pixelSpace):
turtle.penup()
turtle.setposition(k, half)
turtle.pendown()
turtle.forward(length)
turtle.penup()
turtle.home()
Be careful with the indentation of your code.
Running Your Code
Now that we are done with the functions for our grid, we only need to call the functions in our code.
The code to do this is:
drawSquare(400)
drawHorizontalLine(400, 40)
drawVerticalLine(400, 40)
Our grid is now drawn across the screen as shown below:

Now we have a grid of 400 X 400 pixels divided into 40 sections. This means that the size of each pixel is 10 pixel. We will use this value to multiply all the values we got from out image.
Laying The Framework
Before we can start drawing, we need to draw diagonal lines from one end of the grid to another.
Before we can do this, we need to look at the documentation for Turtle graphics on how we can change the pencolor of the turtle.
The function to test for this is the colormode. Run this code in your Python shell:
turtle.colormode()
If it returns the value of 1.0, run this code to change it:
turtle.colormode(255)
Now change the colour by using RGB values. For the pencolor, I want it to be red the value of red is (255, 0, 0). So run this code:
turtle.pencolor(255, 0, 0)
The next thing we need to do is to draw a line between the two points. This image from Math Open Reference explains it all.

To find the length between the two points, we will use the above formula. For the sake of simplicity, I will not create a Point class although I will state it here that the Java programming language comes with one in-built.
Before we can create a new function, some housekeeping is in order. The first thing we need to do is to get the Maths module into our script.
To do this, go to the top of the script and type:
import math
Next create the code for your function. The code is shown below:
Now move your arrow to the upper left hand corner of the grid. Since we know its dimensions, the code to do this is:
turtle.penup()
turtle.setposition(-200, 200)
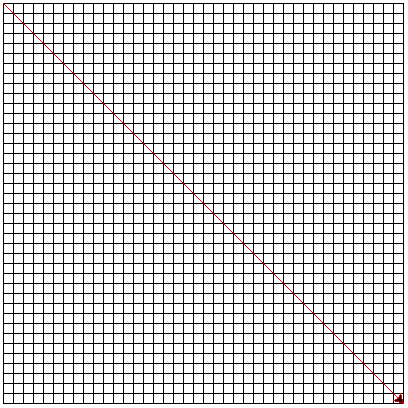
Set the angle of the turtle to be 135 degrees. Next, draw a line from the upper left hand side to the bottom right hand side.
The code to do this is shown below:
turtle.setheading(315)
diagonalLength = coordinateDistance(-200, 200, 200, -200)
turtle.pendown()
turtle.forward(diagonalLength)
This code will give us the horizontal line from the upper left hand corner to the lower right hand corner as shown below:
Next we will need to move our turtle from this position to any of the other edges. Due to my preference, I will choose the lower left hand corner and draw a line from the lower left hand corner to the upper right hand corner. The code to do this is given below:
turtle.setheading(45)
diagonalLength = coordinateDistance(-200, -200, 200, 200)
turtle.pendown()
turtle.forward(diagonalLength)
This will now create the image shown below:

Next we bring the turtle back to the center of the screen using the turtle.home() command.
Change the pencolor of the turtle using this command:
turtle.pencolor(0, 0, 0)
Draw The Centre Circle
To draw the centre circle, you have to remember that the number of squares covered by the radius of the circle is 7.
With this in mind, you have to multiply this by 10 so the size of the circle that you are trying to draw is 70 pixels.
To draw a circle of this radius, you move the turtle to the point on the grid where the value of x is 0 and that of y is -70. The code for this is:
turtle.penup()
turtle.setposition(0, -70)
Unlike the circle we drew when we were drawing the Adinkrahene symbol, this symbol will need to be filled in its centre.
To do this, when need to use the fill property of Turtle graphics. This will allow us to draw a shape that will be filled.
To draw a filled circle, we need to begin the fill, draw the circle and then end the fill. The code to do this is shown below:
turtle.pendown()
turtle.begin_fill()
turtle.circle(70)
turtle.end_fill()
Our drawing now becomes:

Draw The Quadrant Semi-Circles
Next we go to the upper left quadrant. The first thing we need to do is to draw a line from where the semi-circle should start from to where it will end.
To do this, we move our mouse to the lower position. The coordinates of this position are at (-16.5, 3) since our grids are 10 pixels each, we multiply by 10.
So we have to move our mouse to the position where (-165, 30) and draw a line to (-30. -165). The code to do this is shown below:
turtle.penup()
turtle.setposition(-165, 30)
turtle.setheading(45)
diagonalLength = coordinateDistance(-165, 30, -30, 165)
turtle.pendown()
turtle.forward(diagonalLength)
Our drawing now becomes:

Next we go to the location where the turtle stops and we change the heading of the turtle. The heading determines the direction in which your turtle will head.
When our code draws the line, we what it to also draw a semi circle from that point back to the starting point. The code to do this is shown below:
turtle.penup()
turtle.setposition(-30, 165)
turtle.pendown()
turtle.setheading(135)
turtle.begin_fill()
turtle.circle(diagonalLength/2, 180)
turtle.end_fill()
Note the heading of 135. This is because the default position of the turtle is taken at 0 degrees. This code will create the image shown below:

Now that we have gotten this far. All that is left is to draw the line from the centre of the circle to somewhere within the semi-circle. We don’t have to be exact as the default colour is black.
However, we have to make the turtle go to the centre of the screen, increase our pensize to 30, set the heading to 135 degrees and draw a line from the centre of the screen to a distance of 0.75 times the diagonalLength variable.
The code that does this is shown below:
turtle.penup()
turtle.home()
turtle.setheading(135)
turtle.pendown()
turtle.pensize(30)
turtle.forward(diagonalLength * 0.75)
The drawing now becomes:

Now we go to step 4 of the algorithm which is to repeat this for the remaining quadrants. Now that we are done with the upper left hand corner, this is easy.
We will move from the upper left quadrant to the upper right quadrant. We shall complete the symbol by drawing it in a clockwise manner.
The sequence to draw the remaining 3 attachments to the symbol is given below:
- Draw a line from the most clockwise point to the next point
- Move the position of the turtle back to the next point
- Set the heading of your turtle to the angle of the line crossing through your quadrant
- Draw the filled semi-circle
- Move back to the centre of the circle
- Increase the pensize to 30
- Draw a line to the semi-circle
If we follow the above steps the requisite number of times, we would have successfully drawn our shape.
The coordinates for the points the upper right semi-circle should pass through are (3, 16.5) to (16.5, 3). The size of a square on our grid is 10 pixels so we just have to multiply by 10.
The code for this is shown below:
turtle.penup()
turtle.home()
turtle.pensize(1)
turtle.setposition(30, 165)
turtle.setheading(-45)
diagonalLength = coordinateDistance(30, 165, 165, 30)
turtle.pendown()
turtle.forward(diagonalLength)
It produces the image shown below:

The code to draw the filled semi-circle is shown below:
turtle.penup()
turtle.setposition(165, 30)
turtle.pendown()
turtle.setheading(45)
turtle.begin_fill()
turtle.circle(diagonalLength/2, 180)
turtle.end_fill()
It produces the image shown below:

The final steps are easy enough. We move the turtle back to the centre of the circle, increase the pensize and draw a line to the centre of the circle.
The code to do this is shown below:
turtle.penup()
turtle.home()
turtle.setheading(45)
turtle.pendown()
turtle.pensize(30)
turtle.forward(diagonalLength * 0.75)
Our image now becomes:

To repeat the drawing in the lower right quadrant, we need to repeat the 3 steps. The coordinates for the point are from (16.5, -3) to (3, -16.5). We just need to multiply by 10 because the size of each square is 10 pixels.
The code to draw the line is shown below:
turtle.penup()
turtle.home()
turtle.pensize(1)
turtle.setposition(165, -30)
turtle.setheading(-135)
turtle.pendown()
turtle.forward(diagonalLength)
We no longer need to calculate the diagonalLength value as the shape is symmetrical.
The image we generate is shown below:

Next we draw the semi-circle. The code to do this is shown below:
turtle.penup()
turtle.setposition(30, -165)
turtle.pendown()
turtle.setheading(-45)
turtle.begin_fill()
turtle.circle(diagonalLength/2, 180)
turtle.end_fill()
The image generated is shown below:

Now we need to draw the line from the centre to the semi-circle. The code to do this is shown below:
turtle.penup()
turtle.home()
turtle.setheading(-45)
turtle.pendown()
turtle.pensize(30)
turtle.forward(diagonalLength * 0.75)
Our image now becomes:

To complete our drawing, we need to draw the last part of the symbol. This is in the lower left corner.
The first step is to draw the from (-30, 165) to (-165, -30). The code to do this is shown below:
turtle.penup()
turtle.home()
turtle.pensize(1)
turtle.setposition(-30, -165)
turtle.setheading(135)
turtle.pendown()
turtle.forward(diagonalLength)
This will give us the image shown below:

Next we draw the semi-circle. The code to do this is shown below:
turtle.penup()
turtle.setposition(-165, -30)
turtle.pendown()
turtle.setheading(225)
turtle.begin_fill()
turtle.circle(diagonalLength/2, 180)
turtle.end_fill()
Our image now becomes:

Now we draw the line from the centre of the circle to the semi-circle. The code to do this is shown below:
turtle.penup()
turtle.home()
turtle.setheading(225)
turtle.pendown()
turtle.pensize(30)
turtle.forward(diagonalLength * 0.75)
Our image now becomes:

Conclusion
At the end of this post, we have successfully use the Python turtle environment to draw the Akoma Ntoaso symbol.
I will admit that this was a long post. However, if you have followed this post to the end, you will see how beautiful it was to create this symbol using code.
I plan to draw 25 Adinkra shapes in this series. So I have 23 more to go. See you next week.