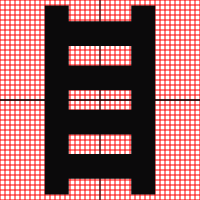
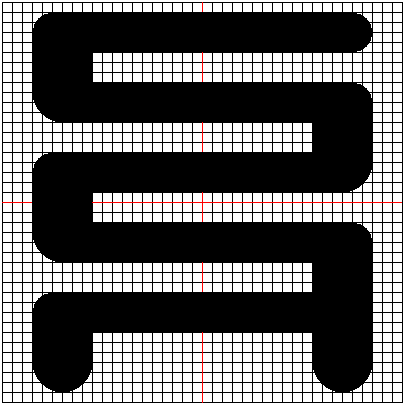
Nyame Nnwu Na Me Wu means "God never dies, therefore I cannot die". It is the symbol of God's omnipresence and the perpetual existence of man's spirit. This signifies the immortality of man's soul, believed to be a part of God. Because the soul rests with God after death, it cannot die.
We will use the 5 pixel grid to trace out this image. The image of this is shown below:
This function is a composite made up of circles and line. We need to know where the circles are in order to draw this shape.
The plan to draw this symbol is given below:
- Lift up the pen
- Change the pen size to 10 pixels
- Draw the upper left circle
- Draw the lower left circle
- Draw the upper right circle
- Draw the lower right circle
- Change the pen size to 30 pixels
- Draw a line from the upper left circle to the lower right circle
- Draw a line from the upper right circle to the lower left circle
- Change the pen size to 10 pixels
- Change its colour to white
- Draw a line from the upper left circle to the lower right circle
- Draw a line from the upper right circle to the lower left circle
Using Turtle Graphics
We will use the template.py file and rename it to nyame.py.
The code for the first two steps is given below:
turtle.penup()
turtle.pensize(10)
To draw the upper left circle, we have to know its position. The position of the upper left circle is at (-125, 70). The circle has a radius of 50 pixels.
The code to draw the circle is as follow:
turtle.penup()
turtle.setposition(-125, 75)
turtle.pendown()
turtle.circle(50)
The position of the lower left circle is at (-125, -180). The code to draw it is given below:
turtle.penup()
turtle.setposition(-125, -175)
turtle.pendown()
turtle.circle(50)
The position of the upper right circle is at (125, 70). The code to draw it is given below:
turtle.penup()
turtle.setposition(125, 75)
turtle.pendown()
turtle.circle(50)
The position of the lower right circle is at (125, -180). The code to draw it is given below:
turtle.penup()
turtle.setposition(125, -175)
turtle.pendown()
turtle.circle(50)
The generated image is shown below:
At step 7 we lift up the pen and increase the pen size to 30 pixels. The code to do this is shown below:
turtle.penup()
turtle.pensize(30)
The coordinate of the point for the joining line between the upper left circle and the lower right circle is (-90, 90) and (90, -90).
We will use the coordinateDistance function to find the distance between the two points since we already know the the orientation between them is a factor of 45 degrees. The code to do this is written below:
pointDistance = coordinateDistance(-90, 90, 90, -90)
Now that we know the distance between the 2 points, we move the pen back to the upper left circle and set its heading to -45 degrees. The code to do this is shown below:
turtle.setposition(-90, 90)
turtle.setheading(-45)
turtle.pendown()
turtle.forward(pointDistance)
The generated image is shown below:

We lift up the pen and move it to the upper left quadrant. We set the orientation of the turtle to 225 degrees and we draw the line. The code to do this is shown below:
turtle.penup()
turtle.setposition(90, 90)
turtle.setheading(225)
turtle.pendown()
turtle.forward(pointDistance)
The generated image is shown below:

Now we are at step 10. The code to change the pen size to 10 pixels is given below:
turtle.penup()
turtle.pensize(10)
To change the colour of the pen to white, the code to do this is shown below:
turtle.color(“white”, “white”)
Now the pen will be moved back to the position we drew from in both cases. Then we will place the pen down, move backward by 10 pixels and move forward by 10 pixels. This will help to clean out the blot lines. The code to do this is shown below:
turtle.setposition(-90, 90)
turtle.setheading(-45)
turtle.pendown()
turtle.backward(10)
turtle.forward(pointDistance + 20)
We repeat this steps again but this time we move the turtle to the upper right circle. The code for this is shown below:
turtle.penup()
turtle.setposition(90, 90)
turtle.setheading(225)
turtle.pendown()
turtle.backward(10)
turtle.forward(pointDistance + 20)
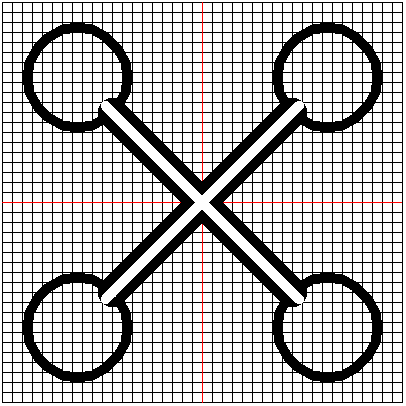
The generated image is shown below:
Conclusion
We have finished drawing the basic shape. A technique to make it perfect would be to initially draw the circles as filled shapes.
This symbol is truly deep.