Monday 25 July 2016

Android Development for Everyday People - Game Development II


Welcome to the 9th week. It has been hard ride making it far but together we've made it. I am grateful that at last this series is finally rounding up.


The algorithm to create the entire game starts with what actions must be carried out when a pot is clicked by the user and it is given below:
  1. Check if the pot is empty or has seeds inside it
  2. If the pot has seeds inside it, check the number of seeds it has
  3. Pick the seeds from the pot the user selected
  4. Distribute the seeds picked from the pot to its neighbouring pots in ascending order one pot at a time until all the seeds are finished. Cycle back from pots 12 to 1. Drop a seed into each pot.
  5. If the last seed is placed on a pot with no seed, stop the seed distribution.
  6. Else if the last seed is placed in a pot with 3 seeds in it, capture the seeds, assign it to the player's score and end the distribution.
  7. Else pick the seeds from the pot and repeat step 4.
  8. Assign seeds that reach up to 4 during distribution to the player who owns the pot the belong to and capture them.

In our last post, we covered steps 1 to 4. Now we will do the remaining steps and complete our game.
In order to complete our game, I needed to add 4 extra variables. They are:
  1. playerID which is used to identify whose turn it is to play
  2. distributionInProgress which prevents the user from clicking a pot while seeds are being distributed
  3. playerOneScore which is the score for the first player
  4. playerTwoScore which is a score for the second player

The variables are thus shown below:
It is important to remember that we are making a two player game so these variables  must be included in our game.

When our game loads up, we want it to display instructions that the player 1 should start the game. This is also the reason why our playerID variable is initialized to 1. To this end we will create the code for that part of the program first. The code for when our game starts is shown below:

Next we need to ensure that our pots cannot be clicked while the seed distribution is ongoing. To do this, create a new variable called distributionInProgress and set its value to false. Next we check if this value is whenever a pot is touched by any of the users. Our code for all our pots now becomes as shown below:
So as long as the distribution of seeds is in progress, the players cannot select a seed. They have to wait for the seed distribution to be completed.

When a distribution of seeds is not ongoing, you can then assign the potID to the setPotID procedure. Your setPotID procedure needs to notify the user when they select a pot with no seeds. But that’s not all. Because we are making a two player game, we need to know at each point of the game who’s turn it is to play.

To do this, we create a new function called getPlayerID which will allow us know the ID for the player whose turn it is.

As a result of this, we have to change our setPotID procedure from what we had last week. Our new procedure is shown below:

The new additions are the if block to check who’s turn it is to play and the getPlayerID function.

We do this to ensure that the user can only select from their own pots. In our game pots 1 to 6 are assigned to the first player while pots 7 to 12 are assigned to the second player.

Our getPlayerID function is simple enough. It uses the potID assigned from the pot selected by the user to get whose turn it is. When our potID is less than 7, then return a playerID of 1. Otherwise, return a playerID of 2.

The code to do this is shown below:

Once we have the playerID, we can pick the seeds in the pot and start the seed distribution. In the last post, we had solved this problem but we didn’t continue the distribution once it ended.

We made a slight change to our distributeSeeds function. In this function we now set the distributionInProgress variable to true.

To make the distribution continue, we must modify our Clock1 code. The first part of the code will now test for when the distribution lands in a pot with no seeds. This is the stopping condition for the loop.

The code to do this is shown below:

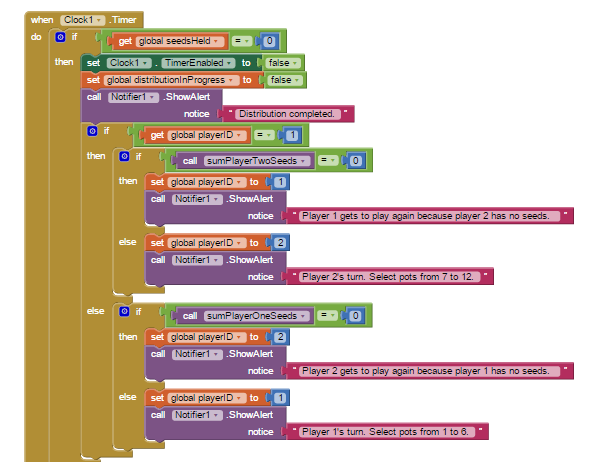
The moment the seed distribution lands on a pot with no seeds, we have to stop the seed distribution. Stopping our distribution means that we disable Clock1, set the distributionInProgress variable to false and notify the user that the distribution has ended.

Our first condition after this is to check which player has just played. Next we also need to check if the number of seeds in the opponent’s pots is equal to zero. If that is the case, we simple skip the turn of the opponent and allow our user play again.

The functions sumPlayerTwoSeeds and sumPlayerOneSeeds checks if the number of seeds in the respective pots of the second player and the first player are 0.

So for sumPlayerOneSeeds we find the total of the contents of the pot list from index 1 to 6. For sumPlayerOneSeeds we find the total of the contents of the pot list from index 7 to 12. Although not shown at this point, we have another function called sumTotalSeeds which sums all the elements from index 1 to 12. I won’t show you the code for these 3 functions. I leave this as an exercise for you.

For the next case where the number of seeds held in the pot is not 0, our code is shown below:

When on the other hand the seedsHeld is not 0, we need to move on to the next pot and add 1 to the pots in the next pot. This is the same logic as we had in the previous post. For the distribution to progress however, we need to determine if the conditions for it to continue are met.

The moment when the seedsHeld variable is zero after the execution of the code above it is the moment we need to test if we are to continue the distribution or not.

For the first test where the potSeeds variable is greater than 1 and not equal to 4, it means that our loop can continue. All we need to do is set the seedsHeld variable to the seeds in our currentPot and continue the loop. To display this to the user, we Clock1 and start Clock2. This way, the seeds the seed distribution and the flipping of images.

When our potSeeds are equal to 1, it means that all the program needs to do is stop the seed distribution as the distribution got to an empty pot. To do this, we assign the value of 0 to the variable seedsHeld which will stop the Clock1 timer when the timer is active again.

When the potSeeds are equal to 4, it means that the distribution of the player landed on a pot with 3 seeds. In such a case, we have a seed capture and we assign the seeds captured to the score of the player who played the move.

For our last case when the potSeeds are equal to 4 but our seedsHeld variable is not equal to 0, it means that the seeds used in the distribution have not been exhausted. However, a pot has been filled with 4 seeds and so we must capture the pots in that seed. The seed from that pot are assigned to the owner of the pot.

Without a second clock Clock2 to perform seed capture, the whole process would execute quicker than the eye can see. With our second clock we slow down this process and make it such that the user can see how the seeds in a pot are picked.

The code to do this is shown below:

The first part of the code picks the seeds in the pot that has the ID of the currentPot. Next we activate Clock1 and deactivate Clock2. We then test for the condition we need to follow to do the scoring.

When the seedsHeld variable is 0, it means that the distribution ended and the player who played should have his score updated. However, when the potSeeds is 4, it means that in the course of distribution, the seeds in the pot became 4 and so we simply have to add to the score of the pot owner.

scorePlayer is a procedure to add to the score of the player who’s turn it was that lead to seed capture. The code is self explanatory and is shown below:

scorePotOwner is a procedure to add to the score of the owner of the pot whose seeds have been increased up to 4 during the seed distribution. In this case the distribution would continue but we have to stop seed distribution and score the owner of the pot. The code to do this is shown below:

sumTotalSeeds is a function that calculates the total of all the seeds in the game board. I asked you to create this earlier so now you get to use it. The easiest way to do this is to sum all the values of the individual elements of the list. So this will be your task.

gameOver is a procedure to end the game. It shows a notification screen and displays who the winner of the game is. It is simple enough and the code is shown below:

Conclusion
This week we finished the game but there is still a lot of room for improvement before this game is ready for prime time.

I have left the sumPlayerOneSeeds, sumPlayerOneSeeds and sumTotalSeeds functions as exercises for you to do in order to have a complete working program. You didn’t think it would be that easy did you?

Next week, I will round up on this series. All our projects are done. Thank you for sticking with me this far. See you next week.

Wednesday 6 July 2016

Android Development for Everyday People - Game Development I


Welcome to a new month. Its been a while since my last post and with this post, we are on our 8th post. Work has been busy with the school calendar ending, we are focussed on preparing for summer.

No course on Android development would be complete without covering game development. There is an abundance of materials covering this online and I decided that rather than rehash this materials, I would add my voice to the mix.

The above game is called Ise. It is played by my people who are from Edo state in Nigeria. The Ghanaian version is called Oware.

The wikipedia page is somewhat detailed on how to play the game. The key to creating this game is the design of its algorithm.

Game play starts by picking a pot and moving anti clockwise in your seed distribution. The pots on the lower side of the board will belong to one player and the other one to the next player. We will be creating a two player version of this game.

Following the NICE methodology, all that remains is to create our user interface. In my case, I used images I could find online for figures. I named them with the image value for example an image that would display zero would be named 0.jpg because it would allow us map the changes to the pots easier.

To represent the board, I decided to use a list. Lists have already been introduced to you so I thought it would be a nice way to extend your knowledge. Our list would represent the internal state of the board.

A key component of programming is our ability to model the real world in a way that makes the computer understand it. Doing this successfully requires an understanding of how to represent objects in the real world to a computer.

For our board, this representation is made using the list. It is simple and easy enough to represent reality and can be tweaked to work for our purposes.

The algorithm to create the entire game starts with what actions must be carried out when a pot is clicked by the user and it is given below:

  1. Check if the pot is empty or has seeds inside it
  2. If the pot has seeds inside it, check the number of seeds it has
  3. Pick the seeds from the pot the user selected
  4. Distribute the seeds picked from the pot to its neighbouring pots in ascending order one pot at a time until all the seeds are finished. Cycle back from pots 12 to 1. Drop a seed into each pot.
  5. If the last seed is placed on a pot with no seed, stop the seed distribution.
  6. Else if the last seed is placed in a pot with 3 seeds in it, capture the seeds, assign it to the player's score and end the distribution.
  7. Else pick the seeds from the pot and repeat step 4.
  8. Assign seeds that reach up to 4 during distribution to the player who owns the pot the belong to and capture them.
The above steps will not be implemented all at once. We will cover steps 1 to 4 in this blog post and the remaining steps in part II.

Since we know the name of our game, our first step would be to create our user interface for our board. The way to go about this is to use the first 2 components which can be found under the Drawing and Animation components of your Palette drawer. These is shown below:


Drag the Canvas component from the Palette drawer and set its Width and Height to fill parent. When creating games in App Inventor, your Canvas component is your drawing surface.

Next drag out 14 ImageSprites and name them in the following order:


The user pots containing 0 would be named for the players scores. The one on your right should be called player1Pot as it will keep track of the score for player 1 while the one on your right should be called player2Pot. The picture properties of the ImageSprite is used to change the image displayed by the ImageSprite components that we are using.


We name our pictures for the value of our pots using this format of matching our numerical value to the number displayed on the image as this will help us program a procedure to flip our images to the values of the board. In all, you would need 49 images to do this as you must be able to display from 0 to 48.

Extra components would include a Notifier component and a Clock. The Notifier component would be used to display a message to the user while our Clock would be used to slow down the distribution process and make it visible to the eye. For our Clock we disable its TimerAlwaysFires and TimerEnabled properties by unchecking them.

Programming

The first thing we want to program would be our list the code to do this is shown below:


Once we are done with our list, we need 4 variables to get our program working. Our variables are shown below:


When a pot is clicked, our first task is to get its potID which is also the index of the pot in the list we created. This will help us have a reference for the pot that was clicked by the user. To do this, we will use a procedure which will get the potID of the pot that was clicked by the user and assign it to the currentPot variable that we have created. Create a shell procedure with potID as an input parameter and use it for this purpose. Do this for all 12 of your pots. For my first 3 pots, the code is shown below:


Our setPotID procedure takes the potID as an input parameter and assigns the currentPot variable to it. The seeds held by the pot are calculated using the seedsHeld function which also takes in potID as an input parameter.

If the seeds held by the selected pot is 0 (meaning that the pot is empty), we notify the user to select another pot. Otherwise, we pick the seed in that pot and distribute our seeds. The code for the setPotID procedure is shown below. Ensure to use skeleton blocks for the procedures or functions not yet covered.


Our seedsHeld function works by returning the value of the element at the index. The difference between functions and procedures is that functions return a value while procedures carry out an action. The code for this function is shown below:


Our pickSeeds procedure works on the model of the board to the computer and its visual representation to the user. This procedure is designed to pick the seeds in the pot selected by the user so that distribution of the seeds can start. To do this, it must replace the value of seeds held by the pot in the list to 0 and change the image displayed for the seeds held by the pot in the list.


The changeImage procedure is used by the pick seeds method to change the image for a pot. It works matching the imageValue to the picture in our media library. We use the trim function to prevent any surprises. The changeImage procedure is shown below:


The distributeSeeds procedure is a simple procedure that activates your Clock component. All it does is set the TimerEnabled property of your Clock component to True so that your clock can start. Since your TimeInterval property is 1000 or 1 second, it means that your clock will fire every second. The code for the procedure is given below:


Once your Clock is activated, it will fire every second and continue seed distribution until the number of seeds held is 0. In a way, our clock acts like a loop but it is a timed loop. Once the seeds held is 0, the Clock will be disabled and the user will be notified the the distribution of seeds has stopped.


As long as the number of seeds held is greater than 0, we will have to get the next pot for us to distribute our seed to. This is important because the limit of our board is 12 and we must ensure that the distribution loops back to 1 once we get to 12. For our next pot, we add a seed to it and then we subtract 1 from the number of seeds held. Finally, we set our nextPot to our currentPot and continue until our seeds held is 0.

Our getNextPot function uses the modulus operator. The modulus operator is an operator that returns the remainder of the division of two numbers. For example 10 modulus 3 returns 1. A modulus of 0 means that the first number is divisible by the second number. We use this in our program to make our pot distribution cycle back from 12 to 1. The code for this is shown below:


The addSeeds procedure gets the number of seeds in our pot and adds 1 to it. For now we are not implementing the capture part but next week, we will complete the program and this procedure will help us implement capture. The code to do this is shown below:


Conclusion

This week we implemented a simple game using App Inventor. The game Ise belongs to the Mancala family of games.

We have created the basic code covering steps 1 to 4 of our algorithm, next week we will conclude this game.

By now, I expect that you would have completed your first Android application. If you haven't you could create an Android program that tests if a number is even or odd.

When we come back next week, we will be concluding this game and rounding up this series. Do have a great weekend.