Tuesday 8 May 2018

This is Not the End


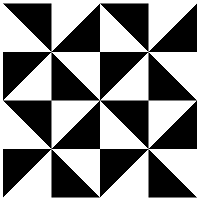
If you've seen the Black Panther movie, the scene where Prince T'Challa returns home shows the Wawa Aba symbol.

This is the first time an Adinkra symbol is shown in the movie.

The Wawa Aba is the symbol of symbol of hardiness, toughness and perseverance. It literally means "seed of the wawa tree".

The seed of the wawa tree is extremely hard. In Akan culture, it is a symbol of someone who is strong and tough. It inspires the individual to persevere through hardship

The symbol is shown below:


This series was borne out of a desire to fight for the little bits of African culture that remain after the last 500 years of devastation.

The search is on for what parts of our cultural heritage we can use to build the life of our dreams. Everywhere you look, the African lives without quality and dignity.

However, we cannot be aided into development. Any sustainable development must come from within. I believe that the key to unlocking our potential lies in remembering the past.

As at this writing the movie Black Panther has become the ninth-highest-grossing film of all time.

Its success points to the fact that there is a hunger for content that elevates African dignity.

A lot has been lost. To bemoan the past would be to lose sight of the battles we can win right now.

The battles we can win right now are the battle against our ignorance of self, a lack of unity and a lack of support for the little we have left.

This is Not the End.

But for this blog, this series has come to an end. I will be reviewing and rewriting the contents of Drawing Adinkra Symbols using Python on my author platform later in the year.

I am a recipient of the Google Africa Challenge Scholarship Program so I will be out of action for the next 2 months. I need to focus that time on finishing the course as best as I can.

So my journey on this blog has come to an end.

I shall condense the contents of this series into 42 blog posts as soon as I get back from participation in Phase 1 of the Google Africa Challenge Scholarship Program.

You can sign up for my newsletter to stay in touch.

It's been 46 weeks since I started this series. I am grateful to be able to close the curtain on it.

See you at my author platform.

This post is part of the series: Drawing Adinkra Symbols using Python. The goal is to draw 40 Adinkra symbols using the Python programming language.

Sunday 6 May 2018

UAC Nkanea


UAC Nkanea means "UAC lights". It is the symbol of technological advancement.

Several of the symbols in the adinkra cloths record social changes that have been brought about by both external and internal factors.

For example, the Aban (Castle, Fortress), Kuronti ne Akwamu (Council of State), Ohene Tuo (King’s Gun), UAC Nkanea (UAC Lights), Benz, Television, Kookoo Dua (Cocoa Tree), and Sedee or Serewa (Cowrie Shell) symbols record specific technological developments and historical events that led to particular changes and factors that influenced the direction of such changes in the Asante (Akan) and Ghanaian society.

We will use the 5 pixel grid to trace out this image. The image of this is shown below:


The plan to draw this shape is given below:
  1. Set the pensize to 40 pixels
  2. Lift the pen up
  3. Starting with the part of the symbol in the upper left quadrant, change the heading to the heading for the starting point in that quadrant
  4. Move it to the starting point for the quadrant
  5. Place the pen down
  6. Move forward by 90 pixels
  7. Turn right by 90 degrees
  8. Move forward by 170 pixels
  9. Turn right by 90 degrees
  10. Move foward by 120 pixels
  11. Move backward by 30 pixels
  12. Turn left by 90 degrees
  13. Move forward by 90 pixels
  14. Repeat steps 2 to 12 changing the heading for the quadrant
Using Turtle Graphics

We will use the template.py file and rename it to uac.py.

The code for step 1 is shown below:

turtle.pensize(40)

Steps 2 to 13 repeat so we will use a function that draws the portion of the shape in a quadrant.

The code for the function is shown below:

def drawInQuadrant(x, y, heading):
    turtle.penup()
    turtle.setposition(x, y)
    turtle.setheading(heading)
    turtle.pendown()
    turtle.forward(90)
    turtle.right(90)
    turtle.forward(170)
    turtle.right(90)
    turtle.forward(120)
    turtle.backward(30)
    turtle.left(90)
    turtle.forward(90)
The code to call the function is shown below:

drawInQuadrant(-170, 80, 90)

The generated image is shown below:


To draw the remaining parts of the symbol, we need the coordinates of the remaining points and their respective headings.

Moving in a clockwise fashion, they are:
  1. (80, 170) with heading 0
  2. (170, -80) with heading 270
  3. (-80, -170) with heading 180
The code to call the functions is shown below:

drawInQuadrant(80, 170, 0)
drawInQuadrant(170, -80, 270)
drawInQuadrant(-80, -170, 180)

The generated image is shown below:


Conclusion

At the end of this section, we have successfully drawn the UAC Nkanea symbol.

This post is part of the series: Drawing Adinkra Symbols using Python. The goal is to draw 40 Adinkra symbols using the Python programming language.

Som Onyankopon


Som Onyankopon means "Worship God". It is the symbol of devotion to God.

We will use the 5 pixel grid to trace out this image. The image of this is shown below:


The plan to draw this shape is given below:
  1. Lift up the pen
  2. Set the pensize to 40 pixels
  3. Draw the vertical line at the centre
  4. Draw all the U shaped figures
  5. Draw the horizontal line

Using Turtle Graphics

We will use the template.py file and rename it to som.py.

The code for steps 1 and 2 are shown below:

turtle.penup()
turtle.pensize(40)

To draw the vertical line, we move the turtle to the position (0, 160) and move forward by 140 pixels.

The code to do this is shown below:

turtle.setposition(0, 160)
turtle.pendown()
turtle.setheading(270)
turtle.forward(220)

The generated image is shown below:


Working from the bottom, we shall draw the U shaped symbols and then the final horizontal line.

To draw the first U shape, we move the turtle to the position (-40, -80), move 80 pixels, turn to the left by 90 degrees and move another 80 pixels.

The code to do this is shown below:

turtle.penup()
turtle.setposition(-40, -80)
turtle.pendown()
turtle.setheading(270)
turtle.forward(80)
turtle.left(90)
turtle.forward(80)
turtle.left(90)
turtle.forward(80)

The generated image is shown below:


To draw the lower U shaped symbol, we need to move the turtle to the position (-130, 0) and repeat the steps above only that instead of 80 pixels when we turn, we move by 260 pixels.

The code to do this is shown below:

turtle.penup()
turtle.setposition(-130, 0)
turtle.pendown()
turtle.setheading(270)
turtle.forward(80)
turtle.left(90)
turtle.forward(260)
turtle.left(90)
turtle.forward(80)

The generated image is shown below:


To draw the low U shaped symbol, we need to move the turtle to the position (-80, 80) and repeat the steps above only that instead of 80 pixels when we turn, we move by 160 pixels.

The code to do this is shown below:

turtle.penup()
turtle.setposition(-80, 80)
turtle.pendown()
turtle.setheading(270)
turtle.forward(80)
turtle.left(90)
turtle.forward(160)
turtle.left(90)
turtle.forward(80)

The generated image is shown below:


To draw the horizontal line, we move the turtle to the position (-40, 120). Place the pen down, set the orientation of the turtle to 0 degrees and move forward by 80 pixels.

The code to do this is shown below:

turtle.penup()
turtle.setposition(-40, 120)
turtle.pendown()
turtle.setheading(0)
turtle.forward(80)

The generated image is shown below


Conclusion

At the end of this section, we have successfully drawn the Som Onyankopon symbol.
It looks like a catcus tree to me but also like a cathedral.
This post is part of the series: Drawing Adinkra Symbols using Python. The goal is to draw 40 Adinkra symbols using the Python programming language.

Sepow


Sepow means "Executioner's knife". It is the symbol of A symbol of justice.

We will use the 5 pixel grid to trace out this image. The image of this is shown below:


The plan to draw this shape is given below:
  1. Lift up the pen
  2. Set the pensize to 30 pixels
  3. Move the pen to the location of the leftmost part of the triangle
  4. Find the distance and the angle between the leftmost part and the topmost part
  5. Draw the triangle
  6. Draw the circle
Using Turtle Graphics

We will use the template.py file and rename it to sepow.py.

Steps 1 and 2  are simple, we only need to lift up the pen. The code to do this is shown below:

turtle.penup()
turtle.pensize(30)

The leftmost tip of the pen is at (-105, -20) to find the optimal position of the pen, we must add 15 pixels to it. This gives us: (-90, -5).

Compensating for the position of the pen, the coordinate of the topmost position is (0, 175).

The function to find the angle between the two points is given below:

def angleBetweenPoints(x1, y1, x2, y2):
    myradians = math.atan2(y2 - y1, x2 - x1)
    angle = math.degrees(myradians)
    return angle
The function to find the distance between the two point is given below:

def coordinateDistance(x1, y1, x2, y2):
    dx = x1 - x2
    dy = y1 - y2
    D = math.sqrt((dx * dx) + (dy * dy))
    return D
To use the above functions, we use the code shown below:

angle = angleBetweenPoints(-90, -5, 0, 175)
length = coordinateDistance(-90, -5, 0, 175)

To draw the triangle, we use the code shown below:

turtle.setposition(-90, -5)
turtle.pendown()
turtle.setheading(angle)
turtle.forward(length)
turtle.setheading(360 - angle)
turtle.forward(length)
turtle.setheading(180)
length = coordinateDistance(-90, -5, 90, -5)
turtle.forward(length)

The generated image is shown below:


Drawing the circle is quite easy. We move the turtle to the position (85, -90) and draw a circle of radius 85 pixels.

The code to do this is shown below:

turtle.penup()
turtle.setposition(85, -90)
turtle.pendown()
turtle.setheading(90)
turtle.circle(85)

The generated image is shown below:


Conclusion

At the end of this section, we have successfully drawn the Sepow symbol.

This post is part of the series: Drawing Adinkra Symbols using Python. The goal is to draw 40 Adinkra symbols using the Python programming language.

Friday 4 May 2018

Kyemfere


Kyemfere means "Potsherd". It is the symbol of experience, knowledge, service, antiquity, time, heirloom and rarity.

We will use the 5 pixel grid to trace out this image. The image of this is shown below:


The plan to draw this shape is given below:
  1. Divide the symbol into 4 equal parts
  2. Get the coordinates of the centers of the 4 quadrants
  3. Lift up the pen
  4. Place the pen in center of the upper left quadrant
  5. Move to the top left corner of the upper left quadrant
  6. Place the pen down
  7. Set the heading of the pen to 315 degrees
  8. Draw a line from the top left corner to the bottom right corner
  9. Set the heading of the pen to 180 degrees
  10. Move forward to the length of the middle of the center of the quadrant
  11. Set the heading of the pen to 90 degrees
  12. Move forward to the end of the length of the symbol
  13. Set the heading for the pen to 180 degrees
  14. Move forward by half of the length of the symbol
  15. Fill the shape
  16. Lift up the pen
  17. Place the pen in the right upper quadrant
  18. Place the pen down
  19. Set the heading of the pen of the pen to 225 degrees
  20. Draw a line from the upper right quadrant to the lower left quadrant
  21. Set the heading of the pen to 90 degrees
  22. Move forward by half of the length of the side of the quadrant
  23. Set the heading of the pen to 0 degrees
  24. Move forward by the length of the quadrant
  25. Set the heading of the pen to 90 degrees
  26. Move forward by half of the length of the quadrant
  27. Fill the shape
  28. Repeat steps 3 - 27  for the remaining quadrants
Using Turtle Graphics

We will use the template.py file and rename it to kyemfere.py.

The first step of our plan is manual. We have to find the center of the symbols in all the quadrants.

The image is divided into 4 parts as shown below:


The coordinates of the centers of the quadrants starting from the upper right quadrant and moving clockwise are: (-95, 95), (95, 95), (95, -95) and (-95, -95).

Now we lift up the pen and move it to the position of the center of the first quadrant. The code to do this is shown below:

turtle.penup()
turtle.setposition(-95, 95)

The top left corner of the quadrant is at (-190, 190) we move the pen to that position and set the heading of the pen to 45 degrees. We then find the length from the top left corner to the center of the entire symbol. The code to do this is shown below:

turtle.setposition(-190, 190)
turtle.pendown()

Before we can draw a line from the upper left quadrant to the center of the symbol, we need to use the coordinateDistance function to find the distance between the two points. The code for the function is shown below:

def coordinateDistance(x1, y1, x2, y2):
    dx = x1 - x2
    dy = y1 - y2
    D = math.sqrt((dx * dx) + (dy * dy))
    return D
length = coordinateDistance(-190, 190, 0, 0)

To place the pen down you use the code shown below:

turtle.pendown()

We set the heading of the pen and we move from the top left corner of the quadrant to the center of the symbol. The code to do this is shown below:

turtle.setheading(315)
turtle.forward(length)

Now that the shape is done, we need to fill it. To fill the shape, we place the turtle.begin_fill() and turtle.end_fill() functions before and at the end of the drawing code.

The generated image is shown below:


The code for steps 16 to 27 is shown below:

turtle.begin_fill()
turtle.penup()
turtle.setposition(0, 190)
turtle.pendown()
turtle.setheading(225)
turtle.forward(length)
turtle.setheading(90)
turtle.forward(95)
turtle.setheading(0)
turtle.forward(190)
turtle.setheading(90)
turtle.forward(95)
turtle.end_fill()

The generated image is shown below:


The rest is easy. We simply need to move the turtle to where we want it to be in order to draw the other parts of the symbol.

We will move to the upper right quadrant and draw the first half of the symbol in that quadrant. The code to do this is shown below:

turtle.begin_fill()
turtle.penup()
turtle.setposition(95, 95)
turtle.setposition(0, 190)
turtle.pendown()
turtle.setheading(315)
turtle.forward(length)
turtle.setheading(180)
turtle.forward(95)
turtle.setheading(90)
turtle.forward(190)
turtle.setheading(180)
turtle.forward(95)
turtle.end_fill()

The generated image is shown below:


The code to complete the upper left quadrant is shown below:

turtle.penup()
turtle.begin_fill()
turtle.setposition(190, 190)
turtle.pendown()
turtle.setheading(225)
turtle.forward(length)
turtle.setheading(90)
turtle.forward(95)
turtle.setheading(0)
turtle.forward(190)
turtle.setheading(90)
turtle.forward(95)
turtle.end_fill()

The generated image is shown below:


From this stage onwards, I will batch together the code that draws the remaining quadrants.

The code to draw the lower right part is shown below:

turtle.begin_fill()
turtle.penup()
turtle.setposition(0, 0)
turtle.pendown()
turtle.setheading(315)
turtle.forward(length)
turtle.setheading(180)
turtle.forward(95)
turtle.setheading(90)
turtle.forward(190)
turtle.setheading(180)
turtle.forward(95)
turtle.end_fill()

turtle.penup()
turtle.begin_fill()
turtle.setposition(190, 0)
turtle.pendown()
turtle.setheading(225)
turtle.forward(length)
turtle.setheading(90)
turtle.forward(95)
turtle.setheading(0)
turtle.forward(190)
turtle.setheading(90)
turtle.forward(95)
turtle.end_fill()

The generated image is shown below:


The code to draw the lower left symbol is shown below:

turtle.begin_fill()
turtle.penup()
turtle.setposition(-190, 0)
turtle.pendown()
turtle.setheading(315)
turtle.forward(length)
turtle.setheading(180)
turtle.forward(95)
turtle.setheading(90)
turtle.forward(190)
turtle.setheading(180)
turtle.forward(95)
turtle.end_fill()

turtle.penup()
turtle.begin_fill()
turtle.setposition(0, 0)
turtle.pendown()
turtle.setheading(225)
turtle.forward(length)
turtle.setheading(90)
turtle.forward(95)
turtle.setheading(0)
turtle.forward(190)
turtle.setheading(90)
turtle.forward(95)
turtle.end_fill()

The generated symbol is shown below:


Conclusion

In this section we cover how to draw the Kyemfere symbol using the Python programming language.

This post is part of the series: Drawing Adinkra Symbols using Python. The goal is to draw 40 Adinkra symbols using the Python programming language.

Owia A Repue


Owia A Repue means "Rising Sun". It is the symbol of progress, renewal, development, warmth, vitality, and energy.

We will use the 5 pixel grid to trace out this image. The image of this is shown below:


The plan to draw this shape is given below:

  1. Lift up the mouse
  2. Place the turtle at the left tip of the symbol
  3. Find the angle and length between the position of the turtle and the next point.
  4. Draw a line from the left tip to the next point
  5. Move the turtle to the next point
  6. Continue steps 3 to 5 until you get to the middle point of the shape
  7. Draw the rest of the shape
  8. Fill up the shape

Using Turtle Graphics

We will use the template.py file and rename it to owia.py.

In all the entire shape is made up of 10 lines on the side before the centre line. We shall name the angles and lengths from 1 to 10.

Starting from the left hand side, we have 11 points of interest. Their coordinates are given below:
  1. (-180, -145)
  2. (-150, -125)
  3. (-200, -75)
  4. (-150, -75)
  5. (-190, -10)
  6. (-130, -20)
  7. (-165, 55)
  8. (-80, 10)
  9. (-90, 100)
  10. (-30, 50)
  11. (0, 160)
I think its high time to create a function to find the angle between two points. I will call this function angleBetweenPoints.

The code for this function is shown below:

def angleBetweenPoints(x1, y1, x2, y2):
    myradians = math.atan2(y2 - y1, x2 - x1)
    angle = math.degrees(myradians)
    return angle
Now that we have created our function, we have all we need to complete the drawing of this symbol.

To get the length, we reuse the code for the coordinateDistance function which is shown below:

def coordinateDistance(x1, y1, x2, y2):
    dx = x1 - x2
    dy = y1 - y2
    D = math.sqrt((dx * dx) + (dy * dy))
    return D
The first step in the algorithm is to lift up the turtle. The code to do this is shown below:

turtle.penup()

Next we move the turtle to the first position on our list which is (-180, -145). The code to do this is shown below:

turtle.setposition(-180, -145)

We find the angle and the length between the first and second position using the code shown below:

angle1 = angleBetweenPoints(-180, -145, -150, -125)
length1 = coordinateDistance(-180, -145, -150, -125)

We do this for the rest of the angles and lengths of the symbol. The code for this is shown below:

angle2 = angleBetweenPoints(-150, -125, -200, -75)
length2 = coordinateDistance(-150, -125, -200, -75)

angle3 = angleBetweenPoints(-200, -75, -150, -75)
length3 = coordinateDistance(-200, -75, -150, -75)

angle4 = angleBetweenPoints(-150, -75, -190, -10)
length4 = coordinateDistance(-150, -75, -190, -10)

angle5 = angleBetweenPoints(-190, -10, -130, -20)
length5 = coordinateDistance(-190, -10, -130, -20)

angle6 = angleBetweenPoints(-130, -20, -165, 55)
length6 = coordinateDistance(-130, -20, -165, 55)

angle7 = angleBetweenPoints(-165, 55, -80, 10)
length7 = coordinateDistance(-165, 55, -80, 10)

angle8 = angleBetweenPoints(-80, 10, -90, 100)
length8 = coordinateDistance(-80, 10, -90, 100)

angle9 = angleBetweenPoints(-90, 100, -30, 50)
length9 = coordinateDistance(-90, 100, -30, 50)

angle10 = angleBetweenPoints(-30, 50, 0, 160)
length10 = coordinateDistance(-30, 50, 0, 160)

Now that we have all the angles we need, we can start drawing the symbol. The code to do this is shown below:

turtle.pendown()
turtle.begin_fill()
turtle.setheading(angle1)
turtle.forward(length1)
turtle.setheading(angle2)
turtle.forward(length2)
turtle.setheading(angle3)
turtle.forward(length3)
turtle.setheading(angle4)
turtle.forward(length4)
turtle.setheading(angle5)
turtle.forward(length5)
turtle.setheading(angle6)
turtle.forward(length6)
turtle.setheading(angle7)
turtle.forward(length7)
turtle.setheading(angle8)
turtle.forward(length8)
turtle.setheading(angle9)
turtle.forward(length9)
turtle.setheading(angle10)
turtle.forward(length10)
turtle.setheading(360 - angle10)
turtle.forward(length10)
turtle.setheading(360 - angle9)
turtle.forward(length9)
turtle.setheading(360 - angle8)
turtle.forward(length8)
turtle.setheading(360 - angle7)
turtle.forward(length7)
turtle.setheading(360 - angle6)
turtle.forward(length6)
turtle.setheading(360 - angle5)
turtle.forward(length5)
turtle.setheading(360 - angle4)
turtle.forward(length4)
turtle.setheading(360 - angle3)
turtle.forward(length3)
turtle.setheading(360 - angle2)
turtle.forward(length2)
turtle.setheading(360 - angle1)
turtle.forward(length1)
turtle.end_fill()

The generated image is shown below:


Conclusion

At the end of this section, we have successfully drawn the Owia A Repue symbol. It is the last hard symbol to draw. From this point on, the rest is easy. 3 more to go.

This post is part of the series: Drawing Adinkra Symbols using Python. The goal is to draw 40 Adinkra symbols using the Python programming language.

Thursday 3 May 2018

Obohemmaa


Obohemmaa means "diamond". It is the symbol for precious items.

We will use the 5 pixel grid to trace out this image. The image of this is shown below:


The plan to draw this shape is given below:

  1. Lift up the pen
  2. Find the angle and length between the leftmost position and the top of the symbol
  3. Draw the entire shape and fill it

Using Turtle Graphics

We will use the template.py file and rename it to obohemmaa.py.

The code to lift up the pen is shown below:

turtle.penup()

The coordinate of the leftmost part of the symbol is (-100, 0). The coordinate for the topmost part of the symbol is (0, 200).

The code to find the angle is shown below:
myradians = math.atan2(200 - 0), 0 - (-100))
angle = math.degrees(myradians)

To find the distance between the two points we use the coordinateDistance function. The code for it is shown below:

def coordinateDistance(x1, y1, x2, y2):
    dx = x1 - x2
    dy = y1 - y2
    D = math.sqrt((dx * dx) + (dy * dy))
    return D
We call the function using the code shown below:

length = coordinateDistance(-100, 0, 0, 200)

The rest is easy. The code to draw the entire shape is shown below:

turtle.penup()
turtle.setposition(-100, 0)
turtle.begin_fill()
turtle.pendown()
turtle.setheading(angle)
turtle.forward(length)
turtle.setheading(360 - angle)
turtle.forward(length)
turtle.setheading(180 + angle)
turtle.forward(length)
turtle.setheading(180 - angle)
turtle.forward(length)
turtle.end_fill()

The generated image is shown below:


Conclusion

At the end of this section, we have succeeded in drawing the Obohemmaa symbol.

This post is part of the series: Drawing Adinkra Symbols using Python. The goal is to draw 40 Adinkra symbols using the Python programming language.

Nya Gyidie


Nya Gyidie means "have faith". It is the symbol of faith.

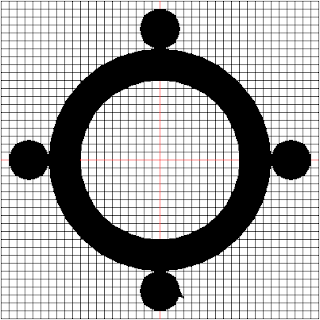
We will use the 5 pixel grid to trace out this image. The image of this is shown below:


The plan to draw this shape is given below:

  1. Lift up the pen
  2. Set the pensize to 40
  3. Draw the large circle
  4. Set the pensize to 1
  5. Draw the outer circles
  6. Draw the inner square
  7. Draw the supporting shape

Using Turtle Graphics

We will use the template.py file and rename it to nya.py.

The for the first two lines is shown below:
turtle.penup()
turtle.pensize(40)

To draw the large circle we need to move the turtle to the position (120, 0) and draw a circle of radius 120 pixels.

The code to do this is shown below:

turtle.setposition(120, 0)
turtle.setheading(90)
turtle.pendown()
turtle.circle(120)

The image generated is shown below:


To draw the outer circles we need to get the coordinates of the right most sides of the circles.

Starting from the right and moving anticlockwise, they are (190, 0), (25, 165), (-140, 0) and (25, -165).

The code to draw the outer circles is shown below:

turtle.pensize(1)

turtle.penup()
turtle.begin_fill()
turtle.setposition(190, 0)
turtle.setheading(90)
turtle.pendown()
turtle.circle(25)
turtle.end_fill()

turtle.penup()
turtle.begin_fill()
turtle.setposition(25, 165)
turtle.setheading(90)
turtle.pendown()
turtle.circle(25)
turtle.end_fill()

turtle.penup()
turtle.begin_fill()
turtle.setposition(-140, 0)
turtle.setheading(90)
turtle.pendown()
turtle.circle(25)
turtle.end_fill()

turtle.penup()
turtle.begin_fill()
turtle.setposition(25, -165)
turtle.setheading(90)
turtle.pendown()
turtle.circle(25)
turtle.end_fill()

The generated image is shown below:


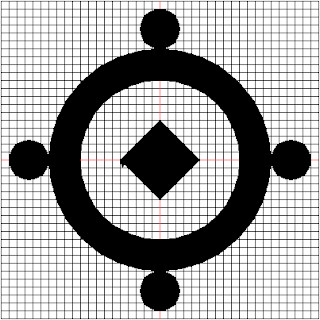
To draw the inner square, we need to move our turtle to the leftmost part of the square and find the angle as well as the length of the side.

The coordinate for the leftmost side is (-50, 0) while the coordinate for the uppermost part is (0, 50).

The code to find the angle between the two points is shown below:

myradians = math.atan2(50 - (0), 0 - (-50))
angle = math.degrees(myradians)

To find the length between the two sides, we need to use the coordinateDistance function. The code for it is shown below:

def coordinateDistance(x1, y1, x2, y2):
    dx = x1 - x2
    dy = y1 - y2
    D = math.sqrt((dx * dx) + (dy * dy))
    return D
We call the function using the code shown below:

length = coordinateDistance(-50, 0, 0, 50)

The code to draw the square is shown below:

turtle.penup()
turtle.setposition(-50, 0)
turtle.begin_fill()
turtle.pendown()
turtle.setheading(angle)
turtle.forward(length)
turtle.setheading(360 - angle)
turtle.forward(length)
turtle.setheading(180 + angle)
turtle.forward(length)
turtle.setheading(90 + angle)
turtle.forward(length)
turtle.end_fill()

The generated image is shown below:


Drawing the upper filled quadrant is not difficult. The quadrant starts at (-40, 90) and heads to the point (0, 50) where it joins the upper tip of the inner square.

To draw this quadrant we move the pen to the position (-40, 90) and draw a line to the point (0, 50). Then we draw the line back to the point (40, 90) where the quadrant ends. The fill property of Python turtle will fill the quadrant for us.

The code to do this is shown below:

turtle.setposition(-40, 90)
turtle.pendown()
turtle.begin_fill()
turtle.setheading(inclineAngle)
turtle.forward(inclineLength)
turtle.setheading(360 - inclineAngle)
turtle.forward(inclineLength)
turtle.end_fill()

The generated image is shown below:


To draw the lower filled quadrant, we need to use the same principles we use to draw the top quadrant.

The code for this is shown below:

turtle.penup()
turtle.setposition(-40, -90)
turtle.pendown()
turtle.begin_fill()
turtle.setheading(360 - inclineAngle)
turtle.forward(inclineLength)
turtle.setheading(360 + inclineAngle)
turtle.forward(inclineLength)
turtle.end_fill()

The generated image is shown below:


To close the gaps in the shape we need to use the fill property.

Move the turtle back to the position of the right hand of the upper triangle. Set the heading to 90 degrees and move forward by 10 pixels.

The code to do this is shown below:

turtle.penup()
turtle.setposition(40, 90)
turtle.setheading(90)
turtle.pendown()
turtle.begin_fill()
turtle.forward(10)
turtle.left(90)
turtle.forward(80)
turtle.left(90)
turtle.forward(10)
turtle.left(90)
turtle.forward(80)
turtle.end_fill()

The generated image is shown below:


The code to draw the lower filled quadrant is shown below:

turtle.penup()
turtle.setposition(-40, -90)
turtle.setheading(270)
turtle.pendown()
turtle.begin_fill()
turtle.forward(10)
turtle.left(90)
turtle.forward(80)
turtle.left(90)
turtle.forward(10)
turtle.left(90)
turtle.forward(80)
turtle.end_fill()

The generated image is shown below:


Conclusion

At the end of this section we have successfully drawn the Nya Gyidie symbol.

This post is part of the series: Drawing Adinkra Symbols using Python. The goal is to draw 40 Adinkra symbols using the Python programming language.

Saturday 28 April 2018

Nteasee


Nteasee means "understanding". It is the symbol of understanding and cooperation.

We will use the 5 pixel grid to trace out this image. The image of this is shown below:


The plan to draw this shape is given below:

  1. Lift up the pen
  2. Set the pensize to 40 pixels
  3. Draw the upper prong
  4. Draw the lower prong
  5. Draw the upper arrow
  6. Draw the lower arrow
  7. Draw the middle hexagon

Using Turtle Graphics

We will use the template.py file and rename it to nteasee.py.

The code for the first two steps are shown below:

turtle.penup()
turtle.pensize(40)

To draw the upper prong, we must move the pen to the position (-70, 180). We do this because the pensize is 40 pixels and will take up a space of 20 pixels when it is placed down.

We place the pendown and move forward by 130 pixels, turn left by 90 degrees, move forward by 140 pixels, turn left by 90 degrees and move forward by 130 pixels.

The code to do this is shown below:

turtle.setheading(270)
turtle.setposition(-70, 180)
turtle.pendown()
turtle.forward(130)
turtle.left(90)
turtle.forward(140)
turtle.left(90)
turtle.forward(130)

The generated image is shown below:


To draw the lower prong, we need to use the steps above but modify them for our purposes.

To do this, we move the pen to the position (-70, -180) and we set the heading of the turtle to 90 degrees.

Next we move up by 130 pixels, turn right by 90 degrees, move forward by 140 pixels, turn right by 90 degrees and move down by 130 pixels.

The code to do this is shown below:

turtle.penup()
turtle.setheading(90)
turtle.setposition(-70, -180)
turtle.pendown()
turtle.forward(130)
turtle.right(90)
turtle.forward(140)
turtle.right(90)
turtle.forward(130)

The generated image is shown below:


Drawing the upper arrow is easy. We need to use a filled shape to do this. To start we, we move the turtle to the left position of the arrow.

We must reduce the pensize of the turtle to 1. Next move forward by 60 pixels then turn left by 90 degrees and move forward by 15 pixels.

We need to find the angle between the current position of the turtle and its next position as well as the distance between them.

Once we have done the above, the rest is easy. All we need to do is reverse the steps and draw the other half of the arrow.

The code to lift up the pen and set its pensize to 1 is shown below:

turtle.penup()
turtle.pensize(1)

We move the position of the pen to the left side of the arrow as well as change its heading. The code to do this shown below:

turtle.setposition(-20, 70)
turtle.setheading(90)
turtle.pendown()

We move forward by 60 pixels, turn left by 90 degrees and move forward by 15 pixels. The code to do this is shown below:

turtle.begin_fill()
turtle.forward(60)
turtle.left(90)
turtle.forward(15)

The current position of the turtle is at (-35, 130). Its next position is (0, 190). To get there, we need to find the angle between the two points. The code to do this is shown below:

myradians = math.atan2(190 - 130, 0 - (-35))
angle = math.degrees(myradians)

To find the length between the two points, we use the coordinateDistance function. The code for it is shown below:

def coordinateDistance(x1, y1, x2, y2):
    dx = x1 - x2
    dy = y1 - y2
    D = math.sqrt((dx * dx) + (dy * dy))
    return D

We call the function using the code shown below:

length = coordinateDistance(-35, 130, 0, 190)

The code to draw the rest of the arrow is given below:

turtle.setheading(angle)
turtle.forward(length)
turtle.setheading(360 - angle)
turtle.forward(length)
turtle.setheading(180)
turtle.forward(15)
turtle.setheading(270)
turtle.forward(60)
turtle.end_fill()

The generated image is shown below:


To draw the lower part, we need to move the turtle to the position () and reverse the steps above.

The code to do this is shown below:

turtle.penup()
turtle.setposition(-20, -70)
turtle.setheading(270)
turtle.pendown()
turtle.begin_fill()
turtle.forward(60)
turtle.right(90)
turtle.forward(15)
turtle.setheading(360-angle)
turtle.forward(length)
turtle.setheading(angle)
turtle.forward(length)
turtle.setheading(180)
turtle.forward(15)
turtle.setheading(90)
turtle.forward(60)
turtle.end_fill()

The generated image is shown below:


To complete this symbol we need to draw the hexagon.

To do so, we need to move the turtle to the left side of the hexagon. The coordinate of this position is (-20, -30).

The next thing is to find the angle and length between this position and the next position. The coordinates of the next position are (-35, 0).

The code to find the angle and length is given below:

myradians = math.atan2(0 - (-30), -35 - (-20))
hexAngle = math.degrees(myradians)
hexLength = coordinateDistance(-20, -30, -35, 0)

The code to draw the hexagon is given below:

turtle.penup()
turtle.setposition(-20, -30)
turtle.setheading(hexAngle)
turtle.pendown()
turtle.begin_fill()
turtle.forward(hexLength)
turtle.setheading(180 - hexAngle)
turtle.forward(hexLength)
turtle.setheading(0)
turtle.forward(40)
turtle.setheading(360 - (180 - hexAngle))
turtle.forward(hexLength)
turtle.setheading(360 - hexAngle)
turtle.forward(hexLength)
turtle.setheading(180)
turtle.forward(40)
turtle.end_fill()

The generated image is shown below:


Conclusion

At the end of this section, we have successfully drawn the Nteasee symbol.

This post is part of the series: Drawing Adinkra Symbols using Python. The goal is to draw 40 Adinkra symbols using the Python programming language.

Wednesday 25 April 2018

Nsoromma


Nsoromma means "child of the heavens". It is the symbol of guardianship. A reminder that God is the father and watches over all people.

We will use the 5 pixel grid to trace out this image. The image of this is shown below:


The plan to draw this shape is given below:
  1. Lift up the pen
  2. Find the angle between the edge of the shape in the lower left quadrant and the top of the shape
  3. Find the distance between the edge of the shape in the lower left quadrant and the top of the shape
  4. Move the pen to the position of the lower left quadrant
  5. Set its heading to the value found in 2
  6. Move forward by the distance found in 3
  7. Continue alternating through steps 5 and 6 until the shape is completed
  8. Fill up the final shape
  9. Move to the rightmost position for the radius of the circle
  10. Draw a filled circle

Using Turtle Graphics

We will use the template.py file and rename it to nsoromma.py.

Step 1 is easy, we only need to lift up the pen. The code to do this is shown below:

turtle.penup()

For step 2 we need to find the angle between the lower left point of the symbol and its uppermost part. Their respective coordinates are (-140, -140) and (0, 195).

The code to do this is shown below:

turtle.penup()
myradians = math.atan2(195 - (-140), 0 - (-140))
angle = math.degrees(myradians)

The value of the angle will be used in drawing the entire shape.

Next we find the length between the two points using the coordinateDistance function. The code for it is shown below:

def coordinateDistance(x1, y1, x2, y2):
    dx = x1 - x2
    dy = y1 - y2
    D = math.sqrt((dx * dx) + (dy * dy))
    return D

We call the function using the code shown below:

length = coordinateDistance(-140, -140, 0, 195)

Steps 4 to 6 are easy enough. But we must use the fill property to draw the shape.

The code for the entire drawing is shown below:

turtle.setposition(-140, -140)
turtle.pendown()
turtle.begin_fill()
turtle.setheading(angle)
turtle.forward(length)
turtle.setheading(360 - angle)
turtle.forward(length)
turtle.setheading(90 + angle)
turtle.forward(length)
turtle.setheading(90 - angle)
turtle.forward(length)
turtle.setheading(180 + angle)
turtle.forward(length)
turtle.setheading(180 - angle)
turtle.forward(length)
turtle.setheading(270 + angle)
turtle.forward(length)
turtle.setheading(270 - angle)
turtle.forward(length)
turtle.end_fill()

To really understand what is going on, add each setheading and forward combination gradually.

The generated image is shown below:


Drawing the circle is easy. We simply move the turtle to the position (50, 0), set its heading to 90 degrees and draw a filled circle.

The code to do this is shown below:

turtle.setposition(50, 0)
turtle.setheading(90)
turtle.color("white", "white")
turtle.begin_fill()
turtle.circle(50)
turtle.end_fill()

The generated image is shown below:


The only code that might appear strange is this line:

turtle.color("white", "white")

The above line makes the pencolor and fillcolor of the turtle white.

Conclusion

At the end of this section we have successfully drawn the Nsoromma symbol.

This is my favourite symbol in this series. It has an emergent property. It is made up of triangular shapes that combine to form it.

This post is part of the series: Drawing Adinkra Symbols using Python. The goal is to draw 40 Adinkra symbols using the Python programming language.