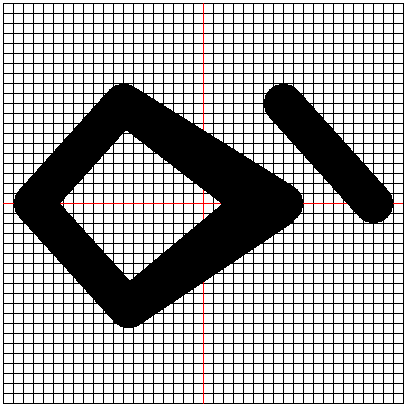
Epa is the symbol of law and justice, slavery and captivity.
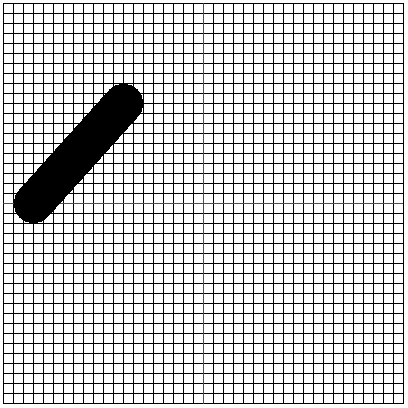
We will use a grid of 5 pixels to trace out the image. The image of this is shown below:
This symbol consist only of straight lines. It consists of an intersecting symmetric shape. Once you draw one shape, you can use that to draw the other shape. We will start with the shape on the left hand side.
The plan to draw this shape is as follows:
- Lift the turtle
- Move the turtle to the position of the center of the left most part of the shape
- Set the size of the pen to 4 units of the square
- Find the distance to the upper position
- Find the angle to the upper position
- Place the pen down
- Draw a line to the upper position at the angle of the position
- Find the distance to the outer final point
- Find the angle to the outer final point
- Draw a line to the outer final point from the upper position
- Lift up the pen
- Move it back to the upper position
- Find the distance to the inner final point
- Find the angle to the inner final point
- Place the pen down
- Draw a line to the inner final point from the upper position
- Lift up the pen
- Move the pen back to the starting position in step 2
- Find the distance to the lower position
- Find the angle to the lower position
- Place the pen down
- Draw a line to the lower position at the angle of the position
- Find the distance to the outer final point
- Find the angle to the outer final point
- Draw a line to the outer final point from the lower position
- Lift up the pen
- Move it back to the lower position
- Find the distance to the inner final point
- Find the angle to the inner final point
- Place the pen down
- Draw a line to the inner final point from the lower position
- Repeat the steps for the shape on the right hand side
Using Turtle Graphics
We will use the grid from the last section. Rename template.py to epa.py. The size of each square on our grid is 10 pixels. We shall use this as our multiplication factor.
From step 1 of our algorithm, we need to lift the pen. The code to do this is shown below:
turtle.penup()
To move the turtle to the position of the center of the left most part of the shape, we need to get its location. This location is at the point where (-170, 0). When we multiply by 10, we know that we have to move the turtle to (-170, 0). The code to do this is shown below:
turtle.setposition(-170, 0)
We set the pensize of the turtle to 4 units. Since our multiplication factor is 10, we will use 40. The code to do this is shown below:
turtle.pensize(40)
The upper position is situated at (-8, 10). Using our multiplication factor, this will be (-80, 100). To find the distance between the two points, we will use a function called coordinateDistance. The function definition is given below:
def coordinateDistance(x1, y1, x2, y2):
dx = x1 - x2
dy = y1 - y2
D = math.sqrt((dx * dx) + (dy * dy))
return D
After we define this function in our code, we do the following:
upperLength = coordinateDistance(-170, 0, -80, 100)
Now that we have the length of the distance between the two points, we only need to find the angle. Using the formula to find the angle between two points, our code will now be:
myradians = math.atan2(100 - 0, -80 - (-170))
upperAngle = math.degrees(myradians)
turtle.setheading(upperAngle)
Now we can draw the line to that point. Before we do this, we need to place the pen down. The code to do this is shown below:
turtle.pendown()
Now that the heading is set and our pen is down, all we need to do is to draw the line. The code to do this is given below:
turtle.forward(upperLength)
The generated image is now as shown below:
From this point, we can draw a line to the final point. The final point however comes with some complications. It diverges into two points. The trick then would be to use two positions taking them as the outer and inner points.
We will do for the outer point first. Its coordinates are (8, 0). Using the multiplication factor, this will be (80, 0). Based on step 8 we find the distance to the outer final point the code to do this is shown below:
outerUpperLength = coordinateDistance(-80, 100, 80, 0)
Next we need to find the angle to the outer final point. The code to do this is shown below:
myradians = math.atan2(0 - 100, 80 - (-80))
outerUpperAngle = math.degrees(myradians)
turtle.setheading(outerUpperAngle)
Next we draw a line to the outer final point from the upper position. The code to do this is shown below:
turtle.forward(outerUpperLength)
The generated image is now shown below:
We lift up the pen to go back to the upper position. The code to lift the pen is given below:
turtle.penup()
Next we move the pen back to the upper position. The code to do this is shown below:
turtle.setposition(-80, 100)
The coordinates of the inner final point are (5, 0) multiplication by 10 gives us (50, 0). The code to find the distance to this point is:
innerUpperLength = coordinateDistance(-80, 100, 50, 0)
To find the angle to this point, we use the code shown below:
myradians = math.atan2(0 - 100, 50 - (-80))
innerUpperAngle = math.degrees(myradians)
turtle.setheading(innerUpperAngle)
We need to place the pen down. The code to do this is shown below:
turtle.pendown()
Next we draw a line from the upper point to the inner final point. The code to do this is shown below:
turtle.forward(innerUpperLength)
The generated image is shown below:
Now we can go on to draw the lower portion of the shape. Before we can do that we need to lift up the pen so that it doesn’t draw while we are moving it. The code to do this is shown below:
turtle.penup()
Now we have to move the turtle back to its starting point. The code to do this is shown below:
turtle.setposition(-170, 0)
The location of the lower position is at (-7, -10). Multiplication by 10 gives us the point (-70, -100). The code to find the length is given below:
lowerLength = coordinateDistance(-170, 0, -70, -100)
The next task we have is to find the angle to the lower point. The code to do this is shown below:
myradians = math.atan2(100 - 0, -80 - (-170))
lowerAngle = math.degrees(myradians)
turtle.setheading(360 - lowerAngle)
Before we can draw a line, we must place the turtle down. The code to do this is shown below:
turtle.pendown()
We now draw the line from our starting point to the lower point. The code to do this is shown below:
turtle.forward(lowerLength)
This generates the image shown below:
Now we must find the distance from the lower point to the outer final point. The code to do this is:
outerLowerLength = coordinateDistance(-70, -100, 80, 0)
We must now find the angle from the lower point to the outer final point. The code to do this is:
myradians = math.atan2(0 - (-100), 80 - (-70))
outerLowerAngle = math.degrees(myradians)
turtle.setheading(outerLowerAngle)
Now we draw a line from the lower point to the final outer point. The code to do this is:
turtle.forward(outerLowerLength)
Our generated image now becomes:
Now we lift up the pen. The code to do this is:
turtle.penup()
Now we move it back to the lower position. The code to do this is shown below:
turtle.setposition(-70, -100)
Now we find the length between the lower point and the inner final point. The code to do this is:
innerLowerLength = coordinateDistance(-70, -100, 50, 0)
Now we calculate the angle between the two points and set the heading of our turtle to the angle. The code to do this is:
myradians = math.atan2(0 - (-100), 50 - (-70))
innerLowerAngle = math.degrees(myradians)
turtle.setheading(innerLowerAngle)
We now place the pen down as we are about to draw the line. The code that does this is:
turtle.pendown()
We can move the turtle forward to complete the drawing. The code to do this is shown below:
turtle.forward(innerLowerLength)
The generated image is now shown below:

With this, the left side of our image is complete. We will assume that the right side is symmetrical. So we will create it as a mirror imageof the left hand side.
The first step of the algorithm is to lift up the turtle. The code to do this is shown below:
turtle.penup()
Next we have to lift the pen to the right most part of the shape. The coordinates for this location are (170, 0). The code to move to this position is given below:
turtle.setposition(170, 0)
If you run the code at this point, you will see that it still takes the heading from when it was drawing the previous shape. We will change the heading to make it face the left side. To do this we need to make the heading the value of 180. The code to do this is shown below:
turtle.setheading(180)
Now to draw all that we need to do is to reuse the variables from drawing the other side and draw our shape.
We place the pen down. The code to do this is:
turtle.pendown()
We now set the heading of the turtle using the upperAngle value. We subtract by 180 because of the value we are compensating for.
turtle.setheading(180 - upperAngle)
Now we draw the line to that point. Our code now becomes:
turtle.forward(upperLength)
The image this will generate is now shown below:

Now we draw a line to the outer final point. The code that does that is:
turtle.setheading(180 - outerUpperAngle)
turtle.forward(outerUpperLength)
The image that is generated is shown below:

Now we lift up the pen. The code to do this is:
turtle.penup()
Next we have to move back to the upper right point. Its coordinate is (80, 100). The code to do this is shown below:
turtle.setposition(80, 100)
Now we must set the heading of the turtle to the innerUpperAngle. The code to do this is:
turtle.setheading(180 - innerUpperAngle)
Then we move forward by the innerUpperLength. The code to do this is:
turtle.forward(innerUpperLength)
We lift up the pen. This will prevent it from drawing. The code to do this is:
turtle.penup()
Now we move the turtle back to the righmost point. The code to do this is:
turtle.setposition(170, 0)
turtle.setheading(180)
Now that it is back at this point, we need to draw a line to the lower point. The code that does this is:
turtle.pendown()
turtle.setheading(180 + lowerAngle)
turtle.forward(lowerLength)
The generated image is shown below:
Now we draw the line to the outer final point. The code to do this is given below:
turtle.setheading(180 - outerLowerAngle)
turtle.forward(outerLowerLength)
The generated image now becomes:
To complete this shape, we just need to draw the line from the lower hand back to the inner final point. The code that does this is given below:
turtle.penup()
turtle.setposition(70, -100)
turtle.setheading(180 - innerLowerAngle)
turtle.pendown()
turtle.forward(innerLowerLength)
The generated image is now:
Conclusion
At the end of this post, we have successfully used Python Turtle Graphics to draw the Epa symbol.
I must admit that is was tasking to do because of the way the lines diverge but at the end, we made it happen.
Feel free to experiment with the pensize of the turtle and also the coordinates of the inner and outer final points. On my end, its a wrap.