Friday, 11 March 2016

Android Development for Everyday People - Diving In Part II

Welcome to a new week. Last week, we created the user interface of the Three Number Average application. By now, I expect that you have installed BlueStacks based on the instructions given on this blog or that you have followed the instructions on the App Inventor website and configured to run your mobile device to run applications.

This week we will be looking how to add events to our mobile application. This will ensure that when we click the Compute Average button, the button computes the average of the 3 numbers and displays the result in our 5th label.

Last week, we gave two conditions that had to be met in order for our application to work properly. For the sake of review, they are:
  1. The textboxes should only allow numbers as input
  2. The program should only compute the average when all the 3 textboxes are filled
We have ensured the first condition by ensuring that our textboxes only takes numbers in. To do this we used the NumbersOnly property for a textbox in App Inventor.

To meet the second condition, we will have to check that the values in each textbox is not empty. To do this, we first have to learn about variables, procedures and functions.

Variables, Procedures and Functions

If you were a librarian and you had a book in a library and you were searching for a book in the library, the easiest way would be to check the library reference. All things being equal, a check at the library reference would reveal the location of your book. Once you have the location of the book, you can then go to its location to retrieve it.

From the above example, the book you want to retrieve is a variable. The library reference is a function and you are a procedure. In computer science terms, a variable is a store of value, a procedure carries out an action and a function returns a result.

Once you understand how to think in this manner, you are well on your way to becoming a programmer. Getting this concept is the hardest step in programming. However, once you do, you can learn how to program in any language of your choice.

Enough talk. Let’s get started. Open your browser and visit the App Inventor website (Put link). You will see a list of projects. My projects list is shown below:


Click on the ThreeNumberAverage on your list. If you haven’t created any other project, you should have only 1 project listed. However, if you haven’t created any other project, I must state that I am disappointed. I told you to create the user interface for your own project. The best way to learn is by doing.

Once you click on the project, it loads up in the browser window. My screen is shown below:


To calculate the average of the three numbers, we have to get the values from their respective text boxes. To do this, we will need to access the Text property for each Textbox. This is shown below:


We will need four variables to calculate the average of the three numbers. Remember what I said about naming, our variable names must make sense to us. Remember that programming isn’t just giving instructions, it is communication.

Our variable names are:
  1. firstNumber
  2. secondNumber
  3. thirdNumber
  4. average
We need just 1 procedure to display the average in the 5th label. However we will need 2 functions. Our first function called checkInput will check the textboxes to ensure that all of them have a number. Since it is a function, it will return either true of false. Once it is true, we will calculate the average otherwise, we will clear the textboxes and notify the user of the need to fill all the textboxes.


Programming Events

The events in App Inventor are found in by clicking Blocks in our menu. This is shown below:

Right now our Designer window is active. Clicking on Blocks takes us to our Blocks menu which is shown below:


The Blocks Viewer is empty. This is because we haven’t done any programming. Do note the dustbin at the corner. It is used to discard blocks we are no longer using. On the left, you should see a list of all your components. Look through this list carefully. You will realize that this is the same list we saw in the designer view.

To create a variable, go to Blocks. Scroll up until you see the Built-in menu. It is shown below:

Under Built-in, you see a list of stuff you can do. But where are the functions? In classical computer science, procedures are different from functions. However, App Inventor considers them the same. They only vary in usage.

So it begins. In App Inventor, all our programming is drag and drop. To accomplish this, click on the Variables link. It will bring up a pop out as shown below:


Now drag out the initialize global block to the white space. Your Blocks area should now look like this:


Next go to Math under the Built-in menu and click on it. You should see a pop out as shown below:


Drag out the empty block and snap it to the initialize global name block. Drag out the block with 0 and snap it to the initialize global name block.

You Block area should be as shown below:

Now click inside the area with name and change the name to firstNumber. Your Block area will be as shown below:


Do this for your other variables. Your Block area should be as shown below:

Now we can start. I won’t go over this again. Just use matching colours to follow along and ask me any questions if you need help. I can’t promise an immediate response as I work a full time job but I promise to answer as soon as I am able.

To handle our events, click on Button1, you will see a pop out as shown below:
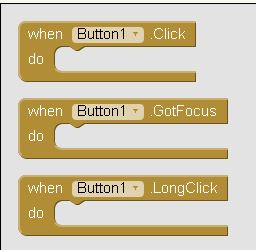
Drag out the when Button1.click block into your code area. This block is called an event listener. Event listeners respond to an action. The action we want is that when Button1 is clicked, the checkInput function should first check if the text areas are empty. This function acts like a sentinel and protects our program.

Creating the checkInput Function

Our first function works by checking if the contents of the three textboxes have been filled. If they have been filled, we simply need to go ahead to calculate the average. Otherwise, we have to clear the text boxes and display a message to the user.

The code that does this is shown below:


To create this code, you need to use blocks from the Procedures, Control, Logic and Text under the Built-in drawer.

I won’t be showing you how to do this. Did you think this teacher would let you off so easy. Trust me on this. It isn’t hard to do. However, if you have any problems, Google “how to create a procedure in App Inventor”. This course is meant to teach you how to think like a programmer and part of that thought process is the ability to research. If you find it too hard to do, let me hear from you in the comments.

Debugging

Debugging is the act of getting our programs to work as expected. Whenever we create programs, it is rare to have them work exactly as we want them to work. To this end, we need a way to understand what is going on in our program.

In App Inventor, we debug by using the Notifier component. It is found under the user interface drawer in App Inventor. Add it to your Screen. Since it is a non visible component, it will not show on the screen.
Switch to the block area and drag click on your Notifier object. Next drag out the ShowAlert block for the Notifier object.

This is shown below:
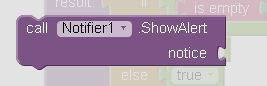
Note the pouch near notice. It is where we will place the call to the checkInput function in this pouch.
Click on the Procedures drawer. Now you will see the call checkInput block.


Drag it out and place it on the pouch of the ShowAlert block. You code will be as shown below:

To call this block, click on Button1 and drag out its Click event listener. An event listener waits for an event to occur. Drag it and place the completed Notifier block inside it. Your code should be as shown below:

Build your app in App Inventor and test it on BlueStacks. Your application should look as shown below:


Note that the textboxes have their hints on them thus showing that they are empty. When you click the Compute Average button, you should see a popup saying false. When you fill just 1 of the textboxes, the false still pops up. However, once you fill all 3 textboxes and click on the Compute Average button.

As always, if you need help, fill them in the comments and I will get back to you when I can. But search before you ask. That is what I would do as a programmer.

Creating the calculateAverage Function

This function takes the values entered by the user and returns the average. The average is the sum of the numbers divided by 3.

The algorithm for this function is shown below:
  1. Assign the values in the textboxes to their respective variables
  2. Add the variables together and divide them by 3
  3. Assign the value obtained from 2 above to the sum variable

When you drag out the procedure block from Procedure, to add parameters to it, you need to click on the blue notch on the function body it will bring out the following:

Now drag the input x block into the inputs block. Doing this will add your first parameter. This is shown below:


Do this 3 times to and rename your parameters to firstNumber, secondNumber and thirdNumber. Also rename your procedure to calculateAverage. Your function should look like below:

Now create the part that will compute our average. Drag out the get block from the Variables drawer and select firstNumber. Do this for secondNumber and thirdNumber.

Next go to the Maths drawer and drag out the addition block. Click on its notch. It will give you this diagram.

The code for the entire function is shown below:

Now add a 3 parameter and place your variables inside them. Now your function should look like this:

Next in Maths, find a division block. Place this block into your result and let the above block be on its left and the number 3 on its right. Your final function is shown below:

As always, let me have your questions in the comments area. The 3 was placed by using the number block found in the Math drawer.

Your function is complete.

Creating the displayAverage Procedure

A procedure carries out an action. Our procedure takes the average as a parameter and displays the result in the 5th label. This procedure is easy so I will just show the code.

Putting it all together

Now that we have completed our functions and procedure, we can create the code for our button. This is shown below:


Build your application. Now you have successfully created your first application using App Inventor.

Adding an Application Icon

To customize your application, you need to add an icon. To do this, go Designer view and click on Screen1.
Browse down to Icon. This is shown below:


When you click inside it, you get a popup as shown below:


Click on the Upload File button to choose an icon of your choice. I will use my company logo. So I will navigate to it and load it up. This is shown below:
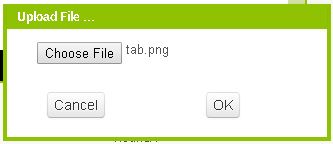
Click on the OK button. This will now load our icon. When we now build our app in BlueStacks or our mobile device, our app icon should have changed. Try it out yourself.

Conclusion

Congratulations on making it to the end of the second section of this series. I would be lying to you if I said it wasn’t long. Take heart in the fact that I wrote it.

I took my time with this section because I wanted to be sure that we went together. At the end of this section, I expect that the Three Number Average is running on your setup. Whether you are using BlueStacks or your mobile device.

What a long post. I now assume you know what to do with App Inventor. If you need help, leave a comment or do a Google Search. Have a great weekend.

Friday, 26 February 2016

Android Development for Everyday People - Diving In Part I

We start here at the very beginning. For our first application, we shall be creating the 3 Number Average program as an Android application.

I intend to show you the thought process I follow when creating an application. I learned the NICE technique while learning Visual Basic 6 a lifetime ago and I haven’t deviated too much from it.

NICE means Name, Interface, Controls and Events. Name refers to the name of the application you want to create. Interface refers to what your application looks like. Controls are the elements of the user interface while Events are responses to the interaction of the user with the user interface.

Getting Started

The first step in the creation of anything is to give it a name. The act of naming embodies properties that are desired in the named object. As an African, the act of naming is taken seriously as Africans believe that the name a child bears affects his life.

As a programmer, I will state that by getting the name right, you force your mind to converge around a single spot. Contrary to the philosophy of being open minded, a creative person cannot be open minded when creating. The act of creation is simple. You either focus or you fail. A name helps you to focus.

Our first application is called the Three Number Average. From the name, you should already be able to guess what it does. It is a simple mobile application for calculating the average of three numbers.

It sounds simple enough. But if you remember what I mentioned about IPO (Input, Process and Output), the first consideration we must have is our input. Input is how we will be taking in the 3 numbers. Our process is the computation of our average while the output is how our user will see the result of the computation.

Once we have an idea of the IPO process, we can draw our user interface. Our user interface is shown below:
If you look at the user interface above, the Compute Average block will be a button while for input we will use textboxes. The others will be labels. These are our controls. The C in the NICE acronym.
Even without being computer savy, I expect that you know that a button should be pressed. Pressing a button in our case will make the program execute an action. When a button is pressed, the program should grab the number values from the textboxes and display them in the label.
Even though this is a simple program, I would like to put 2 conditions that should be met before our program can run. This is the art of defensive programming. We don’t want our users to be able to do anything that can crash our program. These conditions are:

  1. The textboxes should only allow numbers as input
  2. The program should only compute the average when all the 3 textboxes are filled

Keeping these two conditions in mind, let’s get started.

Project Creation

We start by creating a new project. Go the menu of App Inventor and select new project. Enter the name of the project as shown below:


After this, the project screen opens. This is your project screen an all you are going to do will be done here.


Using this screen, we can create any application we intend to create. I truly love the prototyping qualities in App Inventor because it lets you quickly create the vision of what you want to create. You don’t have to set up anything. Just dive in and start creating.

Adding Controls

Having named our application, the next thing we need to do is create the user interface. The first step in this task is to set the properties for our screen.

Set you AlignHorizontal property from Left to Center. This will make all the components you place on the screen to be aligned around the center.

Next we place 3 HorizontalArrangement components on the screen. They can be found in the Layout drawer of the Palette. Our application screen will now look like this:

Now to each Horizontal Arrangement, we add a label and a textbox. If you figure how to do this, your application screen will now look like this:

Next we add our button and 2 labels. Our user interface will now look like this:


Setting Properties

For our screen we want to change our Screen Orientation from Unspecified to Portrait and Title from Screen1 to Three Number Average. In App Inventor, your screen icon is what the user will see when the application is installed on his phone. If you don’t set an icon, App Inventor will use its default icon.

For the labels, set the Text property to match what we have in the interface that we have designed. For label 5 clear out the Text property. Once you change the Text property of label 5 to empty, it shrinks to a dash. Don’t worry about that for now.

As shown below, the Text property is what is displayed on the label.

For the textboxes, first change the Hint property to Please enter a number. This is what the user will see when the application is running on his phone. You can customise it to be specific for each textbox. Thus your Hint for the first textbox could be Please enter the first number. To make your application take only numbers as input, you need to check the NumberOnly property. The properties for the first textbox are shown below:

For our button, we set its Text property to Compute Average. Our user interface is complete and looks like this:


As you can see, our 5th label is barely visible because we set its text to empty. If you have made it this far, I want to congratulate you as you have done 75% of the required work. The rest is to create the events you need and you are all done. Before we do that however, I want to teach you about testing your application.

Application Testing

If you go to the App Inventor website, you will be given all you need to setup your phone for App Testing. If you have a phone and follow the instructions, you should be all setup to run the app on your phone.

However if you don’t have a phone or in my case if you have to teach a class of students, you must run everything on your machine. I struggled with this problem until I finally solved it by using BlueStacks.
BlueStacks is a desktop application that allows you to run Android applications on your local machine. 

Download and installation is easy so I won’t cover that here. Once your installation is completed, launch BlueStacks. If you are offline, you will get the screen shown below:


The labelled part called APK is where you click to load your APK file for a project. So how do you create an APK file?

Creating an APK File

The process of creating an APK file is simple and easy in App Inventor. All you do is go to the menu and click App (save APK to my computer). This is shown below:


Once you do this, App Inventor will package your application and save it in the downloads folder of your machine.

Running the APK File

When you want to run an APK, click the APK tab in BlueStacks and navigate to the application you want to run. Select it and BlueStacks and click the Open button will take care of the rest. You can see this below:


Once the application is installed, you will get notification from BlueStacks that the application has finished installing.

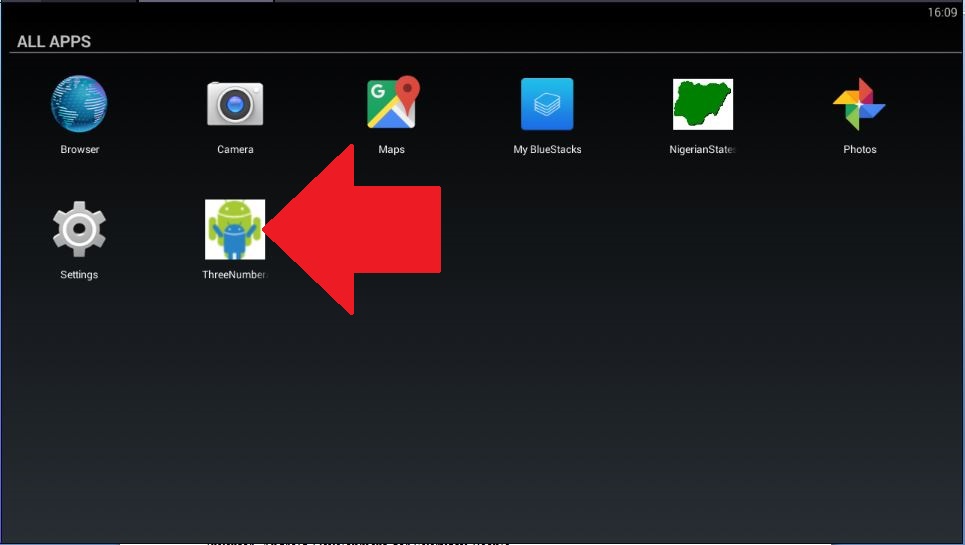
Click on the All Apps button in BlueStacks and you will see the ThreeNumberAverage installed on your machine. My screen is shown below with the ThreeNumberAverage pointed out in red.


Click on it and application to launch it. Our application is shown below.


So our application is done and running on our BlueStacks. Since you have the APK, you can install it on your own phone. Do your own research on how to do this. Proceed at your own risk.

Conclusion

Congratulations on making it to the end of this week’s topic for Android Development for Everyday People. We are by no means done with this deep dive but I wanted to give you time to catch your breath as this week’s post was long and involves you having to do some research.

At this stage you should have version of the ThreeNumberAverage running on your BlueStacks. If you have a phone, you can run it on your phone. It does nothing because we haven’t added events to our application.
As a homework, go through this post again and work through your own application idea. Choose something simple and get it to work.

Join me next week for the concluding part of this section of Android Development for Everyday People.

Saturday, 20 February 2016

Android Development for Everyday People - Introduction

Hello,

Welcome to Android Development for Everyday People. This course is designed for anyone with an idea for an application who doesn't know how to program. I assume that you have a laptop and can use the computer reasonably well. Beyond that, know this anyone can learn how to program. A background in engineering or science is not required. Patience, practice, and an interest in the subject matter should suffice, along with the required software and hardware.

On the software end, you have everything you need. We will be using a cloud based application called App Inventor so there is nothing new to install. I only ask that you use a modern browser like Google Chrome or Opera.

I started this course as a way to teach absolute beginners how to program without having the obstacle of learning how to code. Mobile applications were chosen as the focus because there is nothing more satisfying that seeing an application that you have created being used by someone else. The future is mobile and by taking this step, you are getting into an exciting time in history.


In the last quarter of 2008, the Android operating system launched. Today in 2016, Android is the number 1 mobile operating system in the world. The continued growth of Android is assured so learning how to create mobile applications means that you will be relevant in the future of technology as a creator not as a consumer.

In the early days, developing a mobile application involved programming in Java. This made the development of Android applications exclusive to programmers. Google introduced App Inventor as a way to democratize app development for non-programmers.

In 2015, the Android One device would be launched in Nigeria. This represents an attempt at making smartphones available for a new generation of users. Coming in at under $100, it is the first attempt to replace feature phones by smartphones through the elimination of the price barrier.

When the Android One device was launched, the realization hit me that a new wave of users would be entering the mobile computing era. For most of them, their mobile device will be their primary means of accessing the internet. This presents an unprecedented opportunity.

However, I was struck by the fact that despite the fact that a new generation of users would be coming on-board, the next generation of programmers would not be able to catch up. This is because for the Android platform, Java is the main programming language.

Java has a reputation of being hard to learn and for me it is. That said, it was once the darling of the industry and the typical Java programmer trained in the last decade. The next generation developer doesn’t have the time to scale that learning curve in order to create mobile applications.


Today in technology, virtually every niche now has tools to simplify your work. If you want a website, you don’t need to write a line of code. All you need is to use a CMS like WordPress. For game development, we have game engines like Unity that make the entire process of creating a game easier and more efficient than it was in the last decade.

For application development today, depending on the route you want to take, there is a tool for you. If you are a web developer with a strong knowledge of HTML, CSS and JavaScript, you could use PhoneGap. For a Python programmer, Kivy is coming on strong. For non-programmers, there are a lot of cloud based services that make the process of application development easy. For our purposes, we shall be using App Inventor which runs in the cloud

For some time in the past only highly technical people could set up blogs and wikis. Then tools like WordPress, Blogger and Google Sites transformed things so that anyone could create a blog or wiki. I see App Inventor doing the same thing — it’s going to allow all types of people, not just the techies — to create apps for this incredible new mobile world.

With App Inventor, if you can imagine it, you can create it. Using this free, friendly tool, you can decide what you want your app to do and then click together colorful jigsaw-puzzle blocks to make it happen. App Inventor turns your project into an Android app that you can test on your computer, run on your phone, share with your friends, and even sell in the Google Play store.


Cloud means that you run on the platform through a browser with nothing to download. It is done this way because of the assumption that anyone who doesn’t know how to program might not have the technical skills to set up his machine for application development so why bother that individual. Knowing what I know about setting up your programming environments for certain platforms, I totally agree.


Today if you have an idea for a mobile application, all you need to do is to get a solid internet connection and you are on your way. App Inventor is a visual programming environment that allows you create mobile applications for the Android platform using Lego like blocks. The blocks are constructs for the functions you want to use.

It is cloud based hence the need for a solid internet connection. But this is a small price to pay for creating the idea you have in mind. At a minimum, learning App Inventor would enable you to prototype your idea and then hand it over to a developer for serious rework when your idea gains traction.

The cost of following this workflow is a lot easier than having to describe your idea to a programmer and have him create it from scratch. Trust me on this the average programmer has a little arrogance in him/her and nothing fuels that arrogance than a client that hasn’t done his/her homework.


In my time as a programmer, I have met all sorts of clients. The most annoying ones were the ones who wanted you to read their minds. Nothing gains a programmer’s respect like preparation and the best preparation is having an application that you have developed being discussed with a programmer for the improvements you want.


What You Can Do With App Inventor

Using App Inventor, you can create:

1.      Games
2.      Sensor Enabled Apps
3.      SMS Apps
4.      Educational Apps
5.      Social Apps

With App Inventor, the only limit is your imagination. If you can dream it, you can do it.

Abstraction

A critical concept in programming is abstraction. Abstraction is a reduction in the level of detail to allow a grasp of the relevant information. An example of this is a map. A map is a representation of an actual physical space but in order to really represent it, all we do is take the portions we are interested in and ignore the rest.

App Inventor allows us to use an abstraction of programming constructs to create and develop mobile applications. This shortcut makes it easier to create a mobile application.

Don’t miss the point to all of this. You are still programming. However, you are not coding. Programming is about getting the computer to do what you want it to do. This means you have to give the computer instructions.

With coding you would have to figure out your instructions as well as create the constructs for them. By using already available constructs in App Inventor, you make the process of creating mobile applications easier.

It is important to note that the computer is a machine. The acronym GIGO (Garbage In, Garbage Out) covers this. For the computer to accurately execute you instructions, you need to give in unambiguous instructions.

A set of unambiguous instructions to carry out a task is called an algorithm. Note the emphasis on unambiguous because the instructions must be specific and exact. As human beings we tend to make a lot of assumptions whenever we issue instructions.

Part of the difficulty in programming is that we have to explicitly describe what we want to do to the computer. The sequence of steps that accomplish this exactly are called an algorithm.

In truth creating an algorithm is the hardest part of programming. Once you have created your algorithm, writing the code to do execute it is much easier. Thankfully with App Inventor, there is no need to write code. Just assemble your constructs.

Algorithms

An algorithm is a set of specific steps that you can follow to solve a problem. I specifically mention steps because in truth algorithms apply to everyday life.

Below is an algorithm to find the average of 3 numbers.
  1.      Set a running total to 0.
  2.     Add the first number to the running total.
  3.     Add the second number to the running total.
  4.     Add the third number to the running total.
  5.     Divide the running total by 3.
  6.     The result is the average of the 3 numbers.
If you followed this algorithm without deviation, you would always get the average of 3 numbers. You don’t need a computer to execute the above algorithm; you can do it by hand.

Algorithms surround us. Cooking is one area where algorithms abound. Following a recipe to cook a particular meal is the same as executing an algorithm on a computer.

For example if you are a Nigerian, you should be familiar with this algorithm:
  1. Empty INDOMIE noodles into 550cc (approx. 21/3  glasses) of boiling water and simmer for 3 minutes then turn noodles to the other side.
  2. Add seasoning and chilli powder, to your taste and stir occasionally. Cook until the water is almost dried up.
  3. Your delicious noodles is ready to be served. For soup style, prepare with 650cc (approx. 21/2 glasses) of water.

These are the steps to cooking Indomie noodles. I found them at the back of the wrapper. To be clear, following the instructions in this case requires certain assumptions. The assumptions of a source of heat for cooking is one of them. Can you think of any other?

If we deviate from the above steps in any way, the result would be different. The same goes for Spagetti. All Spagetti packs come with instructions. Deviation in any way would lead to a different set of results.

When programming a computer however, we have no room to make such assumptions. We must give clear instructions to the computer. This is where programming becomes hard. If you are a first time programmer, your whole life before now, you have made assumptions in your thought process. Programming will force you to unlearn that habit.

Programming

When we decide to program, we are making a decision to express an algorithm in a form that the computer can understand. Normally, we would have to write code. But with App Inventor, all we have to do is assemble constructs that implement our algorithm.

If we decided to write a program for our 3 Number Average algorithm, our first decision would be how to get input from the user.

The IPO concept is useful in understanding this. The I stands for input, P stands for process while O stands for output.

In making a decision on how we are to receive input, the environment in which the application will run must be considered. This is because the context of the application determines what kind of user interface we would design.

Processing is generally hidden from the user so there isn’t much to say on this point. I will add that the average mobile phone today is more powerful than anything in the world 50 years ago so you are covered here.

For output, once again the environment you are running on will determine how your results will be presented to the user.

We will look at how to create this as a program in App Inventor as the course begins. It is going to be our first mobile application. I hope you make it back next week.

The Road Ahead

I sincerely congratulate you on deciding to learn how to program visually. If this is your first time programming I would say that you are in luck. This year marks my 11th year as a programmer.


I think back to how I started and then the choices were between Visual Basic and C++. Majority of us who chose Visual Basic as our first programming languages are still programming whereas those who chose C++ dropped out.

I don’t state this to brag but in reality, how you start determines if you will last. You are starting programming at one of its easiest entry points.

Drag and drop programming is the easiest way I know to learn programming. However, don’t let its simplicity make you think that you are not learning anything.

If you decide to stick with me, I will teach you how to think like a programmer. And if you stick around to the end, you will wonder how you lived your life before this time.

Programming opens up a world of possibilities to you and it is my joy to share this with you. I assume you are above the age of eighteen because learning online requires a degree of self motivation. It helps if you are mature.

We will start off easy as you learn the needed concepts and when we are done, you will be given guidance on where to go next.

It’s just like learning how to drive. Spend this time with me and learn from me. When you are done, you will be able to go anywhere you want to.

Wednesday, 3 February 2016

Moving a Live Website to Localhost

First off, welcome to a new year. I have been busy planning for this year so I haven't done any blog posts. I was copying a WordPress site from the live site to localhost and was getting errors.

Frustrated, I checked the internet for a solution and nothing seemed to worked. It turns out that the problem was that I hadn't enabled mod_rewrite on my WAMP server.

I had done a system refresh last month and so my WAMP settings are new. It just skipped my mind.

Thursday, 26 November 2015

SVG with RaphaelJS - Conclusion

So we have reached the end. The bulk of this series was written after I had an accident in January and had to learn how to walk again in February. Writing this series took my mind off the pain. I pulled through okay and was back on my feet again.

I have covered what I know with Scalable Vector Graphics (SVG). I wish I knew more but this covers the limits of my knowledge.

There is so much I didn't cover. On where to go from here, please check out Snap.svg as its the latest library from the creator of RaphaelJS.

Today is Black Friday 34 days from now we will be in a new year. Thank you for sticking with me through this series.

 I wish you health, wealth and happiness in this great gift called life.