We start here at the very beginning. For our first
application, we shall be creating the 3 Number Average program as an Android
application.
I intend to show you the thought process I follow
when creating an application. I learned the NICE technique while learning
Visual Basic 6 a lifetime ago and I haven’t deviated too much from it.
NICE means Name, Interface, Controls and Events. Name
refers to the name of the application you want to create. Interface refers to what
your application looks like. Controls are the elements of
the user interface while Events are responses to the interaction of the user
with the user interface.
Getting
Started
The first step in the creation of anything is to
give it a name. The act of naming embodies properties that are desired in the
named object. As an African, the act of naming is taken seriously as Africans
believe that the name a child bears affects his life.
As a programmer, I will state that by getting the
name right, you force your mind to converge around a single spot. Contrary to
the philosophy of being open minded, a creative person cannot be open minded
when creating. The act of creation is simple. You either focus or you fail. A
name helps you to focus.
Our first application is called the Three Number
Average. From the name, you should already be able to guess what it does. It is
a simple mobile application for calculating the average of three numbers.
It sounds simple enough. But if you remember what I
mentioned about IPO (Input, Process and Output), the first consideration we
must have is our input. Input is how we will be taking in the 3 numbers. Our
process is the computation of our average while the output is how our user will
see the result of the computation.

If you look at the user interface above, the Compute
Average block will be a button while for input we will use textboxes. The
others will be labels. These are our controls. The C in the NICE acronym.
Even without being computer savy, I expect that you
know that a button should be pressed. Pressing a button in our case will make
the program execute an action. When a button is pressed, the program should
grab the number values from the textboxes and display them in the label.
Even though this is a
simple program, I would like to put 2 conditions that should be met before our
program can run. This is the art of defensive programming. We don’t want our
users to be able to do anything that can crash our program. These conditions
are:- The textboxes should only allow numbers as input
- The program should only compute the average when all the 3 textboxes are filled
Keeping these two conditions in mind, let’s get
started.
Project
Creation

After this, the project screen opens. This is your
project screen an all you are going to do will be done here.

Using this screen, we can create any application we
intend to create. I truly love the prototyping qualities in App Inventor
because it lets you quickly create the vision of what you want to create. You
don’t have to set up anything. Just dive in and start creating.
Adding
Controls
Having named our application, the next thing we need
to do is create the user interface. The first step in this task is to set the
properties for our screen.
Set you
AlignHorizontal property from Left to Center. This will make all the components
you place on the screen to be aligned around the center.

Next we place 3 HorizontalArrangement components on
the screen. They can be found in the Layout drawer of the Palette. Our
application screen will now look like this:

Now to each Horizontal Arrangement, we add a label
and a textbox. If you figure how to do this, your application screen will now
look like this:

Next we add our button and 2 labels. Our user
interface will now look like this:

Setting
Properties
For our screen we want to change our Screen
Orientation from Unspecified to Portrait and Title from Screen1 to Three Number
Average. In App Inventor, your screen icon is what the user will see when the
application is installed on his phone. If you don’t set an icon, App Inventor
will use its default icon.
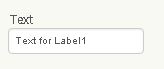
For the labels, set the Text property to match what
we have in the interface that we have designed. For label 5 clear out the Text
property. Once you change the Text property of label 5 to empty, it shrinks to
a dash. Don’t worry about that for now.
As shown below, the Text property is what is
displayed on the label.
For the textboxes, first change the Hint
property to Please enter a number. This is what the user will see when the
application is running on his phone. You can customise it to be specific for
each textbox. Thus your Hint for the first textbox could be Please enter the
first number. To make your application take only numbers as input, you need to
check the NumberOnly property. The properties for the first textbox are shown
below:

For our button, we set its Text property to Compute
Average. Our user interface is complete and looks like this:

As you can see, our 5th label is barely
visible because we set its text to empty. If you have made it this far, I want
to congratulate you as you have done 75% of the required work. The rest is to
create the events you need and you are all done. Before we do that however, I
want to teach you about testing your application.
Application
Testing
If you go to the App Inventor website, you will be
given all you need to setup your phone for App Testing. If you have a phone and
follow the instructions, you should be all setup to run the app on your phone.
However if you don’t have a phone or in my case if you
have to teach a class of students, you must run everything on your machine. I
struggled with this problem until I finally solved it by using BlueStacks.
BlueStacks is a desktop application that allows you
to run Android applications on your local machine.
Download and installation is
easy so I won’t cover that here. Once your installation is completed, launch
BlueStacks. If you are offline, you will get the screen shown below:

The labelled part called APK is where you click to
load your APK file for a project. So how do you create an APK file?
Creating
an APK File
The process of creating an APK file is simple and
easy in App Inventor. All you do is go to the menu and click App (save APK to
my computer). This is shown below:

Once you do this, App Inventor will package your
application and save it in the downloads folder of your machine.
Running
the APK File
When you want to run an APK, click the APK tab in BlueStacks and navigate to the application you want to run. Select it and BlueStacks and click the Open button will take care of the rest. You can see
this below:

Once the application is installed, you will get
notification from BlueStacks that the application has finished installing.
Click on the All Apps button in BlueStacks and you
will see the ThreeNumberAverage installed on your machine. My screen is shown
below with the ThreeNumberAverage pointed out in red.

Click on it and application to launch it. Our
application is shown below.

So our application is done and running on our
BlueStacks. Since you have the APK, you can install it on your own phone. Do
your own research on how to do this. Proceed at your own risk.
Conclusion
Congratulations on making it to the end of this
week’s topic for Android Development for Everyday People. We are by no means
done with this deep dive but I wanted to give you time to catch your breath as
this week’s post was long and involves you having to do some research.
At this stage you should have version of the
ThreeNumberAverage running on your BlueStacks. If you have a phone, you can run
it on your phone. It does nothing because we haven’t added events to our
application.
As a homework, go through this post again and work
through your own application idea. Choose something simple and get it to work.
Join me next week for the concluding part of this
section of Android Development for Everyday People.
No comments:
Post a Comment