Welcome to a new week. This week we will be looking
at lists. A list is a collection of items. An example of a list is a restaurant
menu. It is a list of foods sold by the restaurant as well as their prices.
The first App Inventor application I created was
Nigerian States and Capital. It was part of the requirements for finishing the
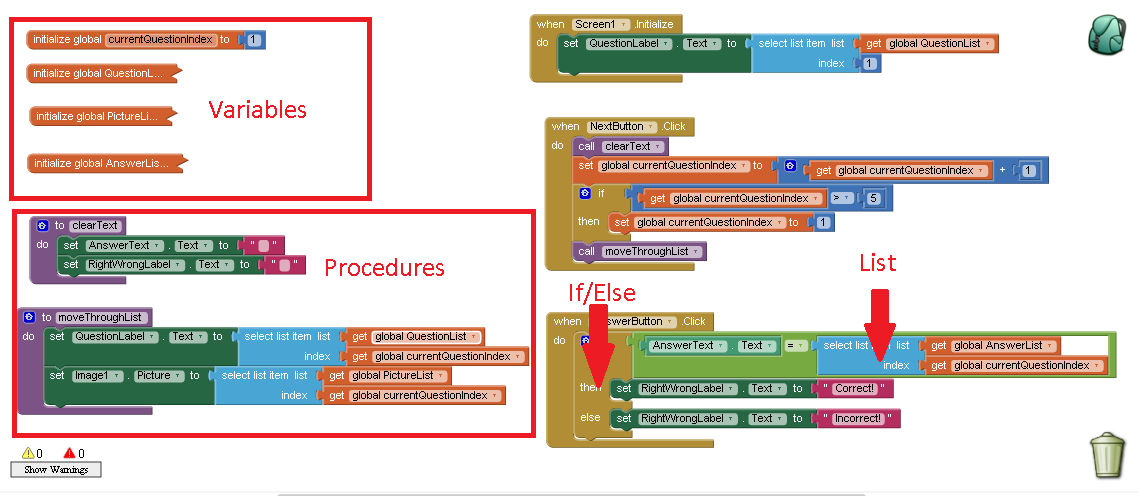
edx course. Above is the image for the code used to create this project the
initial project can be found here. Due to time constraints, I used only 5 out
of the 36 states in Nigeria.
This project was also my first App Inventor
application to be submitted to the Google Play Store. I expanded it to include
36 states in Nigeria along with the Federal Capital Territory. It is a quiz that
test the knowledge of Nigerian states and their capitals. It can be found on
the Google Play Store by clicking here.
This week I successfully uploaded AlphabetDraw to
the Google Play Store. AlphabetDraw is a simple application designed to teach
toddlers the letters of the alphabet. You can find it here.
If you look through
all this applications, the concept of lists is used to create them. This week,
we will be using my first mobile application as the basis for teaching this
topic. So go to this link and download it.
Getting
Started
If you can’t see the introductory image clearly,
please download it and look through it. In the variables section, we have 4
variables and they are:
- currentQuestionIndex
- QuestionList
- PictureList
- AnswersList
We have 2 procedures to use in this application.
I covered procedures in the last topic so please read through it. I know it was
long but a firm grasp of that topic would help you as you go along. Our two
procedures are:
- clearText
- moveThroughList
If you look at the rest of the code, you should
notice that the naming convention I followed easily explains what my objects
do. This is a good programming habit to imbibe. You should name objects and
components of your application based on what they do.
The Screen1.Initialize block initializes the
QuestionLabel to display the first question in the QuestionList.
The NextButton allows the user scroll through the
questions in the QuestionList. If the user exceeds 5, the if block resets
currentQuestionIndex to 1. This prevents the application from crashing.
The AnswerButton gives feedback to the user if the
input values is correct or incorrect. Note the select list item block in the
examples. It allows you to select the elements of a list.
List
Indexing
Take the list of 5 states in Nigeria as shown below:
- Abia State
- Adamawa State
- Akwa Ibom State
- Anambra State
- Bauchi State
List indexing is the assignment of a number to each
value in a list. For our list above, the index of the Anambra State value is 4.
In App Inventor, list indexing starts from 1. The power of this is that if we
know the index of a list, we can get the value at that index.
This concept is used a lot in working with lists so
please don’t skip this part. As a test, the index for Bauchi State is?
NICE
Methodology
In an earlier lesson, I covered the NICE
Methodology. I follow it whenever I am designing applications. NICE means Name,
Interface, Controls and Events. For our application, we are lucky that the name
has already been chosen.
For our user
interface, we will use the design shown below:

The controls for our application are:
- An image component to display the image of the state
- A question label to display the question to the user
- A textbox for the user to enter the answer
- A submit button to submit the answer entered by the user
- A feedback label to display if the entered value is correct or wrong
- A next button to display the next values for the application
The events that will make our application work are
the click events for the Submit and Next buttons.
Project
Creation
The first thing to do is to create your project at http://ai2.appinventor.mit.edu
you already know how to do this so I won’t be showing you this. Call your
project Nigerian States and Capitals. Once your project window shows up, create your user
interface. To do this, follow my lead.
Go to the user interface drawer and drag out image
component unto the screen. This is shown below:
Next we go to the media section of our screen and
upload the images of our states. I got the images I used from Wikipedia so get
them from there.
The Media section is shown below:
Click on the Upload File button. It will bring up
the pop up shown below:
Click on the Choose File button. It will bring
up a screen which will allow you navigate to where your image is stored. Select
the image. Your screen should be as shown below:
Click on OK to upload the image to the App Inventor
setup. Your image is then uploaded. You will see that your media section has
changed to reflect this. You can view this below:
Now attach the image you just uploaded to the image
component you just uploaded. This is similar to the process of adding an icon
to an application which we have already covered. So click inside the Picture
property and select the image you have uploaded.
Set the height of the image component to 250 pixels
and the width of fill parent. Click on the ScalePictureToFit checkbox and you
have successfully set all the properties of the image component. It is
important you do this first because the layout.
Drag out the label component under the image
component. Click the rename button in the components section and rename it to
QuestionLabel. Please there should be no spaces in the name of your components.
Clear out the text property and make it empty. Like
in the 3 number average, the label becomes a dash but we know it’s still there.
Next drag out the horizontal arrangement under the
Layout drawer. Inside it, place a textbox and call it AnswerText and a button
and call the button AnswerButton.
For your AnswerText, set the hint to Enter an answer
and the text on the AnswerButton to Submit.
Drag a label and rename it to FeedbackLabel. In the
image on this post, I called it RightWrongLabel but at the time I was working
on a deadline and didn’t have time to think about my project. Clear the text in
the FeedbackLabel. Your label should disappear but you know it is there.
Finally, drag out a button component to the screen,
rename it to NextButton. We also change its text value to Next. Now out user
interface is complete. Our components drawer should look as shown below:
Event
Handling
To get started, we need to first declare our
variables. If you look carefully at the code for this program, our first
variable currentQuestionIndex is set to 1. You already know how to do this.
Go to the blocks area and create a variable called
currentQuestionIndex your workspace should only have one block that looks like
this:
For our three remaining variables QuestionList,
PictureList and AnswerList, creating them requires using the Lists Drawer.
I will demonstrate how to do this using the
QuestionList variable as an example. First we go to the variables drawer and
drag out the initialize global block. Change the name to QuestionList. Your
block should now look like this:
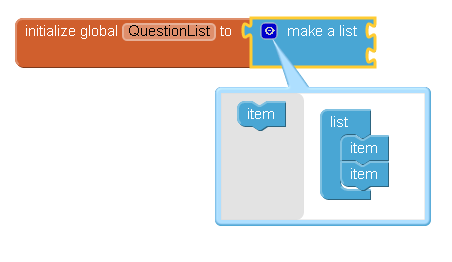
Go to the List drawer and drag out the make a list
block. Attach it to the end of the block above. Your block should now look like
this:
Now we need a list of 5 items. So we click the part
of the list block that looks like an eye. It should open up like this:
Now drag the item outside into the list block to
make it up to 5. You have done this before so I expect your block now looks
like this:
Now all we have to do is attach our questions to it.
To do this, go to the Text drawer and drag out an empty text block. Attach it 5
times. Your list should now look like this:
Now enter your questions and your block should look
like this:
Now our QuestionList variable is complete. Duplicate
this block and do the same for AnswerList and PictureList. So AnswerList look
like this:
Before we can create out PictureList variable,
please upload remaining pictures for the states in Nigeria. Note how they are
stored in the Media area and match them to the index they represent. Your
PictureList should now look something like this:
Now that we are done with our variables, the hard
work is out of the way. Now we need to start the program.
To start the program we need to program the code
that would run when the program starts. This will ensure that the first
question is displayed when the program is first run. To do this click on
Screen1 and drag out the initialize block.
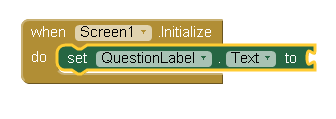
Next click on the QuestionLabel. Drag out the set
QuestionLabel Text to block and snap it to the initialize block of Screen1. Your
block should look like shown below:
Now we need to refer to the content of the first
index of the QuestionList. This is the first question we will ask the user. Our
goal is that once the application runs, we display the first question to the
user. To do this, go to the Lists drawer and drag out the select list item.
Your block will now be as shown below:
Go to the variables drawer and drag out the get
block. Drag out 2 of them. In the first block, select the QuestionList and for
the second one, select the currentQuestionIndex and attach it to the respective
blocks. Our blocks should now look like this:
Our variable currentQuestionIndex is used to move
through the list. The goal would be to increase it until we get to 5 then we
reset its value to 1.
Now would be a good time to do a build of our
application to see how far we have gone. You know how to build an application
so there is no need for me to cover it again. Just ensure that your Screen
Orientation for Screen1 is set to Portrait.
Once your build finishes, run it on your setup. I
will run mine on BlueStacks. My application looks like this:
So we are close to getting to the original
application. Now let’s move on and create the rest of this application.
To complete our application, we need to first create
our procedures. Then we will use them in the event listeners.
Our first procedure is the clearText procedure. It
clears the text in the AnswerText textbox and the FeedbackLabel label. This
will allow us to clear them when we move to the next question. Its easy so I
will do it for you. The code to do this is shown below:
Our next procedure is called moveThroughList and
what it does is to allow us move through our QuestionList and PictureList as
the user presses the next button.
The next thing to do is to create the events for our
buttons. We start with the NextButton. When the NextButton is clicked by the
user, we want to display the image of the next state and the question for that
state. This event also resets our currentQuestionIndex when it is greater than
5.
The code to do this is shown below:
The if block can be found in the Control drawer. It
is used to test if the value of the currentQuestionIndex is greater than 5. We
place it after we have increased the value of the currentQuestionIndex.
Finally we create the event listener for our
AnswerButton. When the user types in a value into the AnswerText textbox and
presses the AnswerButton comparision is made between the value entered by the
user and the correct answer. Based on this comparision, the text in the
FeedbackLabel changes.
The code to do this is shown below:
The comparison is made using the block from the
Logic drawer. The normal if block is used for the comparison but we click on
the sink and bring out the else part of it. This is shown below:
So we are done creating our application. Build it
and test it out. Mine works perfectly. If yours didn’t, take a break for a day.
Come back tomorrow and redo the tutorial.
Science shows us that learning involves increasing
the intelligence so give yourself time to grow.
Conclusion
Congratulation on making it to 4th part
of this course. I commend you for hanging in there. The next topic we will be
covering will be databases. I haven’t created the application I intend to use
to demonstrate the concept of databases so I will take my time in doing it.
You can check up on our progress by visiting this
page. Have a great week and a great month ahead.